It is important to set your margins and gutters correctly when formatting a book. To save the cost of paying someone to format their books, some indie authors choose to format their books in the same app they use to write. In this article you’ll learn to properly set margins for a print book in Microsoft Word.
Table of Contents
What is the trim size in books?
Every paperback and hardcover book has a trim size. If you pick up a paperback book and measure the width and height of the book, the measurements you get will be the trim size for that book.
The trim size for a hardcover book is based on the book block, not the cover which may be slighter wider than the pages.
When print books are produced, the sheets that contain the pages are stacked, then trimmed by knives in a machine. The exact process for that varies depending on the process and machinery used to print the books.
Choosing a trim size for your indie book
There are many available trim sizes, but some of the most common are 5” X 8”, 5.5” X 8.5”, and 6” X 9” in the U.S. or their approximate equivalents in other countries.
You may find that the actual size of the finished book is different from your chosen trim size by a tiny bit. For example, I had one of my books in Amazon KDP and IngramSpark at the same time. Both books had a chosen trim size of 5” X 8”.
The book printed by Amazon KDP actually measured 5” X 7.9375” (7 15/16”). The same book printed by IngramSpark measured 5” X 8”.
You will want to determine the trim size of your book before you set margins, gutters, etc..One reason is that there are usually more words per page in a 6” X 9” book than a 5” X 8” book.
More words per page can result in a book with fewer pages and therefore, a lower print cost.You’ll also need to consider your target reader when determining your trim size. If your target reader is sight-challenged, a larger print version might be appropriate. Most large print books are printed with a trim size of at least 6” X 9”.
The correct trim size for your books can also change if you write children’s books.
If you hope to market your novel as a mass-market paperback, you might choose a smaller trim size along with smaller fonts.
Amazon KDP has the following trim sizes available for paperbacks as of the date this article is written. Certain page count restrictions apply.
- 5″ x 8″
- 5.06″ x 7.81″
- 5.25″ x 8″
- 5.5″ x 8.5″
- 6″ x 9″
- 6.14″ x 9.21″
- 6.69″ x 9.61″
- 7″ x 10″
- 7.44″ x 9.69″
- 7.5″ x 9.25″
- 8″ x 10″
- 8.25″ x 6″
- 8.25″ x 8.25″
- 8.5″ x 8.5″
- 8.5″ x 11″
- 8.27″ x 11.69″
The following trim sizes are available for hardcover books from Amazon KDP with some page count restrictions.
- 5.5″ x 8.5″
- 6″ x 9″
- 6.14″ x 9.21″
- 7″ x 10″
- 8.25″ x 11″
Similarly, IngramSpark has approximately thirty trim sizes available for paperback and hardcover in black and white and color.
Setting margins for print books in MS Word
Once you’ve determined the best trim size for your book, the next step in formatting a book for print is to set the page margins.
How wide should book margins be?
Margins requirements vary based of which company you choose to print your book. Amazon KDP recommends .25” minimum for the top, bottom and outside margins. The outside margin is the side that opens, opposite the bound side.
Although there is a .25” minimum for top and bottom, KDP recommends a one inch margin for both.
IngramSpark requires a .5” margin on all four sides excluding gutter. All printing must be constrained within that 1/2” margin. That includes page numbers.
These measurements do not include the gutter.
What is a gutter margin?
I’m sure you’ve noticed that part of the margin on the bound side of a book page seems to be swallowed up by the binding. The thicker the book, or the more pages it contains, the more difficult it is to actually see the inside edge of the page. You may see exceptions if the book is cheaply bound or binding of a book is completely worn out.
The gutter is that part of the page that is taken up by the binding. It is an additional margin allowance so that there is always a sufficient margin between the binding and the text.
Amazon KDP and IngramSpark take different approaches in setting up your margins for the gutter.
IngramSpark speaks of the gutter as a separate measurement. They say to add .125” to the inside margin – the right margin on a left page or the left margin on a right page. So, that would mean a total of .625” on the inside including the .5” margin and the .125” gutter.
Amazon KDP just refers to the gutter as the inside margin. Rather than simply adding .125” to the inside margin as IngramSpark suggests, KDP has different inside margin requirements for different page counts.
KDP’s inside margin requirements are:
- .375” for 24-150 pages
- .5” for 151-300 pages
- .625” for 301-500 pages
- .75” for 501-700 pages
- .875” for 701-828 pages
Gutter vs inside margin. Should I use both?
Amazon recommends leaving the gutter to 0” in Word or any other software authors use to format their books. They recommend setting the inside margin wide enough to include the additional gutter.
IngramSpark calls for a minimum specific gutter and margin. In reality, what is required is the combined total measurement. You can set the gutter to zero and the inside margin to the total of the recommended margin plus gutter.
As long as you set your inside margin wide enough to account for the normal page margin plus the gutter allowance, there is no difference in the end.
What is bleed and how does it affect margins?
In the simplest terms, bleed is the portion of any full width or full page printed part that would have extended beyond the trim edge of the page when it was printed but before the actual cutting occurred.
An example would be a full-page image. When you look at the image in the finished book, you might think the image had simply fit nicely into the space that was available for it.
Another situation where a bleed would be required is a page that is formatted with a colored background from edge to edge.
The reality is that the image in question would have been inserted into the book file slightly wider and taller than the trim page size. The colored background would be set to cover the entire page of the document including any margins and bleeds.
Amazon KDP allows a shift of .125” in any direction. IngramSpark allows a shift of .0625” of any printed object. If the image you insert into your book file is only as wide or tall as the final trimmed page and a shift occurs during the printing process, there could be a thin blank strip down the edge, top, or bottom of the image in the finished book.
Bleed allowances exist to make room for those shifts. If there is a .125” bleed allowance and the printing shifts .05”, the image would still be full width in the final product.
Amazon KDP and IngramSpark use the same bleed allowance of .125”.
Headers, footers, and margins
The top and bottom margins in MS Word are measured above and below the text block.
When printers discuss top and bottom margins, they are referring to the distance between any readable parts and the edge of the paper.
In Word, headers and footers are inside the top or bottom margin of the document. The text contained in the header and footer must still have the proper margins above or below the text to satisfy KDP or IngramSpark.
There is no margin around bleed parts (background images, etc.) since they print all the way to the edge of the paper.
How to set margins and gutters for Amazon KDP and IngramSpark
If you intend to submit your book only to Amazon KDP, you would of course need to meet just their formatting requirements. Same idea applies if you submit your work only to IngramSpark.
If I were formatting a book and there was any chance at all that I might submit the book to both companies, I would format one file to meet the requirements of both.
Neither company will reject your file simply for having margins that are greater than their requirements. If you format your book to cover the margin requirements for Amazon KDP and IngramSpark, you can use the same file for printing at both.
Because Amazon KDP requires wider inside margins with higher page counts, you’ll need to keep an eye on your page count. Page count can change with font size changes.
If your book contains parts that require bleed allowances, you’ll want to add the bleed measurement in as well.
Format one file for submission to Amazon KDP and IngramSpark
To format your book to satisfy the requirements of both companies, I would first determine which has the widest margin requirement.
For outside margins, IngramSpark requires the widest margin at .5”. For top and bottom margins, Amazon KDP requires .25″ but recommends 1″. We’ll go with 1″.
For the inside, or gutter margin, IngramSpark’s requirement of .625” (.5″ margin + .125″ gutter) is the same as Amazon KDP’s requirement for books with 301 to 500 pages. It is greater than KDP’s requirements for lower page counts.
At this point, if your book’s total page count, including all front and back matter is 500 or lower, I would stick with IngramSpark’s inside/gutter because it satisfies their minimum and KDP’s for books up to 500 pages. Remember, you can have a margin wider than the required, just not narrower.
The recommendation changes if your book will contain more than 500 pages. In that case, I would still use IngramSpark’s required outside measurement of .5” for the outside margin. I would still use KDP’s 1″ margin on top and bottom.
However, because AmazonKDP’s inside (gutter) margin requirement is higher than IngramSpark’s for books with page counts above 500, I would use KDP’s required inside margin of .75” for 501-700 pages or .875” for 701-828 pages.
Now, your margins satisfy both companies.
If your book contains anything on any page that is a bleed object, you will also need to add another .125” to the top, bottom and outside to satisfy the requirements of both companies.
In that case, you will have an inside (gutter) margin of at least .625” for books up to 500 pages. (More for books with more pages.)
The outside margin will be the total of the basic margin of .5” plus .125” added if a bleed allowance is required.
The top and bottom margins would be 1″ plus .125″ additional if a bleed allowance is required.
Note: The bleed allowance is not added to the inside or gutter margin because that is the binding side.
Set the book trim size and margins in Microsoft Word
You’ll set your book’s trim size in Microsoft Word by setting the page size.
Where to set custom page sizes in Word for Macs:
In MS Word for Macs, there is a page size button under the Layout tab. That button only gives you a few page sizes that do not correspond with book trim sizes. There is no option to create custom sizes there.
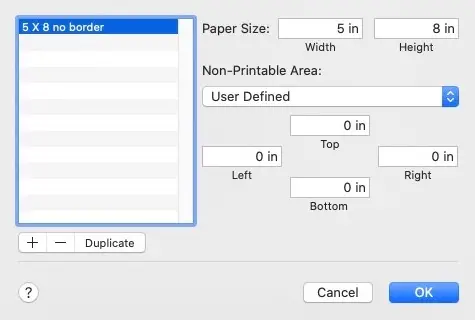
- Go to the File menu.
- Choose Page Setup.
- Under the large box on the left side, click the + button.
- On the right side, click in the box beside Paper Size.
- In first setting, fill in the Width and Height to match your trim size. If your book requires a bleed allowance, add .125″ to the Width and .25″ to the Height (to cover .125″ at the top and bottom).
- Leave the non-printable areas all set to User Defined.
- Leave Top, Left, Right, and Bottom all set to Zero.
- If you wish to name your custom page size, double click the new name in the left side and type in the new name.
- Click the OK button.
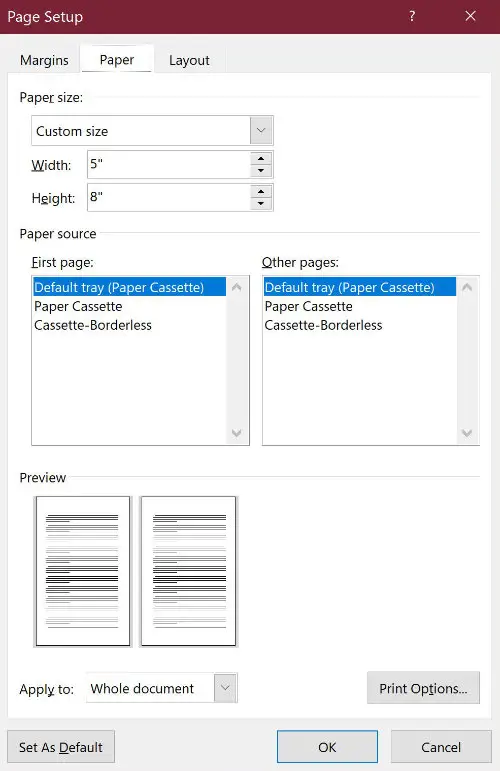
Where to set custom page sizes in Word for Windows:
- Go to the Layout tab.
- Click the Size button.
- At the bottom of the list, click Custom Sizes.
- Under Paper Size, Select Custom Size and fill in the Width and Height to match your trim size. If your book requires a bleed allowance, add .125″ to the Width and .25″ to the Height (to cover .125″ at the top and bottom).
- At the bottom, beside Apply to, select Whole document.
- Click the OK button.
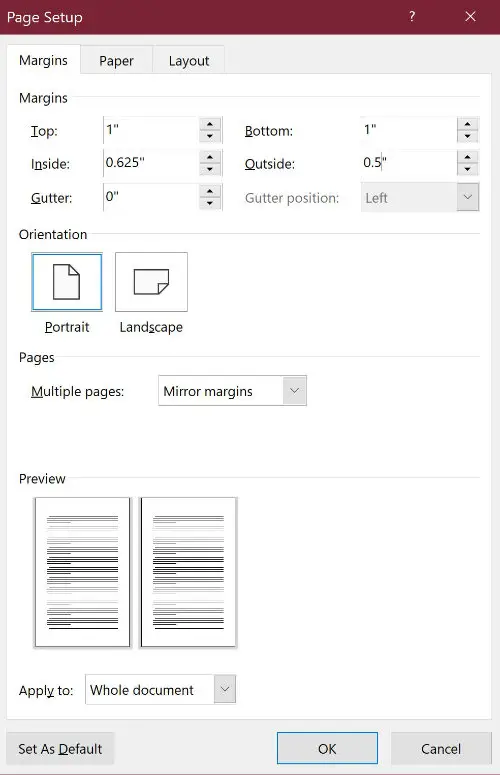
Where to set the margins for a print book in Microsoft Word
The following instructions assume you’ve already set your page size appropriately.
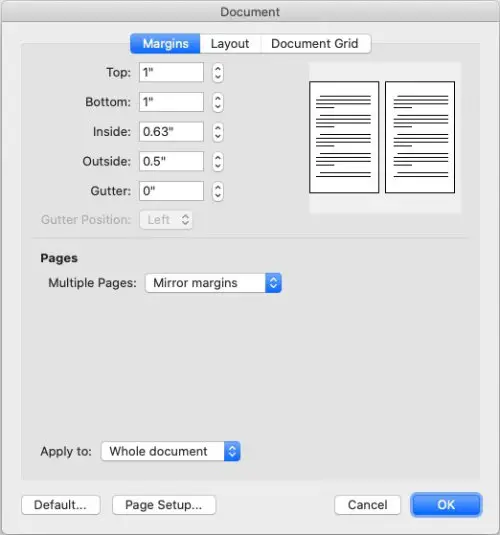
To set your book’s margins in Microsoft Word:
- Open the Layout tab.
- Click the Margins button (second button from the left).
- Click Custom Margins at the bottom of the panel.
- Open the Margins tab.
- Set Top and Bottom to 1″. Add .125″ to both when a bleed is required.
- Set Inside to 0.625″. (MS Word will round it to .63 after you save your settings.)
- Set Outside to .5″. Add .125″ when a bleed is required.
- Set Gutter to 0″.
- Beside Multiple pages, click and select Mirror Margins.
- Near the bottom, beside Apply to: click and select Whole document.
The page setup panel in Ms Word for Windows offers the same settings.
That should give your book the proper margins for printing through Amazon KDP or IngramSpark. If your particular requirements call for a different trim size, you should be able to do so using the same procedure.
Other articles in this series:
Formatting Images and Captions in Microsoft Word for Print Books
How to Set Headers and Footers for a Print Book in Microsoft Word
How to Use Text Boxes in Microsoft Word to Format a Print Book
