In print books, it’s common to see the title and author’s name at the top of the page. Page numbers are commonly at the bottom of the page. In this article, you’ll learn how to set those using headers and footers for a print book in Microsoft Word.
Table of Contents
How to Set Headers and Footers for a Print Book in Microsoft Word
The easiest way to have consistent formatting and style results when inserting the author name, book title, and page numbers is by using headers and footers.
Whatever you place in the header will carry through to the end of the document unless you do something to stop it before you run out of pages.
You will probably not want to have the same headers all the way through the book.
For example, the front matter pages normally do not have a heading. You may not want a heading on the back matter pages.
Footers are often used for page numbers. Like titles that you don’t want to display on certain pages, there will also be pages that will not have a visible page number.
In this tutorial, we will be inserting the author name and book title at the top and page number at the bottom. You can easily swap though, and have the page number at the top.
To have page numbers at the top just follow the instructions given for page numbers at the bottom and apply them to the header. Same for moving author name and book title to the bottom of the page.
Insert a new section for header and footer control in Word
To control which pages have headers, we’ll use section breaks. Use the following instructions to add a section break just before the first chapter title page.
- Go to the page just before the first chapter title page.
- Place your cursor at the end of the content.
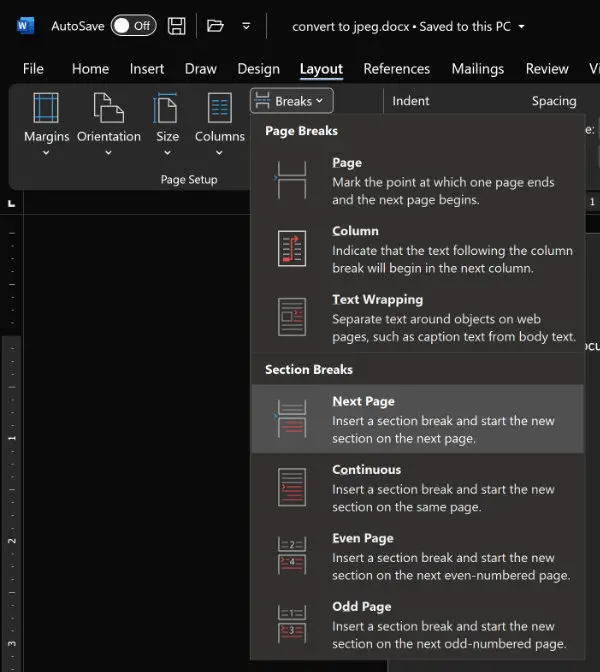
- Open the Layout tab in MS Word.
- Click the Breaks button (probably the sixth button from the left).
- Under Sections Breaks select Next page.
Your first chapter should now start in it’s own section. That will allow you to have headers and footers in the body of the book without also having them in the front matter.
You’ll use this same procedure whenever you need to insert a new section. For example, if you don’t want headers in the back matter, insert another section break at the end of the book body. You’ll still have headers and footers but you’ll be able to turn them off for the back matter.
Odd and even page numbers when formatting a book for print in MS Word
In printed books, there are recto and verso pages. In left-to-right languages, recto pages are always on the right side of the book and should always have odd page numbers.
Verso pages are on the left. So, if you read a recto page then turn to the next one, that next page will be the verso page and even numbered. It is called verso because it is printed on back side of the same sheet of paper on which the recto page was printed.
Certain pages in a book such the title page and the first page of the first chapter should be on a recto page.
Chapters after the first can begin on verso or recto pages.
How to insert author name and book title at top of page in MS Word
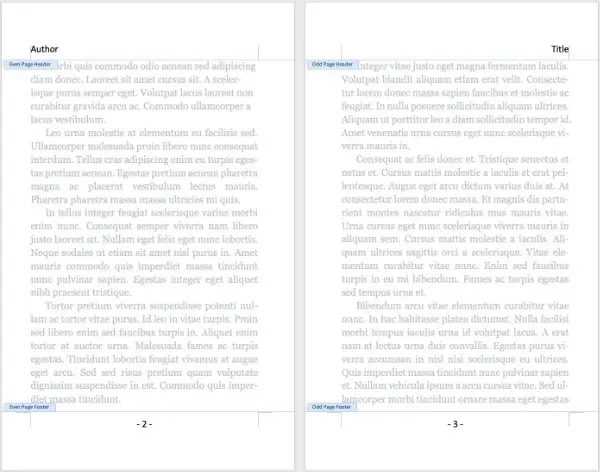
We’ll insert a header at the top of each page. In those headers, we’ll insert the author name on even numbered pages and the chapter title on the odd numbered pages.
There are two common ways to insert the headers in Microsoft Word.
- Open the Insert tab and click the Header button.
- Double-click in the header area and start typing.
The first option allows you to choose a blank header or a pre-styled one. The second option opens the headers as a blank slate.
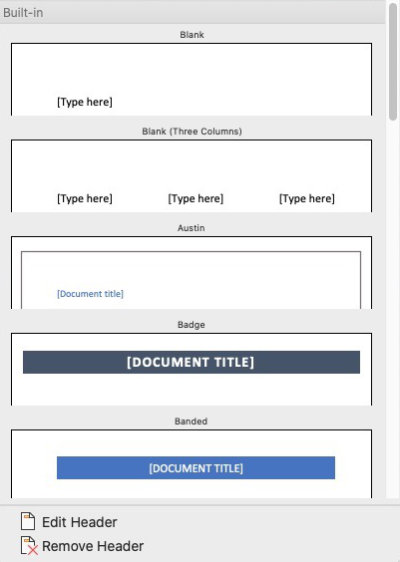
We’ll use the second option because it is slightly simpler and faster.
- Double-click in the header area to open the Header and Footer tab.
- In the fourth section from the left, check the box beside Different Odd & Even Pages.
- Determine which page will be right and which will be left. (Hint: You know the first chapter will start on a recto page which is always odd numbered. You can work out from there which of the pages that follow are recto or verso.)
- In a verso page header, type your author name.
- In a recto page header, type your book’s title.

You can style the fonts and align them left, center, or right by selecting the text and using the text alignment tools in the Home tab.
You can have the author name and book title both center aligned. Or you could left align the author name and right align the book title.
To avoid having the author name or title at the top of the chapter title page, you can select Different first page from the Header and Footer tab. That will hide the header of the first page of the section.
How to have page numbers at the bottom of pages in Word
Page numbers can be at the top in a header or at the bottom in a footer. In this exercise, we’ll use footers to contain and control our page numbers.
Headers and footers in Microsoft Word work in a similar way. Like the headers, we’ll use section breaks to control which parts of the book have page numbers as well as the styling and appearance of our page numbers in those parts.
Just as you used sections to control the headers, you’ll use sections to control which pages get page numbers and how they are styled.
Just as there were with headers, there are two common ways to insert the footers in Microsoft Word.
- Open the Insert tab and click the Footer button.
- Double-click in the footer area.
The first option allows you to choose a blank footer or a pre-styled one. The second option opens the footer as a blank slate.
With the footer active, you have two options for inserting page numbers.
- Click the Page Numbers button from the Insert tab.
- Click the Page Numbers button from the Headers and Footers tab.
When you click the Page Number button from either tab, you’ll see a small panel that allows you to set the alignment of the page number within the footer.

You can choose from:
- Left – Left aligned on recto and verso pages.
- Center – Centered.
- Right – Right aligned on recto and verso pages.
- Inside – Aligned to the edge nearest the binding on recto and verso pages.
- Outside – Aligned to the edge nearest the edge of the page on recto and verso pages.
Just below the alignment setting is a check box labeled Show number on first page. You would normally have this box checked. An exception would be if you have a full page dedicated to your chapter titles. In that case you would uncheck that box to avoid having a page number on a page where a page number might not look quite right.
Headers and footers in following chapters
For maximum control, I would start each chapter with a section break. That would allow you to avoid headers on chapter title pages.
If you use section breaks to start each chapter, you will want to continue your headers and footers from the preceding section.
To continue page numbers from previous sections in MS Word:
- Click the Page Numbers button in the Insert tab.
OR
- Double-click in the footer (or header if you placed your page numbers there) and click the Page Numbers button in the Headers and Footers tab.
- In the Page Numbers panel, select Format Page Numbers….
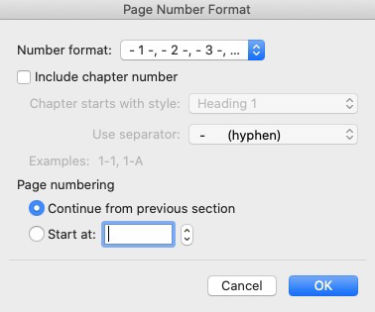
- In the Page Number Format panel, select Continue from previous section.
How to start all new chapters on a recto page
If you prefer to start all chapters on a recto page, you may find yourself having to make an adjustment or two along the way. This section applies only if you want all chapters to begin on a recto page.
Occasionally a chapter will end on a recto page. If you have a chapter that ends on a recto page, you will need to insert a blank page at the end of that chapter.
If you do not insert that blank page, your next chapter will begin on a verso page. That may not be what you want to happen.
To remedy that problem, you’ll insert a Section break – new page after the last line of text in the chapter that just ended. That will force a new blank page into existence.
Blank pages in books do not normally have visible headers or footers. So double-click in the header on that blank page. Under the Header and Footer tab click the Link to Previous button to disable it. The blank page’s header should now be blank if you have not typed anything into it.

At the end of that blank page you’ll insert another Section break – new page because it precedes a new chapter title page.
Use the same process that you learned in the previous section to insert the new sections.
Prologue and other front matter – How and where to insert section breaks for header and footer control
If you want to have page numbers in the prologue, introduction, etc.. and you want them to be formatted differently than in the book body, sections will help you do that.
Perhaps you’d prefer to have no headers in the prologue and to have your prologue page numbers formatted in Roman numerals.
Both of those features will require a section break at the end of the front matter, just before the prologue.
If you’ve been following along with this tutorial, you already have a section break inserted at the end of the prologue so that page numbers will begin properly in the opening chapter.
We’ll insert section breaks in the following places.
- At the end of the page just before the prologue begins.
- At the end of the page just before each chapter title page if you haven’t already inserted one there.
To insert the page numbers in the Prologue, follow the instructions you read earlier for inserting page numbers.
To format those page numbers as Roman numerals, click the Page Numbers button in the Insert tab.
You can also double-click in the footer and click the Page Numbers button in the Headers and Footers tab.
In the Page Numbers panel, select Format Page Numbers….
The first item in the Page Number Format panel is labeled Number Format.
Click in the Number Format dropdown setting and choose the Roman numeral you’d like to use. Both upper and lower case numerals are available.
Final thoughts about inserting headers and footers for a print book in Microsoft Word
Note: Remember also that the numbered pages in your book may not correspond exactly with the page count that Amazon KDP or IngramSpark uses to determine the cost of printing your book. Those companies count every page in your submitted PDF whether it is printed or blank. They do that because you are basically paying for each sheet of paper used in your book whether it is printed or not.
Microsoft Word is really not designed for formatting books for printing. But it can be done with some tweaking and thoughtful work.
This article is part of a series related to formatting books for print in Microsoft Word.
Formatting Images and Captions in Microsoft Word for Print Books
How to Set Margins and Gutters For a Print Book in Microsoft Word
How to Use Text Boxes in Microsoft Word to Format a Print Book
