Writers who are new to Scrivener or are researching it prior to purchasing it sometimes ask, “Can Scrivener export to Word.”
Table of Contents
The answer to that question is yes. We’ll look at two ways you, as a writer, can move your work from Scrivener to Word—exporting or compiling. Which method you should use depends upon how you want to see your work once it is in Word.
Note: Version 3 of Scrivener for Windows was finally released in late March, 2021. Literature and Latte, the makers of Scrivener, say that Version 3 for Windows is “on par” with Version 3 for Mac. Other than the visual appearance of the Windows version vs the appearance of the Mac version, I’ve not found any significant differences between the two. Except where indicated in this tutorial, instructions will be the same for Scrivener V3 for Windows and Mac. Because many users still have V1 for Windows, I will include instructions, but label them for Windows-V1.
Scrivener is an incredible bargain at its full price of $49.00 for Mac or Windows. However, if you own version one of Scrivener for Windows, upgrades are available free of charge or at reduced prices depending upon when you bought version one. Purchase or upgrade Scrivener here.
How to move your work from Scrivener to Word using the Export feature.
The Export feature in Scrivener is best used when you want each of your Scrivener text documents to be separate Word files.
You can export each text document from Scrivener to Word as a separate .docx.
An example of a time when that might come in handy is right here with this article. I write the first drafts of my Techie Senior articles and Tipsheets in Scrivener. Scrivener files have the extension .scriv. In one Scrivener file I have a lot of folders named for article categories. Inside those folders are articles in those categories. One of those folders is named Scrivener. This article is being written and saved in that folder.
If I wanted to move my Scrivener articles to Word, I would export them so that they would make the move as separate .docx files. The files are all related in that they are drafts of Scrivener articles. But each of them is a standalone article covering a different feature or aspect of the software unlike the chapters, scenes, or sections in a book.
Instead of categories and articles, another of my .scriv files might contain chapters, scenes, or sections of a larger document like a book. Each of those chapters, scenes, or sections might be separate documents in Scrivener, but in Word they would belong in the same long book manuscript. In that case, compiling would be the more appropriate way to move the files to Word.
In this tutorial Scrivener documents will refer to the individual text files that make up your .scriv Scrivener file.
If you are a person who prefers to write an entire book in one long file such as one would might in Microsoft Word, either method discussed here will work for you. Or you may use Scrivener as I do when writing fiction—having a folder represent each chapter and then each scene or beat within the chapter a separate text file.
If so, then you should decide whether to export or compile to a .docx file for MS Word.
The big difference between exporting and compiling is that compiling will give you one long Word file that includes all of the parts that you marked for compiling. Exporting will give you a separate Word file for each of those Scrivener text documents within the chapter folder.
This could be very handy if you are a person who prefers to edit or rewrite each scene or beat separately. Separate files would make sending individual chapters to an editor easier. When I write fiction, I set up a folder for each chapter. Within that folder I will have from one to several text documents for the scenes or beats that comprise that chapter.
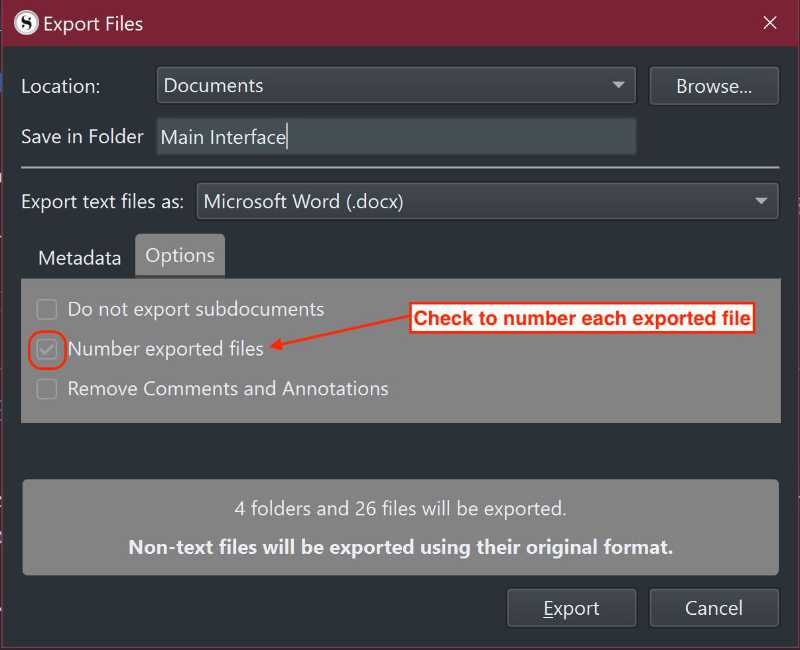
During the export process (Mac and Windows V3) you will see a checkbox which, if checked, will cause Scrivener to number each folder and text document as it exports to Word. Whatever order the text documents are in while in Scrivener is the order they’ll be numbered during the export process.
To export your work from Scrivener to Word:
- Go to the Binder and select the folders or individual text documents that you wish to export.
- Go to the File menu and select Export…. A smaller menu will appear.
- Select Files…. (File > Export… > Files…)
A settings panel will appear that allows you to dictate where you want to save the exported files. You will also see a setting labeled “Export text files as…”. In that setting choose which file version you wish to use. There are several that Microsoft Word is capable of opening….rtf, .docx, .doc, .txt..
If you want to export to an actual Word file, choose .docx if your version of Word is 2007 or later. You may need .doc if you are using an older version of Word.
Check the box if you want each file numbered (Mac and Windows V3 only), then tell Scrivener where on your computer you’d like the files saved. If you export one text document, you’ll have one .docx or .doc file. If you select a folder, you’ll have a folder with all its text files inside as .docx or .doc files.
If, for any reason, you do not want sub-documents exported, you’ll need to check the box labeled “Export Selected Files Only” (Windows V1) or “Do Not Export SubDocuments” (Mac and Windows V3).
You may use Scrivener as I do for writing standalone articles, etc.. If you select multiple folders or the top folder that contains all of your work, Scrivener will export a folder with separate folders inside, each of which will contain individual .docx or .doc files that correspond to the original files in Scrivener.
If you checked the box to number your files (Mac and Windows V3 only), each folder will be numbered as well as each document inside that folder. This is to help you keep your work in the same order that it was in Scrivener.
Note: The files inside each folder are numbered beginning with 1. They are not numbered progressively across several folders.
How to move work from Scrivener to Word using the Compile feature.
If you want to move your work from Scrivener to Word in one large file, you’ll need to use the Compile feature. If you’ve spent time researching Scrivener you may have heard people discussing their bewilderment with the Compile function.
In all fairness, the compile function can be confusing if one hopes to format their completed book as a .PDF ready to publish and just dives straight into it without reading about it or otherwise familiarizing themselves with the feature first.
The process is fairly straight forward if you simply want to move your manuscript from Scrivener to Word. Start by determining which parts of your work you want to move.
If you have a master folder that contains the work you want to move, just select that master folder (for example, the Draft or Manuscript folder if your project has one).
If you want to move just certain folders, select those.
Now, with your folders to be moved selected, go the File menu and near the bottom select Compile….
In Scrivener V1 for Windows, when you go to File, then Compile…, you will probably see a small box with a couple settings labeled Format As: and Compile For:, along with Compile, Save & Close, and Cancel buttons.
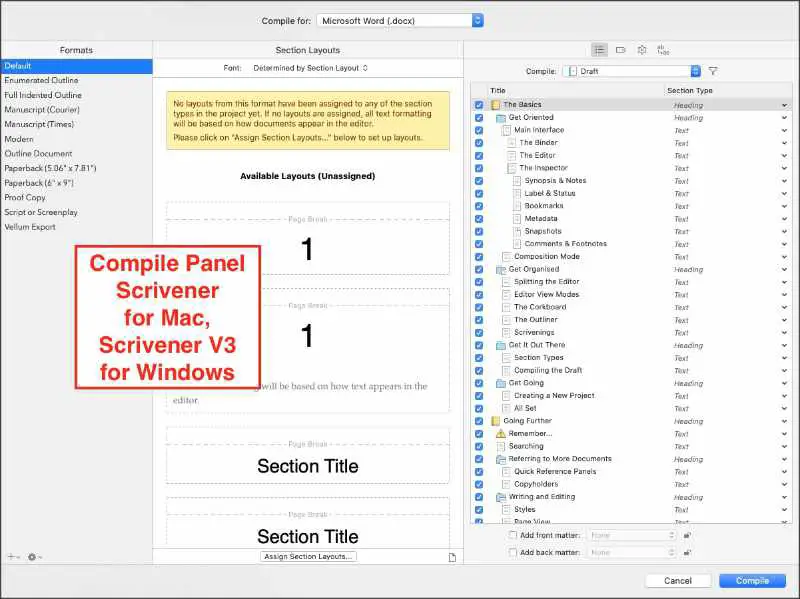
Do NOT click Compile until you open the box further and adjust the settings there. You can open the wider assortment of settings by clicking the downward pointing blue arrow all the way to the right side of the Format As: box. Click that arrow and a larger settings panel will open.
You can compile your document to move from Scrivener to Word in several other formats as well. Be sure you tell Scrivener specifically which format you are compiling for.
- Near the top of the Compile setting panel look for a setting labeled “Compile for…”.
- When you click that setting you’ll see a list that includes “Microsoft Word (.docx)” and “Microsoft Word 97-2004(.doc)”.
- Choose the one that fits your needs.
Now, look for a list labeled “Formats” (Mac) or “Format As:” (Windows V1). For purposes of this exercise, we’ll select “Manuscript.” Note that because Scrivener V1 for Windows does not have every feature of the Windows V3 or Mac versions, the choices listed in the Formats or Format As lists are similar but not exactly the same. Both include a manuscript setting, though.
In Scrivener for Macs and Scrivener V3 for Windows, look for a setting labeled “Compile…”. If you see your master folder listed, select it. If not, choose “Current Selection” to include the folders and files you selected in the Binder. Just below the Compile setting look for a checkbox labeled “Include Sub-documents”. Be sure to check that if you want the contents of your folders included. If you do not check that box, the compile will include the folders but not their content.
A word of caution: It is good practice to mark each text file in Scrivener that you wish to be included in the compile by checking the “Include in compile” box in the Meta Data tab of the Inspector. If you don’t do that, you may have missing files in your compile.
You can be sure you aren’t missing any parts of your work in the compile process by selecting “Contents” from the list on the left (Windows V1), then checking the items that you want included in the panel on the right (Windows V1-V3 and Mac). If you find files in your selected folders in the compile panel that have no checks beside them, those will not be included. You can fix that right from the compile panel by checking the box next to them.
If I were to completely cover the formatting options that could be adjusted prior to compiling, this article might become a small book. I’ll just say that on the same large settings panel in Scrivener V1 for Windows, you can change how the file will look after it is compiled by selecting Formatting from the list on the left and making the adjustments using the editor panel on the right.
In Scrivener for Mac and Scrivener V3 for Windows, you adjust the formatting by selecting the type of compile you want from the list on the left, then scrolling through the illustrated settings in the center panel. Just spend some time playing around with the formatting settings until you get them how you want them.
If I were just compiling my Scrivener files to move them to Word as a manuscript with monospaced fonts like Courier, I would just accept the default settings. I would make whatever adjustments I needed once I opened the compiled file in Word.
Once you’ve selected your settings in either Scrivener for Mac or Windows, you will click the Compile button at the bottom of the settings panel. When you click that button, you’ll be asked to tell Scrivener where you’d like the compiled .docx file saved.
When you open the compiled .docx file in MS Word, you’ll probably have some formatting to do to make it exactly how you’d like it to look. For example, if you are preparing a Word file to send to an editor, you may need to tweak the formatting some to meet his or her requirements.
Hopefully you know enough now to comfortably move your work from Scrivener to Microsoft Word, whether by exporting or compiling it.
A final note
If you are moving your work out of Scrivener to Word so you can use editing apps like ProWritingAid, there is an easier way to use ProWritingAid with Scrivener.
Scrivener is a product of Literature and Latte. If you’d like to take a deeper dive into Scrivener and all it’s capable of, we recommend Joseph Michael’s Learn Scrivener Fast course.
If you’d like to work a little faster in Microsoft Word, you might like our article, 14 Easy Things You Can Do With Keyboard Shortcuts in MS Word.
A note about this tutorial. All of our Scrivener tutorials are personally written based on our own experience with Scrivener. If you would enjoy more in-depth training, we recommend Joseph Michael’s Learn Scrivener Fast Course.
