Can you use ProWritingAid with Scrivener? Yes, you can. In this article you’ll see how easy using ProWritingAid with Scrivener is.
Table of Contents
Using ProWritingAid with Scrivener—how it works
There is no dedicated ProWritingAid plugin or add-on available for Scrivener as there is for Microsoft Office, Google Docs, and some browsers. But there is a solution that is just as good—or better.
You’ll use the desktop app. It’s not difficult at all once you learn the basics of working in the ProWritingAid interface.
The desktop version of ProWritingAid is available for Mac and Windows computers. It requires a Premium subscription to download and use it. If you don’t have a Premium subscription, you can get a 20% discount on ProWritingAid with this link.
To download it, you’ll go to the desktop app page at ProWritingAid.com. Once downloaded, install the app as you would any other app.
Note: If you don’t want a paid account with ProWritingAid, you can still use it to improve work that you write in Scrivener. It’s more cumbersome and time consuming, but doable. I’ll show you how to use that method later in this article.
Open your Scrivener file in ProWritingAid desktop app.
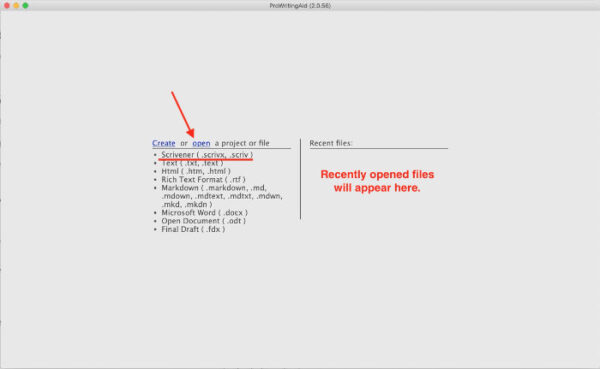
You’ll start by opening your Scrivener file (your .scriv) in the ProWritingAid desktop app. To do that, click the Open link on the open screen. Navigate to your .scriv file and click the Open button.
Scrivener will open your .scriv file. At first you will only see the project files listed in the left sidebar. They are listed in a way that is similar to Scrivener’s Binder. Navigate to the particular document that you want to edit. When you click that document in the sidebar, it will open in the center of the app and the Realtime reports will begin to run. More on that later.
Note that you may not see all formatting that your project had in Scrivener. It should still be in place when you finish and return to Scrivener, though.
How to generate reports in the ProWritingAid desktop app.
There are two ways you can generate reports in ProWritingAid. One is Realtime. The other is manually. With either, you should first give ProWritingAid a little help in understanding your writing style.
Get the most accurate reports for your writing style from ProWritingAid
To get the most accurate and helpful reports from ProWritingAid, you should tell it what writing style or genre you work in. Writing styles in ProWritingAid might be thought of broad genres or categories.
You can set your writing style generally.
- Go to ProWritingAid menu > Preferences (Macs) or Tools menu (Windows).
- Click the box to the right of the Writing Style label.
- Pick the most appropriate style from the list of eight.
You can set your category or genre more specifically. In the ProWritingAid desktop app:
- Look for a dropdown box just below the Goals tab at the top of the Realtime sidebar.
- Click in that box to open a list of the same Writing Styles divided into more than forty categories and genres.
- Choose the most appropriate one for you.
Creating Realtime reports in ProWritingAid
As soon as you open your Scrivener project in ProWritingAid, in the green bar across the top, you will probably see a red icon with white numbers next to the word Reports. That number is the number of issues that have been found thus far in real time.

You should see your report summaries filling in the Realtime sidebar down the right side of the window.
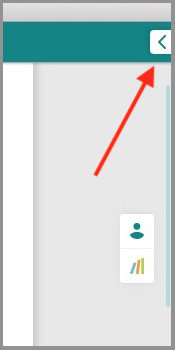
If you don’t see it, look for a small white box containing a green left-pointing arrow on the far right end of the green bar or toolbar. When you click that arrow, the Realtime sidebar will open. To hide the sidebar, click the same arrow, which now points to the right.
How to use the reports that ProWritingAid generates
One of the first things you might notice when running reports is that some words and passages are underscored with various colors of lines.
Those underscores are one of ProWritingAid’s ways of telling you where your work needs help. They are used in conjunction with the reports you see listed in the right (Realtime) sidebar. Note that I will use Realtime sidebar and right sidebar interchangeably.
The Realtime sidebar has two tabs at the top. The Goals tab shows you a scored overview of the results. You’ll see the reports listed separately with a slider image that indicates how well your content scored on the report.
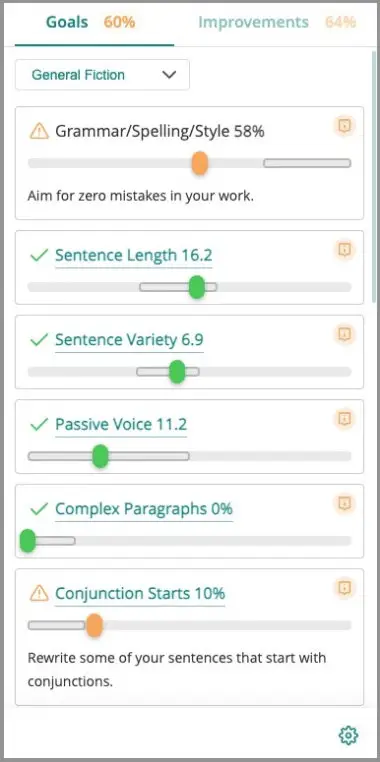
The first score listed is a general overall score based on the particular reports that were generated.
Below that are specific reports. If your work meets ProWritingAid’s expectation, the slider button will be green. There will be a checkmark to the left of the slider and there will be no hints below the slider.
If a ProWritingAid report indicates your work could stand some improvement, the slider will be orange. There will be no checkmark of approval next to the slider, and below the slider there will be an explanation of what the report was looking for.
There are three ways you can see and use ProWritingAid’s suggestions.
There is no requirement that you accept every suggestion ProWritingAid offers.
Method #1: Mouse over the underscored word or words.
You will see a short explanation of the problem. For some, you will see an explanation of the issue, which you can correct by replacing the existing text with your own improved text.
There are two other options given. You can click the first option to disable the rule for the entire document. If you click the second option, you can ignore that particular instance. With either option, you will move on to the next issue.
For some issues, when you mouse over the underscored text, you will also see some suggested substitutions for the existing text. Click one of them if you want to accept it. The suggested wording will replace the original.
If you don’t want to accept the suggestion, disable or ignore the rule. You may also see a link to the thesaurus. You can use that if you’d like a little help finding a better word.
Method #2: Click the Improvements tab in right (Realtime) sidebar.
You’ll see all of the issues listed individually. As you scroll through the document, the items in the sidebar will follow and change so that the issues related to the text in view are visible in the sidebar and vice versa.
If you mouse over the issue in the sidebar, you’ll see the same type of suggestion box you saw in method one. When you click the issue in the sidebar, the suggested remedy will open in the sidebar as well as in the document. Make your correction either place.
If you mouse over the underscored text in the document, the suggested improvements will pop up there and in the sidebar.
Method #3: Open the issue from the Goals tab in the Realtime sidebar
Under the colored sliders the title of the report is underlined. Click on the title. The right sidebar will close and a sidebar will open on the left displaying every instance of the issue in the current document. It will replace the Navigation sidebar until you close that report.
Start by clicking the title of the issue. A list of every instance in the document will open.
You will see a number in parenthesis next to the issue. That number indicates how many of that particular issue are present in the document.
When you mouse over each instance of the issue, a small toolbar will fly out on the right side. The eye icon hides/dims the issue. If the eye has a diagonal line through it, the item will show again when you click the eye.
Some items will have a checkmark in the fly out toolbar. If you tick that checkmark, you accept the correction offered. For example, if the report says you can do without the word in issue, the word will be removed when you tick the checkmark.
There is an upright arrow pointing to the right. If you click that arrow, you are telling ProWritingAid that you want to keep the text as is. You will move to the next occurrence of the issue.
If there is more than one occurrence of an issue, the fly out toolbar will have a downward pointing arrow. Click that arrow to move to the next identical occurrence.
When you arrive at the next occurrence, use the same tools to pass over the suggested correction, correct it or hide it.
When you’ve finished all of the suggestions for that particular issue, click the title of the issue to close it, then move down and open the next one. Continue until you’ve gone through all of them.
When you finish, click the X in the upper right corner of the sidebar to close it. It will close and the right sidebar will reopen.
The navigation panel will reappear on the left.
Generating reports manually in ProWritingAid
I prefer to generate specific reports separately because I don’t need all of them in every piece of writing that I work on.
If you want to turn off the Realtime reports, click Reports in the green bar. It will be replaced by a toolbar of buttons for some of the available reports. The first button from the left is labeled Realtime. To turn it off, just click it. The right sidebar will close.
If you don’t see all of the report buttons across the toolbar, look for a button with three small adjoining circles. The button is labeled More Reports. When you click that button you’ll see a list of the remaining available reports. Click on one to run it.
Generating individual reports in ProWritingAid
Generating individual reports in ProWritingAid is simple. With your Scrivener project open in ProWritingAid, do the following.
- If the toolbar isn’t already showing, click the word Reports in the green bar across the top.
- The first button from the left is the Realtime reports button. If it does not say Off just beside it, click the button to turn it off.
- Look across the toolbar for the report you’d like to run. Click its button.
When the report is running the document navigation panel on the left will disappear and the results of your report will take its place.
Be aware that running reports on large chunks of your project may slow the process. You’ll almost certainly get faster results if you run the reports on small parts of the project such as a single text file. You can restrict the focus of a particular report by only selecting the part(s) of your project that you want it to run on before you start the report.
Because ProWritingAid works over the Internet, several factors can affect the speed of the process. Such things as underpowered computers and slow Internet speeds can effect the timing.
Using the Combo report
The Combo report is one I use frequently. You can set it up so that you can click one button and run only those reports that you need at the time.
To select the reports you want to include in the Combo report, you’ll go to your account online. You can get there from the desktop app two ways.
- Click the Realtime button to open the right side bar. Look for a gear icon in the lower right corner of the sidebar. When you click that gear icon you will be taken to your account at prowritingaid.com.
- Go to the ProWritingAid > Preferences menu (Mac) or Tools menu (Windows). Click the Analysis Settings link.
In either case, you’ll go to the User Application Settings page in your ProWritingAid account.
- Check the box beside each report you want to include in the Combo report.
- Back in the ProWritingAid desktop app, go to the reports toolbar at the top.
- Click the Realtime button to disable Realtime.
- Click the Combo button in the Core section.
Your reports will run. When they are complete, you will see the results in the left sidebar.
To make your edits, follow the instructions as you did in Method #3 above.
Saving your edits in the ProWritingAid app
When you’ve completed your work in ProWritingAid, be sure to save it at File > Save. When you next open your .scriv project in Scrivener, you should see the edits you made in ProWritingAid.
How to use the online version of ProWritingAid with Scrivener
The paid online version of ProWritingAid allows you to open files from Microsoft Word and certain other apps.
ProWritingOnline does not allow you to import a Scrivener project file like the desktop version does.
Editing in the online version of ProWritingAid works almost exactly the same as the desktop app. There are two significant differences.
- The most significant difference is that, because you can’t open Scrivener files online, you’ll have to copy your work from Scrivener into ProWritingAid to edit it. You’ll then copy it back to Scrivener. Of course you could export from Scrivener to Word, then open the Word file in ProWritingAid online. I personally find that to be an extra load of work when your paid ProWritingAid account allows you to work directly with Scrivener files in the desktop app for Windows or Macs.
- The second significant difference is with the Realtime sidebar that we discussed as being on the right side in the desktop app. In the online version, you’ll still only see one sidebar at a time, but they will both appear on the left side of the window when they’re needed.
You can use the free online version of ProWritingAid with Scrivener. It allows you to create 25 different reports. The biggest drawback is that you’ll be limited to running 500 words at one time. You can repeat the process, but on longer documents doing so might become tedious and time consuming.
If you wish to give it a try—moving your work from Scrivener into ProWritingAid’s online editor, then back into Scrivener—keep reading. I’ll tell you how to do that.
How to move text from Scrivener to the ProWritingAid online editor.
Before you can create the individual reports you’ll have to get your text out of Scrivener and into ProWritingAid.
First, you’ll need to copy the Scrivener text that you want to check. Then paste it into ProWritingAid.
I would recommend you check one document at a time. There are two reasons for my suggestion.
- You’ll reduce the chance of mixing up your project files if you run one text document at a time.
- ProWritingAid will run usually run a bit faster with shorter documents.
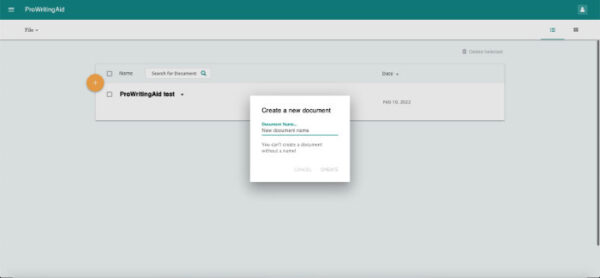
To use ProWritingAid online with Scrivener, log into your ProWritingAid account and click the Web Editor button on the home page. ProWritingAid will open with a rather simple interface that asks you to create a new document or open an existing one. (This may vary slightly. If this is your first time using ProWritingAid, when you log in you may open straight to the editor where you can just paste your text in.)
- In the top left, click the File menu.
- Click New.
- A small panel will appear where you will give your document a name (required).
- Choose Text and click the Create button.
This can vary between the free and paid version, but in the next window you’ll name the file and choose where to save it. Unless you want to, you don’t actually have to keep the file you create when you’re finished, but you have to take these steps if you are to set up ProWritingAid for your copy and paste project.
In Scrivener, select the text of the document that you wish to run through ProWritingAid. Copy it to your clipboard. You can do that very easily by placing your cursor in the document you wish to copy.
- Use Command + A on a Mac, or Control + A on Windows to select the text.
- Use Command + C on Macs or Control + C on Windows to copy the text.
As I said earlier, no reports can be generated until you paste your text into ProWritingAid.
- Place your cursor in the empty document you just created.
- Use Command + V on Macs or Control + V on Windows computers.
Your Scrivener text should be visible in ProWritingAid. You can now run reports on your writing using the instructions you read earlier in this article.
Move your work from ProWritingAid online to Scrivener
When you’ve finished your edits in ProWritingAid, you move your content back to Scrivener using the same method you moved from Scrivener to ProWritingAid, but in reverse.
- Use Command + A on a Mac, or Control + A on Windows to select the text in ProWritingAid.
- Use Command + C on Macs or Control + C on Windows to copy the text.
In Scrivener, either create a new blank text document or select all of the existing text you want to replace with your newly edited work.
- Place your cursor in the blank text document or on the selected text of the existing document.
- Use Command + V on Macs or Control + V on Windows computers to paste the revised content.
A safety advisory about copying your text over
I frequently copy large blocks of text and move it to other locations. To help eliminate the chance that I might lose my work, I take some precautions.
- When I’ve selected the text to copy, once I use Command + C to copy it, I single-click in the copied page to deselect the text. That keeps me from accidentally popping the delete key on the way around my keyboard.
- I sometimes paste the copied text into a blank text file, then copy it from there and paste into the destination file.
Those measures seem like the doing of a paranoid person, but it gives me a margin for error when moving the text out of the original (ProWritingAid in this case), and another margin for error when pasting into the destination document (Scrivener in this case).
Of course, you don’t have to take those steps. But if you have a fear of losing your work on the way from ProWritingAid to Scrivener, or vice versa, they might provide a little cushion for you.
Learn more about using ProWritingAid.
Read more of our articles about using Scrivener.
A note about this tutorial. All of our Scrivener tutorials are personally written based on our own experience with Scrivener. If you would enjoy more in-depth training, we recommend Joseph Michael’s Learn Scrivener Fast Course.
