In this article I’ll show you how to save time doing writing tasks via keyboard shortcuts in MS Word rather than using the toolbars or menus.
Table of Contents
Long-time users of Microsoft Word are most likely familiar with at least a few keyboard shortcuts. If you are one who is not so familiar with shortcuts, keep reading. I’ll show you several that you’ll find useful immediately.
Delete, Copy, Paste, Print, and 10 more things you can do without taking your hands off the keyboard and mouse
One good thing about these particular keyboard shortcuts is that they work in tons of different software applications, especially in apps that are designed for writing and editing. In many cases they’ll even work when you’re filling in contact forms, etc..
The uses I’ve listed here pertain mostly to word processing software and other software that involves the input and styling of text.
Most keyboard shortcuts work in Microsoft Word, Apple Pages, LibreOffice, OpenOffice, and Scrivener.
In a minute I’ll show you some that you’ll find useful on a daily basis. But first, let’s do a little pre-training.
Style or Alter Existing Text
If you want to edit the content or styling of text that you have already typed, most of the keyboard shortcuts will require you to select the text which is to be changed. To select that text I suggest you use one of the following methods.
- Place your cursor immediately before the first character you wish to make a change to. Then go to the end of the section you wish to change. Hold down the shift key and click just past the last character you wish to change.
- Click with your mouse or touchpad immediately before the first character you wish to change and while holding down the left mouse key or trackpad, drag across and down to the end of the section you wish to change.
Here’s a shortcut you can use to select text if you need to select all of the text in your document. Hold the Control key (Windows) or Command key (Mac) plus the A key.
In any of these cases, your selection should be highlighted a different color, probably blue.
14 Computer keyboard shortcuts in MS Word
You can find ways to do any of the following in the software’s menus or toolbars. But that is not necessary when you can do it faster and more easily with just the keyboard and mouse or trackpad.

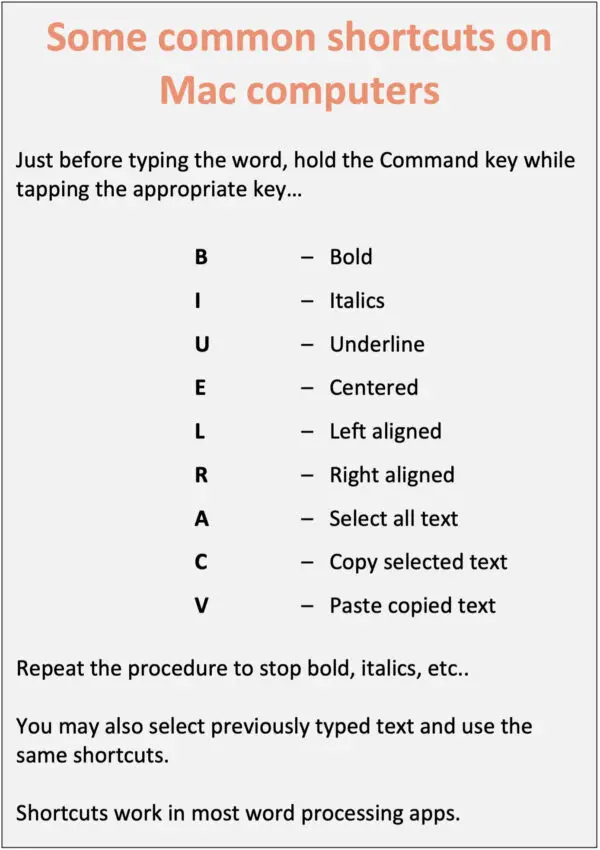
NOTE: In all of the following, use the Control key if you are on a Windows computer. Use the Command key if you are on a Mac computer.
- Select all text in document – Control or Command plus A
- Copy – Control or Command plus C
- Paste – Control or Command plus V
- Delete – Delete key
- Cut (used to move text) – Control or Command plus X to remove the text, then immediately move your cursor to the place where you want to move it, and use Control or Command plus V. The Cut shortcut can also be used to delete. Just cut it without pasting it to another location before selecting a different section of text.
- Bold – Control or Command plus B
- Underline – Control or Command plus U
- Italicize – Control or Command plus I
- Print – Control or Command plus P
- Center – Control or Command plus E
- Left align – Control or Command plus L
- Right align – Control or Command plus R
- Increase font size – Control or Command plus > To enlarge text more, using that shortcut again will make the text even larger. Each stroke of the > key makes it larger than before.
- Decrease font size – Control or Command plus < To decrease your font size even more, using that shortcut again will make the text even smaller. Each stroke of the < key makes it smaller than before.
Using multiple shortcuts
You can also use multiple shortcuts on one selection of text. For example, if you wanted to change a selection of text to bold and italics, you would first select the text. Then hold down the Control (Windows) or Command (Mac) key while you strike the B key. Your text should be bold now. While still holding the Control or Command key, strike the I key. Your text should now be bold and italic. You could go further and follow those up with striking the U key while holding the Control or Command key. Then, you would have a selection of text that is bold, italic, and underlined.
Experiment with different shortcut combinations.
In a matter of seconds, you can change your font styling and size without going to a formatting menu or to the toolbar.
Toggle on and off
If you were to change your mind and decide you really didn’t want it to be both bold and underline, you would select the text, hold down the Control or Command key, and strike the underline key again. The text now is left bold, but with no underline.
The same method can used to toggle many of the shortcuts listed above, but not all. For example, you can’t toggle cut and paste actions using the same actions you used to make the change in the first place. If you decide you need to return the moved text to its original place and moving it was the last action you did, first try Command or Control plus Z.
That should undo your last action. However, if you have done other actions since the one you wish to undo, you’d do that by selecting the desired text again, cut it, then paste in the correct place.
Another action that can’t be toggled on and off by using the same key combinations is enlarging or reducing font size. If you select a section of text and use Control or Command plus > to enlarge text, using that shortcut again will make the text even larger. Each stroke of the > key makes it larger than before.
To undo text enlargement, use Control or Command plus < to reduce the text size. Use it repeatedly until your text is the size you desire.
Bonus Tip – Style text as you go
If you are typing a document and you know that a particular word, sentence, or paragraph should be formatted differently from the main text – for example, bold – you can do that as you type without having to come back over the text to style it later.
To style your text as you go, type your sentence and when you come to a sentence that you want to be in italics, before typing the sentence, use the keyboard shortcut Control or Command plus I. The sentence will be typed in italics. To return to normal text, use Control or Command plus I again before starting the next sentence. The following text will be normal.
This works for bold, italics, underline, font size, and more.
If you have switched from Microsoft Word to LibreOffice Writer, the keyboard shortcuts you just read about should work. If you’d like more tips for Writer, you might be interested in 8 Handy Tips for Working in LibreOffice Writer.
Here are some lesser known keyboard shortcuts.
