One of the most important parts of a book manuscript is the table of contents. Some eBook distributors require them. They are required or recommended in certain other fields of writing such as academic and scientific. In this article I’ll show you how to easily add a table of contents in Microsoft Word documents. I’ll use the terms table of contents and TOC interchangeably.
Table of Contents
How to Add a Table of Contents in MS Word
The task of automatically creating a table of contents in MS Word begins with headings and your use of Word’s built-in styles to format them throughout your document.
Don’t confuse headers across the top of a page with headings. Headings are found within the document text and assist the reader as she moves through the book or other document.

Headers are at the very top of the page, usually containing page numbers, the author’s name, or the title.
In Word documents headings are usually formatted in larger fonts and bolded. In the case of a book manuscript, a chapter title would normally be styled as Heading 1 from the Styles section of the Home tab in the ribbon.
Sections of a chapter might be labeled with sub-titles formatted with lower heading levels like Heading 2 or Heading 3.
Preparing your document for a table of contents
The use of Heading styles is important in the creation of your table of contents because the Table of Contents (TOC) function in Word depends on them as a means of identifying parts of the document.
Simply typing your chapter title in a large bolded font and centering it on the page does not turn that text into a heading as far as Word is concerned. That is because there is no built-in TOC-related programming between the TOC and ordinary manually formatted text as there is between TOCs and Heading Styles.
A chapter title would normally be formatted as a Heading 1. Sections within the chapter might be formatted as Heading 2 and sub-sections might be Heading 3.
To assign a Heading 1 to your chapter title, select or click within your title text. Then, in the Home tab of the ribbon, click the Heading 1 button. Your title will instantly be styled as a Heading 1.

(If you aren’t crazy about the styling of the Heading 1, it can be changed to better suit your taste. Because it would be a rather long article of its own, we won’t be covering how to edit built-in Word styles now.)
Inserting your table of contents
Click in your document where you wish the table of contents to appear.
In the References tab, the first button from the left should be the Table of Contents button. When you click it, you should see a list of 10 or 12 available styles of automatic and manual TOCs. Choose one of the first few choices – any before the Manual table of contents section begins. (The manual table of contents involves a lot more work to create and update than the automatic ones.)

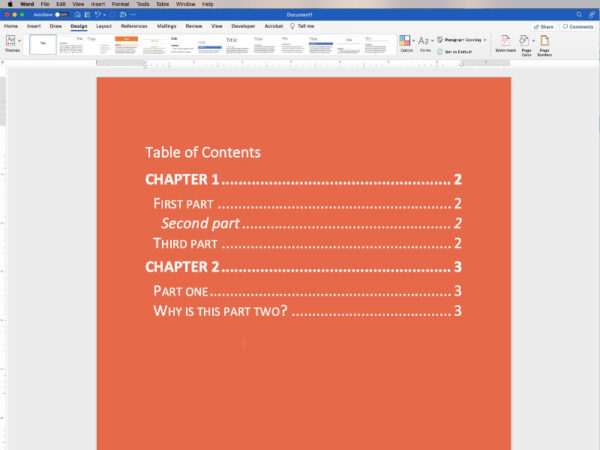
Assuming you have properly formatted the chapter titles with a Heading 1 style and any other important sections as Heading 2 or Heading 3 styles, you should see the table of contents automatically filled with your chapter and section titles. Headings 2 and 3 items will be listed below the Heading 1 shown as section 1 and section 1a. Of course, all actual listings in the table of contents will have the same wording as the text you styled with each Heading style.
You should find that your table of contents is clickable. You should be able to click the title or page number in the TOC and be taken to that page in your document.
If you notice that anything is missing, such as a chapter title, go to that chapter in your document and be certain that you haven’t overlooked assigning a Heading 1 style to it.
You will probably have to update the table of contents after you correct the issue of the missing chapter title. To update it, open the References tab. Look for the Update Tables button near the Table of Contents button. Click that button to update the TOC.
You can also right-click inside the table of contents, choose Update Field, then choose Update Entire Table from the dialog box that pops up.
The end result of using either of the previously listed methods for updating the table of contents is the same. You’ll probably find simply clicking the Update Tables button in the References tab the easiest.
After you click that button you should see that your table of contents has been updated with the missing chapter title in place.
The automatic table of contents should work with Heading 1, Heading 2, and Heading 3.
How to delete a table of contents in MS Word
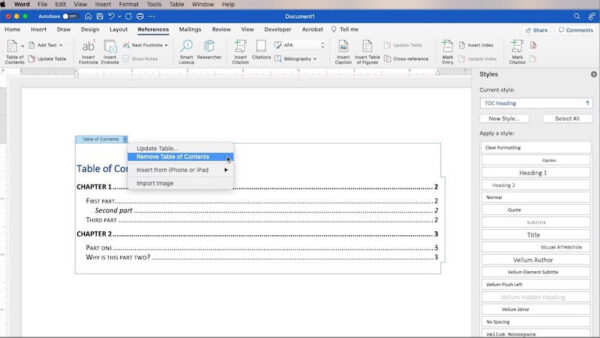
To delete a table of contents in Word, mouse over the table of contents. You should see a shaded background appear. Move your mouse around in the shaded area to a spot where there is no text and click in that empty spot. A small tab should appear in the top left corner. Click the downward pointing arrow in the right side of that box and choose Delete Table of Contents from the menu that appears.

If you click within the table of contents area and find yourself taken to a page in your document, you will have accidentally clicked linked text.
When you’re moving your mouse around within the shaded area, your mouse will probably turn into a hand if you are on linked text. An arrow would indicate no linked text.
What about tables of contents in other writing forms?
The principles and pointers I’ve spoken of apply to any form of writing. The actual styling of the text in the table of contents might vary from one field of writing to another but the basic method of assembling the table of contents is the same.
Final notes on inserting a Table of Contents in a Word document:
That’s all there is to inserting automatic tables of contents in Microsoft Word. There are other types of TOCs available in Word. One allows more customization. Another requires a lot more work to create and update.
If you are one who uses MS Word on a Mac, we’ve also written how to create a table of contents in Apple Pages.
You may also be interested in 14 Easy Things You Can Do With Keyboard Shortcuts in MS Word.
Find out more about creating Tables of Contents in Microsoft Word.


