In this article, you will learn how to create a table of contents in Apple Pages.
Table of Contents
Preparing your Apple Pages document for a table of contents.
Before you can create a table of contents in Apple Pages, you’ll need to style your text using Pages Styles.
Tables of contents work best when they are linked to headings at the beginning of pages or sections.
Depending on what type of document you are creating, the headings might be the chapter titles in the case of a book manuscript. In a short document, the headings might mark the beginning of sections.
In either case you’ll want to style those headings using Pages Styles. There is a hierarchy to headings. Normal practice is to use headings in numerical order. H1, or Heading in Apple Pages, is the highest level. The first sub-heading under Heading should be a Heading 2. Sub-headings under a Heading 2 (also sometimes called sub-subheadings) should be a Heading 3. If you get them out of order when you set up your table of contents, you’ll probably be dissatisfied with the result.
To style your table of contents text:
- Select the text in your document.
- In the right sidebar, open the Format tab.
- The Styles settings will be the first section. It might say Text, Headings, or some other similar word. Click the down arrow to open it.
- Select the appropriate level of heading from the list.
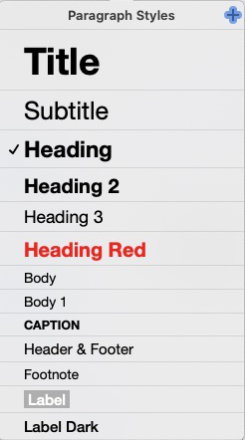
Normally, in a book manuscript, the chapter headings would be a H1, labeled in Pages as simply Heading.
H1 headings in Apple Pages are simply called Heading.
If you are labeling sections in a shorter document, you could label the title as Heading, the main section headings as Heading 2, and the sub-sections as Heading 3.
Create a table of contents in Apple Pages
Apple Pages allows considerable leeway in how you create your table of contents. For example, you can tell Pages which parts of your document you want to be included.
- Click the View menu, then Table of Contents or click the View button toward the left end of the toolbar.
- Select Table of Contents.
- In the top right corner of the Table of Contents panel, click Edit.
- Click the box beside each item that you want to be included in the table of contents.
- To the right of each style, use the left or right pointing icons to indent styles (such as a Heading 2 being indented under a Heading).
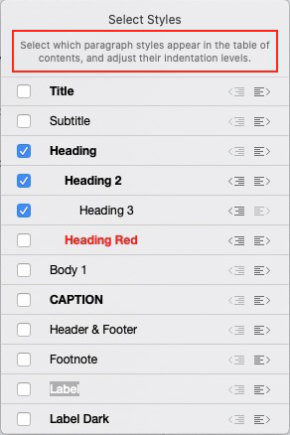
If you have assigned Styles to your document, you should see your headings listed in the Table of Contents panel. If not, you’ll see a large icon with these words under it, “Use paragraph styles in your document to populate the table of contents.”
If you see that message, go back to the previous step and label your headings.
Insert the table of contents into your document
When you are satisfied with your table of contents, you can insert it anywhere in your document.
- Place your cursor where you want the table of contents to be inserted.
- At the bottom of the Table of Contents panel, you should see a button labeled “Insert Table of Contents”. Click the button to insert the table of contents.
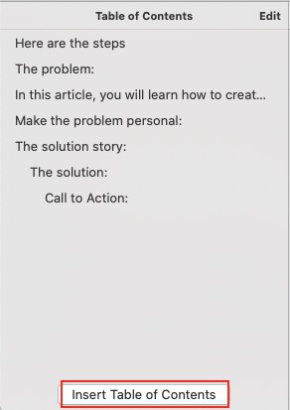
The insert button will be greyed out and unusable if you have nothing styled and selected for inclusion in the table of contents.
Style the table of contents
If you aren’t content with how the table of contents looks, you can edit its styling.
- Open the Format tab in the right sidebar.
- Select the table of contents text you wish to style.
- Be sure the Text tab is selected in the Format panel.
- Adjust the styling of your table of contents text. Most settings in the Text tab can be applied to your TOC text.
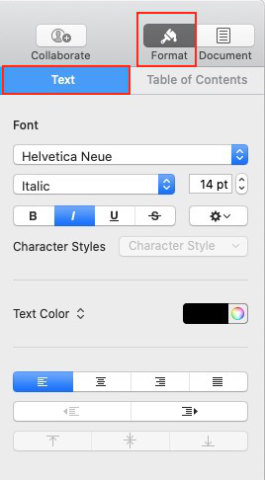
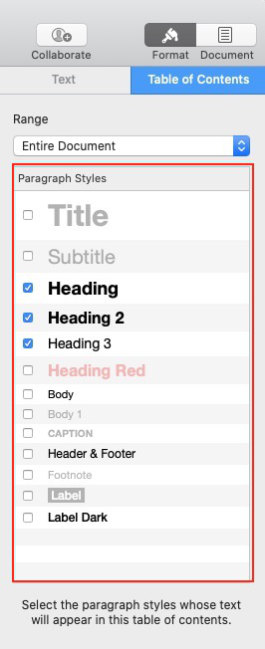
If you have your table of contents selected when you open the Format tab of the right sidebar, you’ll see a Table of Contents tab just to the right of the Text tab.
There are two settings in the Table of Contents tab.
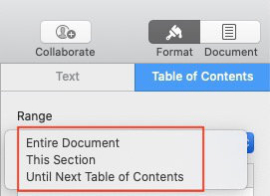
The first is labeled Range. There are three settings there to choose from.
- Entire Document – Includes the entire document in this Table of Contents.
- This Section – Limits the Table of Contents to text that is included in the current section of the document. If you use only one section, it will include the entire document.
- Until Next Table of Contents – Pages allows you to use multiple tables of contents in one document. This setting restricts the current TOC to the text prior to the next table of contents.
The second settings area in the Table of Contents tab mimics the settings in the Edit panel of the Table of Contents in the left sidebar which you read about earlier. From there you can choose which Pages styles are included in the current table of contents.
Other Table of Contents tutorials
We have tutorials about inserting tables of contents in other software.
How do I add a table of contents in Microsoft Word?
Create Tables of Contents and Hyperlinks in OpenOffice Writer
