Fiction and non-fiction writers do a lot of research in the process of writing their stories, documents, or books. This article will show you how to track references and citations in MS Word.
Table of Contents
Fiction writers wouldn’t normally cite sources except in the front or back matter where the author thanks a person or entity for their assistance. For fiction writers, there are more appropriate options available for handling research and sources than Microsoft Word. Scrivener is the best I know of for organizing research for fiction writers.
For non-fiction writers, it’s commonly necessary to track your references and to cite them properly. Later in this article, we’ll take a look at citations and bibliographies.
How to manage references and citations in MS Word
First, we’ll look at footnotes and endnotes, both of which can be used to cite references. They are flexible in their usage. In addition to citing references, they can be used to add important explanatory or background information that would make the main document more cumbersome and difficult to read if it was included inline.
In Microsoft Word footnotes and endnotes are basically the same thing. The primary difference is their location.
A second difference is that footnotes appear on the page where they are inserted and cannot be moved to the end of the book.
Endnotes can be suppressed—MS Word’s way of saying they can be hidden in the section or chapter where they were inserted, then pushed back and displayed on a page of their own.
There is no master list or other method of tracking the resources that are mentioned in footnotes and endnotes beyond the notes themselves.
As mentioned, a footnote will appear at the bottom of the page in which the reference mark citing the note occurred. An endnote will appear at the end of the section or document.
If you write for an organization or company, you may be required to use footnotes or endnotes specifically.
Note: The instructions given here are based on the latest version of Microsoft 365 that was available on the date of writing. However, they should be close enough to be useful back to Microsoft Word 2007.
Inserting footnotes and endnotes in Microsoft Word
I’ll start with a clarification. Technically, endnotes and footnotes are commonly used as citations referring to particular resources. However, Microsoft Word handles footnotes and endnotes together, but separately from citations and bibliographies.
To minimize confusion as much as possible, I’ll use Microsoft’s terminology. The point in a document where you insert a footnote or endnote will be a reference mark. For the feature that Microsoft calls Citations, we’ll insert a citation.
To insert a footnote or endnote, place your cursor where you wish the reference mark to be inserted.
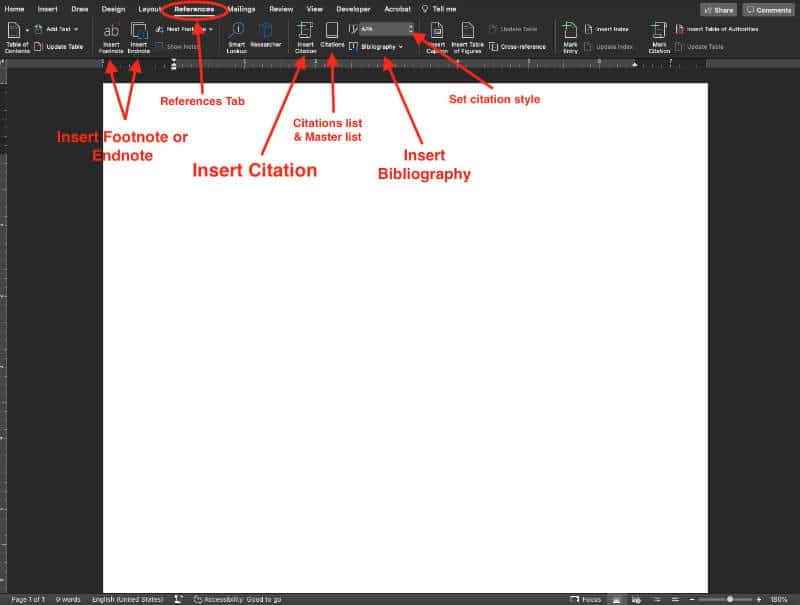
- Go to the Reference tab on the Ribbon—the wide toolbar across the top of the document.
- Click the Footnote or Endnote icon.
- If the one you want to use appears greyed out or inactive, click on the Show Notes button. That will activate both note buttons. Then choose the one you want.
When you insert a footnote reference mark, you’ll see a very small superscript number added where your cursor was and Word will jump to the bottom of the same page where you will see the same number in a small font. Place your cursor just after that number and type the actual footnote.
To return to your place in the document, click the number beside the footnote.
Inserting an endnote works the same way except the endnote can be set to appear after the last paragraph of the section you’re working on or at the end of the entire document.
Go to the end of the section or document and place your cursor just after the endnote character. Type your note.
There are two ways endnotes can be displayed at the end of the document.
- Endnotes can be set to appear at the end of the section you are working on.
- They can be set to appear at the end of the entire document.
With endnotes set to appear at the end of a section, they can appear in some sections and be suppressed in other sections, thereby being pushed to the end of the entire document.
When using this method to have your endnotes display at the end of a book, you have to tell each section not to display them until you come to the last one – the one where you want them to be.
To tell Microsoft Word not to display your endnotes in a section, you must suppress them on a section by section basis.
Suppressing endnotes in MS Word for Windows
In Word for Windows, be sure your cursor is in the section where you do not want your endnotes to display.
- Open the Layout tab, then click in the lower corner of the page settings area (the first area on the left).
- A box will open which has three tabs.
- Click the Layout tab of that box.
- Near the top you’ll see a checkbox marked “Suppress Endnotes.”
If the checkbox is greyed out and unavailable:
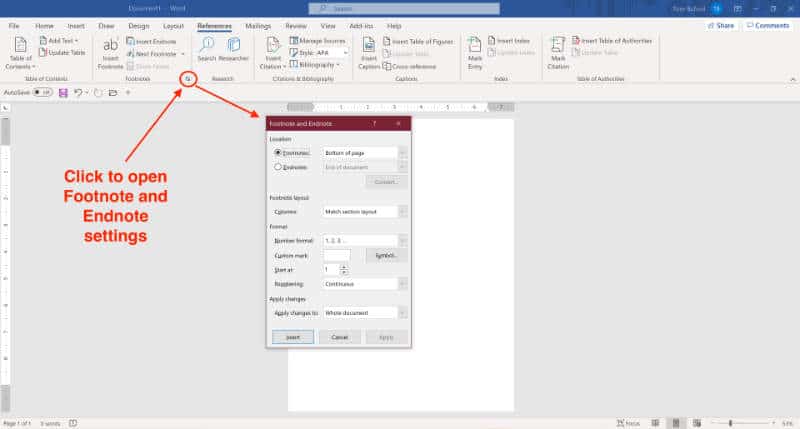
- Open the References tab.
- Click the lower right corner of the Footnotes section.
- At the top of the box that opens you should see a section labeled Location.
- Tick Endnotes, then in the dropdown box beside it, select End of Section. End of Section allows endnote suppression. End of Document moves all endnotes to the end of the document with no possibility of keeping some at the end of a chapter or other section.
You should now be able to check the box to Suppress Endnotes which was mentioned earlier.
Suppressing endnotes in MS Word for Macs
The same options for suppressing endnotes until the end of the document are available in Microsoft Word for Macs but the path to them is different.
To be sure End of Section is selected:
- Go the Insert Menu and choose Footnote….
- In the first section labeled Location, open the dropdown box and choose End of Section.
- To tell Word to suppress endnotes as we discussed earlier in the instructions for Windows:
- Go to the Format menu.
- Select Document…
- You’ll find the checkbox to Suppress Endnotes in the first section of the box.
Bonus hint: I’ve rarely heard this tip mentioned, but in Microsoft Word for Windows and Mac, you can also open the options box where you check to suppress endnotes by carefully holding your mouse or trackpad in the top half of the ruler that sits just above your document. Hold your mouse or trackpad inside the ruler, but near the top edge and double-click.
If your double-click brings up a tab control panel, close that panel, move your mouse closer to the top edge of the ruler and try again. It’s a thin target to aim at and it can be tricky, but it can be done and it’s the fastest way to open that options panel.

Managing references in Word with citations and bibliographies
If your writing requires you to accurately keep track of references in your document and to include specific citation styles for each of them, keep reading.
Microsoft Word’s citation system is easy to use once you get past the fear that it isn’t. First, you’ll need to set the style of citation you’d like to use.
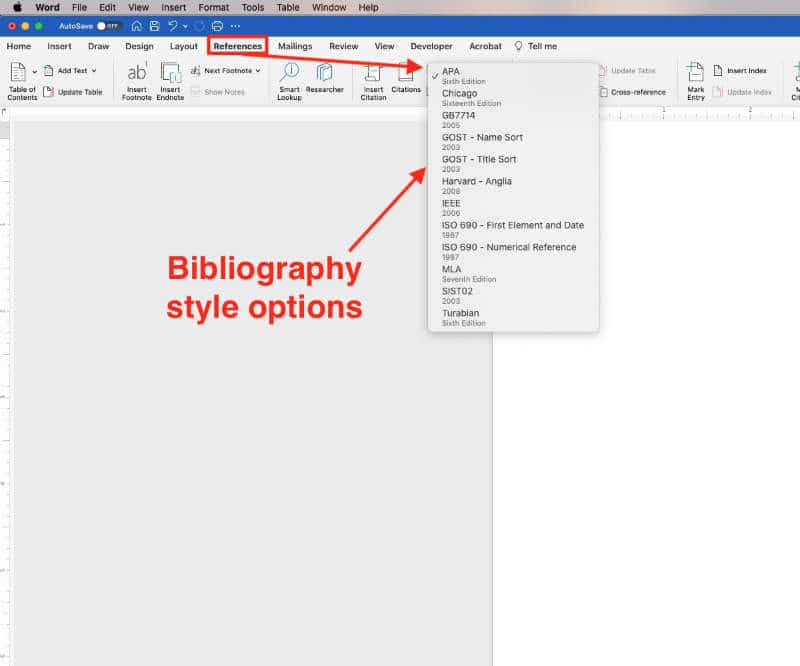
- Open the References tab.
- In the citation section (probably the fourth section from the left), you’ll see a small window that will probably say APA. Click that and a list of about a dozen bibliography style choices will appear.
- Select the one you prefer.
To insert a citation:
- Place your cursor in your document where you want the citation to appear.
- Go to the References section of the Ribbon, the same place where you set the citation style.
- Click Insert Citation.
At the top of the form that opens, you should see a dropdown box that will probably say “Book” if this is the first time you’ve used it. In the current version of MS Word there are sixteen different types of references listed, plus one for miscellaneous.
The numbers, types, and names of the fields in the form vary, depending upon the type of reference you are citing. For example, if you are citing a book and you’ve selected Book as the reference type, you’ll see slightly different fields to fill out than you might if you were citing a page on a website or a work of art.
MS Word will keep track of the references you cite by storing them in a Master list. If you need to cite the same source later in the current document, or even in a new document, you can search the list or master list, select the source and cite it without having to fill in the information again. Entries in the Master List are editable.
Locate the reusable Master Citation List in Microsoft Word
To use the Master List of citations in MS Word for Windows, click the References tab, then click the button labeled Manage Sources in the Citations & Bibliography section.
To use the Master List of citations in MS Word for Macs, click the References tab, then click the button labeled Citations in the Citations & Bibliography section. A sidebar will open. Locate and click the gear icon in the lower right corner of the sidebar. Select Citation Source Manager.
How to insert a bibliography in MS Word
One nice thing about the way Microsoft Word manages citations is that it is incredibly easy to create a bibliography based on those citations at the end of your document.
When you are ready to create the bibliography, just open the References tab, and in the same area where you chose which style of citation you would use, click the button labeled Bibliography. You will be given a choice to label it Bibliography or Works Cited.
A bibliography (or a list of works cited) will magically appear at the end of your document with the resources you cited presented in a list that is properly formatted according to the citation style you chose earlier.
You’ll find more information on using endnotes, footnotes, and citations in Microsoft Word here.
If you are writing a book and intend to format it using Vellum, we also have a tutorial about using bibliographies in Vellum.
You’ll find more of our own Microsoft Word tutorials here.

