In Microsoft Word the rulers’ units of measure can be changed, but not as quickly or easily as in some of its competitors such as LibreOffice Writer. In this article I’ll show you how to change the ruler units of measure in Microsoft Word for Windows and MacOS.
Table of Contents
First, let’s look at how to display the rulers in MS Word. (Note: These instructions apply specifically to Microsoft Word 365, but may apply to certain earlier versions as well.)
How to display the rulers in Microsoft Word for Windows:
In Word for Windows the top horizontal ruler is displayed by default. If you do not see the ruler across the top of your document, click on View at the top, then in the Show section of the ribbon toolbar, check the box next to Ruler to display the ruler.
Tip: If you are working in MS Word for Windows and you have turned on rulers in Print Layout view but you don’t see the top menu, it may be that the ribbon is hiding the top of your document, and therefore your ruler, also. You can hide the ribbon by clicking anywhere in the document area or by clicking the menu title of the ribbon toolbar that is open. For example if the View ribbon toolbar is displayed, click View in the menu above the ribbon to hide the ribbon.
The left side or vertical ruler is not displayed by default and may need to be activated.
To display the left side ruler in Word for Windows
First, you’ll need to have Print Layout view activated. You can turn on Print Layout view by either of these methods:
- Go to the menu and open the View tab in the toolbar ribbon. In the first section on the left, select Print Layout.
- Look for three icons in the bottom bar toward the right side. The center icon that looks like a single sheet with lines is the Print Layout view icon.
With Print Layout activated:
- Go to File > Options > Advanced.
- Scroll down to the Display section.
- Look for “Show vertical ruler in Print Layout View.”
- Check that box to display.
- Uncheck it to remove the vertical ruler.
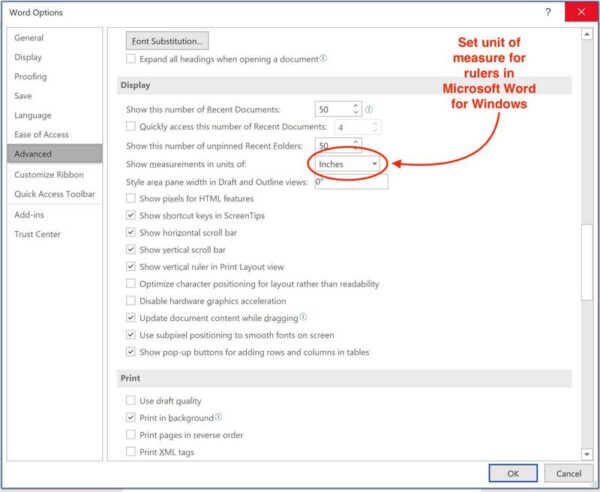
How to change the ruler units of measure in Microsoft Word for Windows:
- Go to File > Options > Advanced.
- Scroll down to the Display section.
- About the fourth line down in the Display section, you should see “Show measurements in units of” followed by a drop-down box from which you’ll make your choice.

How to display the rulers in Microsoft Word for MacOS:
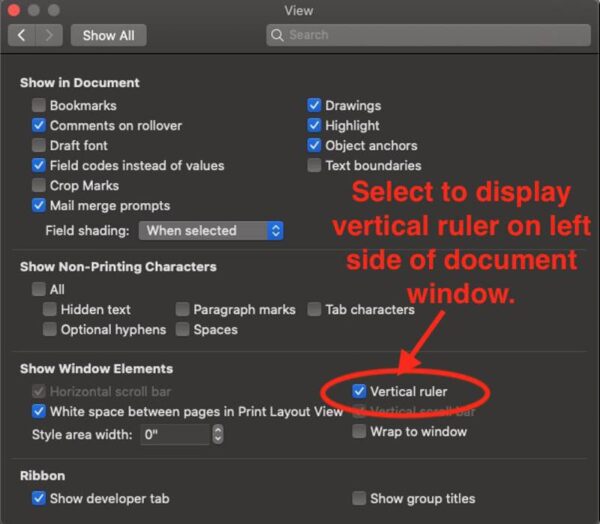
In Word for MacOS the rulers are both displayed when View > Ruler is turned on and View > Print Layout is activated (in the ribbon or menu). If you do not see the vertical ruler on the left side of the window, do the following to activate it.
- In the top menu, go to Word > Preferences.
- Open the View section.
- Look for the third section down, titled Show Window Elements.
- Select Vertical Ruler.

If View > Web Layout or View > Draft is activated, only the top menu will display.
If View > Outline is activated, neither ruler will be displayed in Word on windows or MacOS.
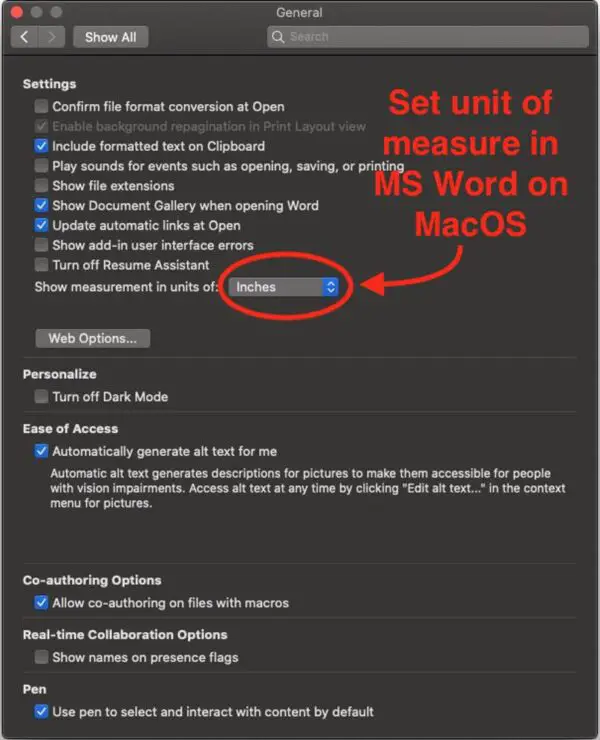
How to change the units of measure in Microsoft Word for MacOS:
- Go to Word > Preferences in the top menu bar.
- Under Authoring and Proofing Tools, select General.
- Look for “Show measurements in units of”.
- Select your preferred setting from the drop-down box.

That’s it! Now you know how to change the unit of measure for rulers in Microsoft Word for Windows and MacOS.
Microsoft offers Word tutorials here.
To find out how to do it in LibreOfficeWriter, see our article Easily Move From Microsoft Word to LibreOffice Writer.


