For people who have used Microsoft Word a long time, the thought of having to learn another application can be daunting, at the least. Couple that with having to learn how to navigate a different operating system and you can find yourself doubly confused.
Table of Contents
People whose use of computers includes writing or office work are familiar with the Microsoft Office suite of products that includes Word, Excel, Powerpoint, and more. MS Office has been available for Windows and Mac for more than thirty years.
For various reasons, many of those longtime users are shopping around for alternatives to apps such as Microsoft Word. In another article I mentioned some alternatives to MS Word, including some free options. As I said in that article, I believe the best of the free options is LibreOffice.
Moving from Microsoft Word to LibreOffice Writer
LibreOffice is open source software that is maintained and distributed by The Document Foundation, a not-for-profit organization. It is well-maintained and is available free of charge. Unlike some free software, LibreOffice isn’t supported by intrusive ads or malware.
LibreOffice Writer can open and save to a large number of file types.
This article is not intended to be a full tutorial describing the use of every feature in LibreOffice. Instead, we’ll focus on getting you started in one app in the LibreOffice suite called Writer, their answer to Microsoft Word. I hope to give you enough information that you can get started with the transition from Microsoft Word to LibreOffice Writer with as little wear and tear on your brain and patience as possible.
How to get LibreOffice
LibreOffice is available for a variety of operating systems including Windows, Mac, and Linux. We’ll focus on the Windows and Mac versions.
To install LibreOffice you first have to download it to your computer. I recommend you download it directly from https://www.libreoffice.org/download/download/.
Install the downloaded app on your computer. For Windows it will be a .msi file. For Macs, it will be a .dmg file. In either case, double-click the downloaded file to install LibreOffice on your computer.
How to open a Writer file
As with most apps, there are some minor difference in the Windows and Mac versions. That is true when opening a new Writer file.
Opening a LibreOffice Writer file on a Mac
When you first open LibreOffice on a Mac, you should see the Startcenter. In both Windows and Mac this is the place where you select which app in the LibreOffice suite you wish to open.
If you had previously saved some files, you would see some of the most recent files represented by document icons as well as a section on the left side that lists the programs in the LibreOffice suite.
LibreOffice Writer can open and save to a large number of file types. However, the default file type for documents written in LibreOffice Writer is .odt. If you have previously had other software installed that saved in the .odt format, and you have since deleted that software, you may see those older .odt files listed in the Start Center.
In the case of a brand new, first-time installation, you should see just the app list on the left side. Under the Create heading, select Writer Document.
If you don’t see the Start center because it has been minimized, go to the File menu and select Text Document. If the Start center was closed using the red X in the top left corner of the window on a Mac or cancelled in Windows, you may need to go to File > New > Text Document.
Opening a LibreOffice Writer file in Windows
If you are on a Windows computer, whether you see the Start Center upon opening the app depends on which link you select from the Windows Start menu. If you click the dropdown arrow at Start Menu > LibreOffice and then click the first item on the list which is labeled LibreOffice, you will see the Start Center. On the other hand, if you choose one of the individual apps from the dropdown list, you will be taken straight into that app and will not see the Start Center.
If you go to the Start Center and had previously saved some .odt files, perhaps from an older app that you had since uninstalled, you would see some of the most recent of those files represented by document icons.
Just as it is on a Mac, there is a section on the left side of the Start Center that lists the programs in the LibreOffice suite. In our case, we would select to open Writer or a Writer document.
Once you are in Writer, you can open new Writer documents or any other type of document that LibreOffice supports from the File menu.
Where is the ribbon in LibreOffice Writer?
Anyone who has used Microsoft Word over the past several years has been well acquainted with the ribbon. If you’re not sure what the ribbon is, it’s that (probably blue) strip of buttons and icons that runs across the width of your computer and changes, depending up which tab or section you choose.
When you first install LibreOffice you will see that the ribbon is conspicuously missing. There is, however, LibreOffice’s version of the same feature available if you know where to look. Be aware that it doesn’t look the same, and is not known by the same name. (I understand that Microsoft holds the intellectual property rights to its version of the ribbon.)
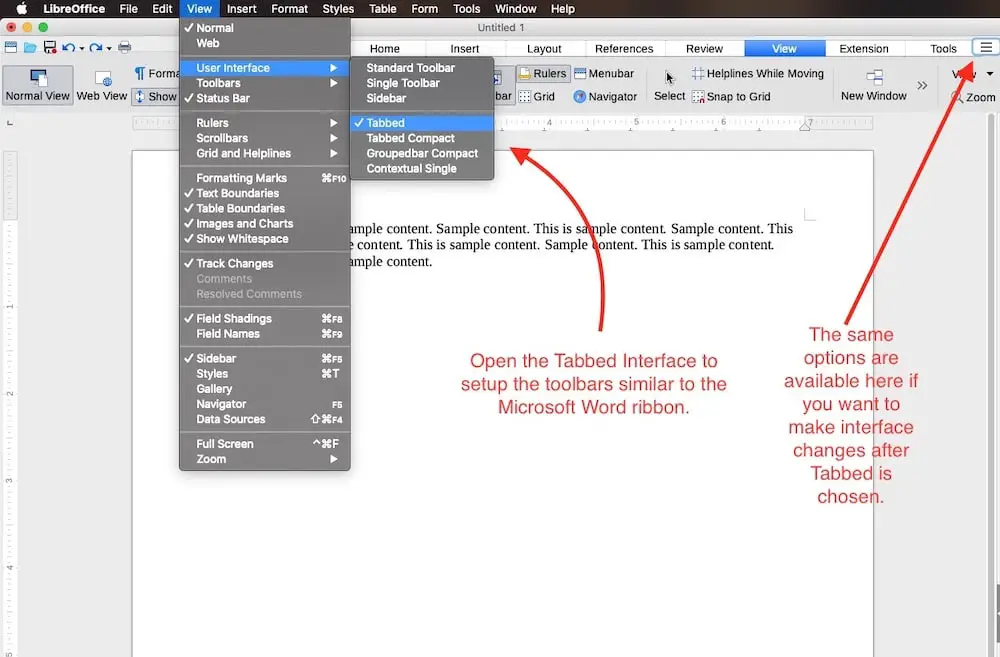
To open a ribbon-like feature on LibreOffice for both Windows and Macs, go to the View menu at the top. From the View menu, select User Interface, then Tabbed. You will see several other options for the User Interface, but Tabbed is as close as I’ve seen to displaying what the MS Word ribbon offers.
The tabbed user interface in LibreOffice isn’t as pretty as the Microsoft original, but it’s quite functional. If function is more important to you than aesthetics, you should find it helpful and intuitive, especially if you are coming from MS Word to LibreOffice Writer. Spend about five minutes experimenting with the different tabs and the settings they display. I’d bet you’ll be able to find your way around using the tabbed interface.
NOTE: It is possible on some computers with high screen resolutions, the Tabbed interface may not be perfectly spaced in a spot or two. I personally have not found a workaround for the issue, nor have I found it be debilitating in any way.
Getting started with LibreOffice Writer
When you open a new document for the first time, you’ll see a window that looks very similar to earlier versions of Microsoft Word. To be fair, the appearance of the app seems a bit dated. But if you can overlook that, you’ll find LibreOffice quite capable for the average user.
Setting tabs and margins in LibreOffice Writer
The interface will open with a document open and margins set to one inch on each side. Right at the top of the document you’ll see the familiar horizontal ruler that is used to set margins, tabs, and first paragraph indents.
To set margins, look for the small upward pointing icon at either end of the ruler. Drag the left one to adjust the left margin. Drag the right side one to change the right side margin.
Drag the downward pointing icon on the left end of the ruler to set the first paragraph indent.
To set tabs in LibreOffice Writer, look for tiny black marks along the bottom of the ruler. Those marks are preset tabs, set every half-inch across the page. You can click any of those marks and drag it to your preferred location. You can also set your own tabs by clicking anywhere along the bottom ruler. Those tabs can also be dragged to different locations.
Note that the preset tabs will remain along the ruler until you click and set your own. As you set your own tabs, the preset ones from that point to the left will disappear. If, for some reason, you’d like to have all of the preset ones disappear, just set a tab all the way to the right.
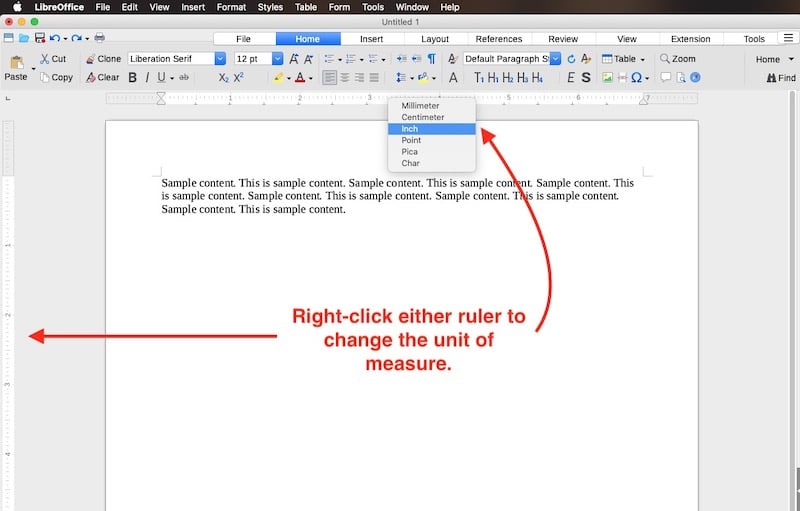
Setting units of measure in LibreOffice Writer rulers
If you need the ruler to display some measurement other than inches, right-click on the ruler and choose a different unit of measure. The following units of measure are available for the horizontal ruler:
- Millimeter
- Centimeter
- Inch
- Point
- Pica
- Char
If you need the vertical ruler, you may have to activate it. You’ll find it on the Tabbed interface under the View tab. You’ll also find it under the View menu (remember this is what Microsoft calls the ribbon). View > Rulers. The following units of measure are available for the vertical ruler:
- Millimeter
- Centimeter
- Inch
- Point
- Pica
- Line
Formatting text in LibreOffice Writer
If you used Microsoft Office prior to installing LibreOffice, formatting text will be an easy task for you.
I will assume you turned on the tabbed interface as instructed earlier. If so, just as you did in MS Word, select the Home tab. You will see most of the same settings that were available under the Home tab in MS Word. That includes choosing the font, changing the font size, line spacing, ordered and unordered lists, and more. Select the text you need to format, then change the settings in the tabbed interface as needed.
Inserting photos in a LibreOffice Writer document
When you know where you need an image inserted, place your cursor in that location. Then from the Insert tab, select Image. You can also do the same by selecting Image from the Insert menu.
To print a document in LibreOffice Writer
Printing a document in LibreOffice Writer is very similar to Microsoft Word. Select Print from the File tab or from the File menu. Either one will open your computer’s print function.
Finding the Help section in LibreOffice Writer
Depending on which operating system your computer uses, LibreOffice may not come with its help system files preinstalled. When I installed LibreOffice on my Windows 10 computer, no help files were automatically installed.
You can download the help files for LibreOffice on Windows here. You’ll have to select the Windows operating system that you use, then look to the left of the button for a link that says “Help for offline use” followed by the language.
When I installed LibreOffice on my Mac, the help files were automatically installed. On the Mac, it may appear at first that you are being taken to the LibreOffice website to view the help section because Help opens in your web browser. But if you look in the address bar of your browser, you will see that you are in fact viewing a local file (one that is installed on your Mac). You see the help files in your browser because they are in HTML format, which is most commonly read in browsers.
You may think there is no help available when you first try to use the Help menu on a Mac. I don’t know the exact reason for this and my research has not turned up any definite answers. But when you first open Help and type into the search box the issue you want information about, you will be presented with a list of help topics from your computer system, not from LibreOffice itself.
Don’t let that little oddity deter you. There are a variety of help resources available for LibreOffice, although it may not appear so at first. The Help menu in LibreOffice may even tell you at first that there are no results for your topic search. But there are. If you click the X at the right side of the search box, a list will appear that includes links to LibreOffice’s online help. You may sometimes see this list right away. Here are the three items on the menu that are most important for receiving help:
1) LibreOffice Help. This is the help that is installed on your Mac and available for Windows. You can access the same LibreOffice help page online here.
2) User Guides. You’ll find an assortment of free LibreOffice User Guides here. At the time this article was written, a guide for the very latest version of LibreOffice Writer wasn’t yet available. But the most recent earlier one is and will be helpful, even with the later version. It comes in the form of a 400+ page PDF document which you can view online, download, or print.
3) Get Help Online. This is the LibreOffice public forum where you can search for answers or ask questions.
Hopefully this introduction to LibreOffice makes it easier for you to make the transition from Microsoft Word to LibreOffice Writer.
