Grammarly can be used with several apps, including Microsoft Word. I’ll show you how to download and install the Grammarly add-in for Word. We’ll also look at other Grammarly options that may be better solutions.
Table of Contents
Should I install the Grammarly Add-in for Word?
Grammarly currently offers a Microsoft Office add-in that works with Word and Outlook. As I write this article, the Office add-in is still available for download.
The MS Office add-in for Macs is available for:
- Macs running macOS 10.13 or newer.
- Microsoft Office version 16 or higher. (Your version number is shown under the Word menu > About Microsoft Word.)
The MS Office add-in for Windows is available for:
- Windows 7, 8, 8.1, 10, and 11.
- Microsoft Office 2007, 2010, 2013, 2016, 2019, 2021 Microsoft 365.
Because Grammarly has transitioned to a version that works across a wide variety of apps, the Office add-in will no longer be updated.
The newer Grammarly for Windows or Grammarly for Mac apps are more versatile, more compact, and work across several apps, including Microsoft Word. But if your computer runs one of the earlier versions of Windows and/or Microsoft Office, you will need the Grammarly for MS Office add-in.
If your computer runs Windows 10 or later or macOS 10.12 or later, I would suggest you consider downloading the Grammarly for Windows or Grammarly for Mac app.
Download and install the Grammarly add-in for Microsoft Word
The method you use to install the Grammarly add-in depends on whether you are on a Windows or Mac computer.
Install the Grammarly add-in for Word for Macs
If you use Microsoft Word on a Mac computer, you can install the add-in directly from Word’s Insert menu or tab.
- Go to the Insert menu.
- Select Add-ins, then Get Add-ins.
- Type Grammarly in the search box at the top of the left column.
- Click the Add button in the Grammarly card in the right column.
The add-in will install and appear as a large green button at the far right end of the Home tab.
You should also see a new Grammarly tab in the ribbon. If you click the tab, you will see the same Grammarly button as in the Home tab. Either button opens Grammarly in a sidebar on the right of your screen.
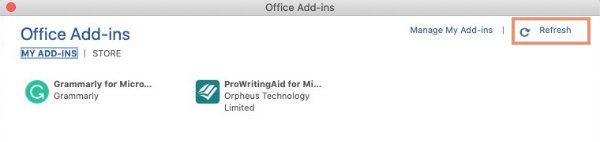
It’s possible you may not see the Grammarly add-in for Macs in your list of add-ins under Insert > Add-ins > My Add-ins. If that happens, click the Refresh link in the upper right corner of the My Add-ins panel.
Download the Grammarly add-in for Word for Windows
If you use Word on a Windows computer, you’ll have to download the add-in from Grammarly.com and install it like any other app.
The Grammarly add-in for Microsoft Word is not real easy to find on the website. You’ll see it referred to in different ways on the Grammarly website.
If you look in the Get Grammarly column at the bottom of most pages at Grammarly.com, you’ll see Grammarly for MS Office. If you click that link, you’ll see it on that page referred to as Grammarly for Microsoft Word and Outlook. Both refer to the same add-in.
You can download the add-in without a Grammarly account. However, you will need at least the free Grammarly account before you can use the add-in. Free accounts offer fewer features than Premium accounts but still allow you to check for spelling and punctuation errors.
Since you’ll need an account before you can use the add-in, I suggest you go ahead and set up your account at Grammarly.com if you don’t already have one.
Look for a green button labeled “Get Grammarly It’s free“. There are several such buttons scattered around the home page.
Once you’ve opened your Grammarly account, click the Grammarly for MS Office link under Get Grammarly (at the bottom of the page). When that page opens, click the green button labeled “Get the add-in It’s free. The add-in should automatically begin to download to your computer. It won’t install itself.
Install the Grammarly add-in for Word on Windows
To install the Grammarly add-in for Microsoft Office (Word), double-click the installer that you downloaded and let it run. If Word is open on your computer when you install the add-in, you may be prompted to close Word and reopen it.
Note: In Word for Windows, Grammarly adds a tab to the ribbon. However, it does not install as an add-in. It does not appear with other Word add-ins and therefore, can’t be removed from there. Instead, it installs as any other application. You would delete it in the same way you would delete any other app.
Use the Grammarly add-in for Word
There are two ways to open the Grammarly for Word add-in.
- Under the Home tab, the Grammarly button will be toward the right end of the ribbon. In Word for Windows and Word for Macs, Grammarly will open in a wide sidebar on the right side of the window.
- Open the Grammarly tab. In Word for Windows, an assortment of buttons will appear. The first of those is a Grammarly button. That button opens the sidebar. In Word for Macs, the Grammarly tab directly opens the same sidebar as the Grammarly button under the Home tab.

There is a limit to the number of words that Grammarly allows in a single document. You must have less than 150,000 characters (including spaces) in your document.
If you see a warning that your document is too long for Grammarly to process, you’ll need to divide the document into smaller parts. You can then run each part through Grammarly.
To see Grammarly’s suggestions, just open your document and click the Grammarly button under the Home tab in Word for Macs or Windows.
When Grammarly has finished processing the text of your document, you will see a list of items to check in the right sidebar.
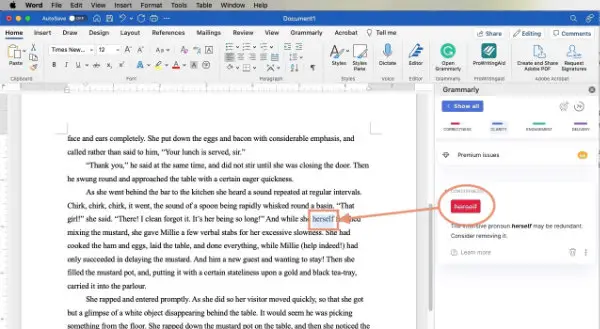
As you scroll down through your document, Grammarly’s suggestions relating to the current page will appear in the sidebar. If you click on an item in the sidebar, you’ll be taken to the offending word(s) in the document.
You can click the word or punctuation in the sidebar to accept the suggestion and fix the problem or click the garbage can in the lower right corner of the suggestion card. That will dismiss that suggestion.

In Word for Windows, you can open the Grammarly tab and use the buttons under that tab to move through the suggested changes by category. You will still see the list of suggestions in the right sidebar. Which buttons are active will depend on whether you have a free or paid account.
Install and use Grammarly for Windows and Macs
If your computer runs Windows 10 or later or macOS 10.12 or later, I would suggest you consider downloading the Grammarly for Windows or Grammarly for Mac app instead of the Microsoft Office add-in.
Go to grammarly.com and download the Grammarly for Windows app. It installs like any other Windows app.
Download the Grammarly for Mac app and double-click the installer. It will install quickly. You won’t see the app until you open MS Word or certain other apps such as Apple Pages. Grammarly also works with Vellum.
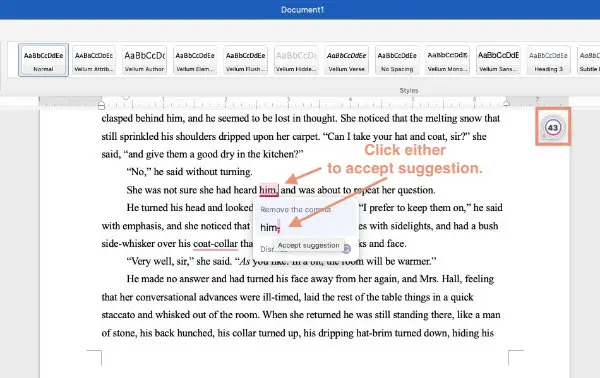
When you open your document in Word for Windows or Mac, you will see a small floating button that looks similar to a bullseye.
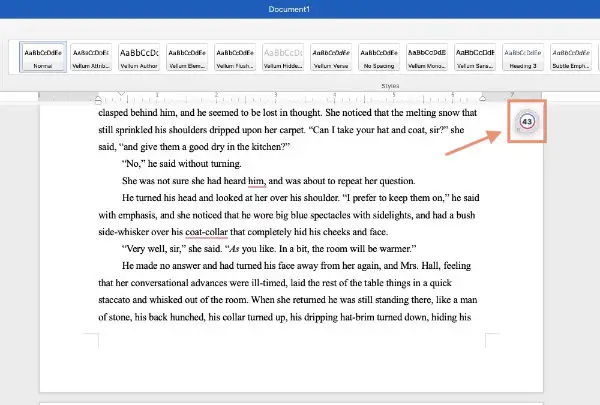
The button is round except for the lower left corner which you can click and hold to drag the button to a different location.
A number in the center of the button will tell you how many issues that Grammarly discovered.
You will see that any issues in your document will be underlined.
You can mouse over the word or phrase in question and click the underlined word to accept the suggested correction.
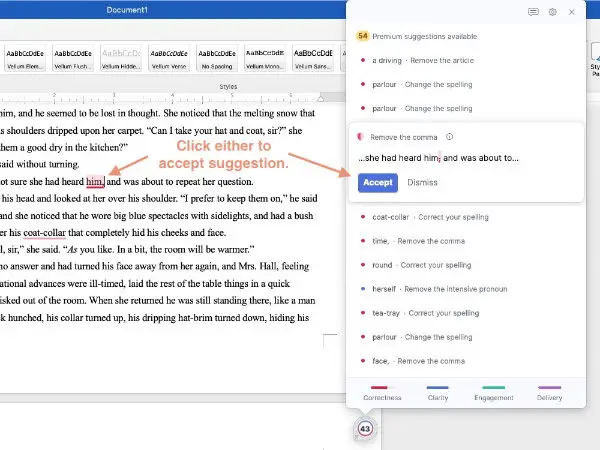
You can also click the button to open a panel with the document’s issues listed. You can click the issue in the panel and click the Accept button to accept the suggestion.
Remember how with the Grammarly add-in for Word you could mouse over an offending word and click to accept the suggestion? You can do the same when you have the Grammarly for Mac app installed.
I find that the Grammarly for Mac and Grammarly for Windows apps stay out of the way and take up very little screen real estate, even when they are being used.
Where the add-in for Microsoft Word that we discussed earlier uses a large sidebar to display suggested changes, the Grammarly for Mac and Grammarly for Windows apps are visible only as a small button until you need to see your suggestion list. Even that list is much more compact than the Word add-in.
Because the Grammarly for Windows and Grammarly for Mac apps are more universal, you will also see the tell-tale Grammarly button in other apps, such as some email apps.
