Headers and footers in LibreOffice Writer are important for a number of reasons. Some academic writing calls for them. Technical writing and book manuscripts call for them. Headers may contain the author’s name, a title, a date, or nearly anything else one wants to insert at the top of a page.
Table of Contents
Like headers, footers can technically contain any information you want to put there (within reason), but they are commonly used for page numbers and meta data. One may have a need to insert publication dates there.
LibreOffice Writer allows you to use headers and footers in the ways described above as well as other creative uses you may think of.
How to insert headers and footers in LibreOffice Writer
The default page style in LibreOffice Writer has headers and footers already in place. To insert text into a header in LibreOffice Writer, just click in the top of the page.
To insert text, page numbers, dates, etc. into a footer in LibreOffice Writer, just click in the bottom of the page.
You should see a set of brackets on the left and right side of the header or footer that indicate where you can add text or other items.
How to add page numbers to headers and footers in LibreOffice Writer
It is up to the user to decide what she wants displayed in the header. One of the most common items in a header or footer is the page number. To insert page numbers in the header, click within the top half-inch or so of the page. You should see some light grey lines and marks that indicate the header.
When you click inside the activated header or footer area, you should see a colored tab (blue in my case) that says Header or Footer (default page style). If you click that tab you will see a short context menu that will allow you to insert Page Number.

You can also insert Page Count. This is useful if you want to indicate which page of the total available you are reading. For example you could insert Page number, then type “of”, then insert Page count. You would have page 1 of 100, or whatever number your total page count is.
The exercise I just described works exactly the same in a footer as it does in a header.
You can use the alignment icon in the toolbar to move the page number left, center, or right.
How to add other data to headers or footers in LibreOffice Writer
There are a lot more items that you can add to headers or footers than just page numbers. To see what is available, you’ll want to use the Insert menu at the top, or the Insert tab if you have the user interface set to Tabbed.
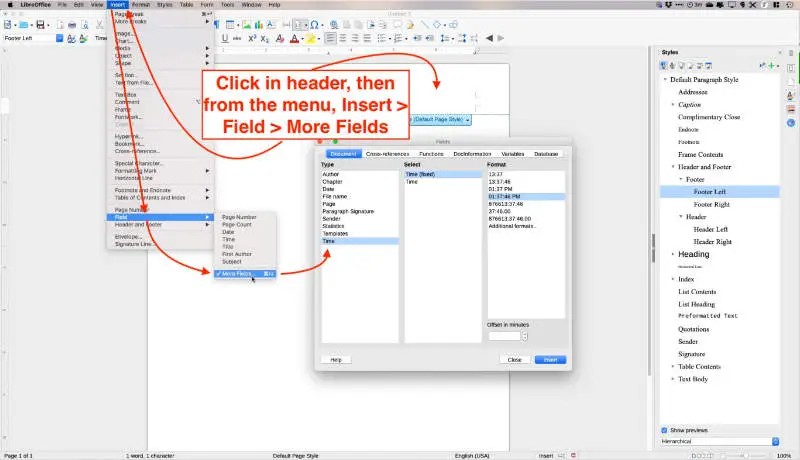
From either the Insert menu or the Insert tab, select Fields. You will be presented with a list of items that you can insert into your header or footer. They include the author, last time printed, different date presentations, the date, and more.
How to insert images in headers or footers in LibreOffice Writer
Inserting images in headers or footers is as simple as it is to insert them in a paragraph. You can create letterheads by placing logo images and other appropriate information in the header or footer, then save the document as a reusable template.
Place your cursor where you want the image in the header or footer, then use Insert > Image To insert text into a header in LibreOffice Writer, just click in the top of the page. from the top menu or the Insert tab > Image icon from the tabbed interface. Locate the image you wish to use and insert it.
Just as you can with text, you can use the left, center, right alignment icons in the toolbar to align the image accordingly.
When the image is first inserted it will probably have red sizing “handles” on each side and each corner. The handles are actually small red squares. Drag a corner handle diagonally toward or away from the center to proportionately change the size of the image.
Dragging a top, bottom, or side handle to the left, right, up, or down, will stretch or shrink the height or width of the image. If doing so distorts the image, start over and drag the corner handles to resize the image without distortion.
Header and footer margins in LibreOffice Writer
You can easily change the margins for headers and footers by clicking in the header or footer, then clicking the blue tab. From the context menu that appears, choose Format Header…. The Header tab should be selected automatically. If it isn’t, select it.
In the Header or Footer tab, if you check the box next to “Use dynamic spacing” and “Autofit height,” the header or footer should adjust itself according to what you have inserted there. If it needs a bit of tweaking, you can do that easily.
For headers you can change the left and right margins. Change the distance between the header and the body of your document with the Spacing setting.
To change the margin at the top of the header, open the Page tab and change the top margin.
For footers you can change the left and right margins. Select the Footer tab. Change the distance between the footer and the body of your document with the Spacing setting.
To change the margin at the bottom of the footer, open the Page tab and change the bottom margin.
Set background colors in LibreOffice Writer headers and footers
You can easily achieve a nice effect by adding background colors or background images in your headers and footers.
To add a background color, click in the header or footer, then click the blue tab. Select “Border and Background.”
In the settings panel that pops up, you will see three tabs across the top – Borders, Area, and Transparency. Select Area.
Six tabs will appear in the second row – None, Color, Gradient, Bitmap, Pattern, and Hatch. The None tab will probably be selected if this is the first time you’ve opened this settings panel.
Select the Color tab. A wide array of color settings will open for you to select from, arranged in three sections.
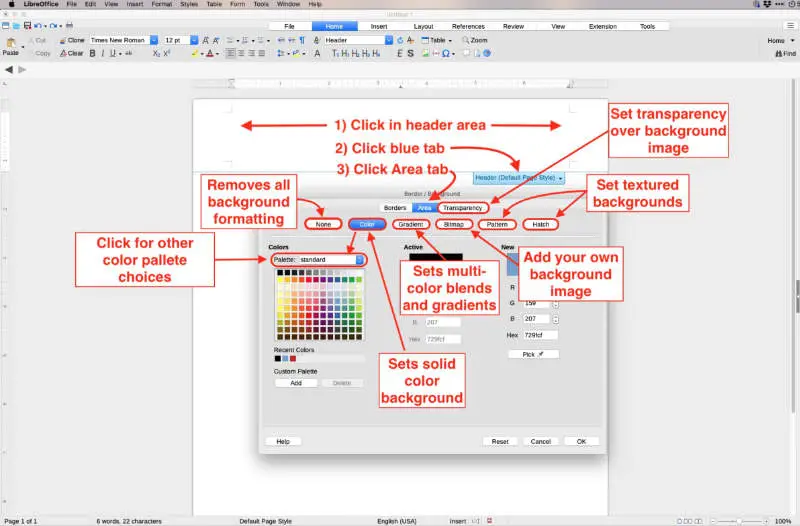
The first section contains the color palettes. If you don’t see a color you like in the pallete that is displayed, click the dropdown box just above the pallete and choose one of the other pallets that are available.
The second section shows you the current (active) color. The third section shows you the new color so you can compare before you click OK to set the new color.
If you want a gradient background, select the Gradient tab. I won’t go into all the settings in that tab, but if you just play around with the settings, you’ll come up with some interesting color combinations and gradient variations.
If you want a patterned or textured background, you’ll find a selection of them under the Patterns or Hatch tabs.
Set a background image in LibreOffice Writer headers and footers
You can achieve an interesting effect by inserting a background image in your header or footer. The image will be on a layer behind any text, dates, page numbers, etc. that you might include.
To set a background image in your header or footer, click in your header or footer to activate it, then click the blue tab as you did to set a background color. This time select the Area tab, then the Bitmap tab.
The Bitmap settings tab is arranged in three sections. The first section from the left allows you to select an image. There is a small selection available by default. Those are designed and sized so that they are repeatable (tiled) in your header or footer background.
You can set a large image across the width of your header by inserting your own image, then adjusting the size. Under the available images, click the button labeled “Add/Import.” Browse to your chosen image and insert it.
The second section is labeled “Options.” This is where you tweak the settings so that your image fills the entire background.
The first item in the Options section is labeled “Style.” From that dropdown box you’ll be able to select Tiled, which repeats the image to fill the background of your header or footer.
“Stretched” does exactly what it says. It stretches the image you selected to fill the available space.
If you insert your own image, say of a landscape or a logo, you’ll want to choose “Custom position/size.” This will allow you to align the image how you want it and to set the width and height of it.
Once you get the image in place, look above the Bitmap tab for one in the first row labeled Transparency.
“No transparency” will probably be pre-selected. Below that is “Transparency.” Tick the button next to “Transparency,” then change the percentage in the small box just to the right of it.
In the third section, you’ll see a small representation of your background image with a transparency level assigned to it. The higher the transparency number, the more faded out your background image will appear. Lower numbers will make your background image more clear.
To achieve a nice effect, set a fairly high transparency percentage to the image, then add your page numbers, titles, or other information.
The faded background image would not be appropriate from some types of writing. It can, however, add a nice touch to creative writing, letterheads, and more.
You’ll find more of our LibreOffice Writer tutorials here.
You’ll find the LibreOffice.org help pages here.
