All writers have spent time working on a scene and later discovered that the story would be better without it. What do we do with unnecessary or unwanted scenes in Scrivener? In this article you’ll learn how to use the Trash in Scrivener.
Table of Contents
Note that this article covers Scrivener v3 for MacOS and Windows. Although we won’t specifically go over Scrivener v1.x for Windows, the methods are similar enough that you should be able to follow along. (There is no v2 of Scrivener for Windows.)
How to use the trash in Scrivener
When you delete scenes, folders, empty documents, etc. in a Scrivener project, they go into Scrivener’s trash and not into the Recycle Bin on Windows or the Trash on MacOS. Therefore, emptying the system trash has no effect on Scrivener’s trash.
Scrivener has its own trash, separate from the system trash in MacOS or Windows.
The Trash in Scrivener is in the Binder but is not considered part of the manuscript in that it cannot be included when a manuscript is compiled. You can recognize it by the trash can icon and the Trash label.

How to delete scenes in Scrivener
Because of Scrivener’s versatility, writers may have their scenes arranged as folders or text documents. However you arrange your work, the Trash works the same way.
Any of the following will give you the same result.
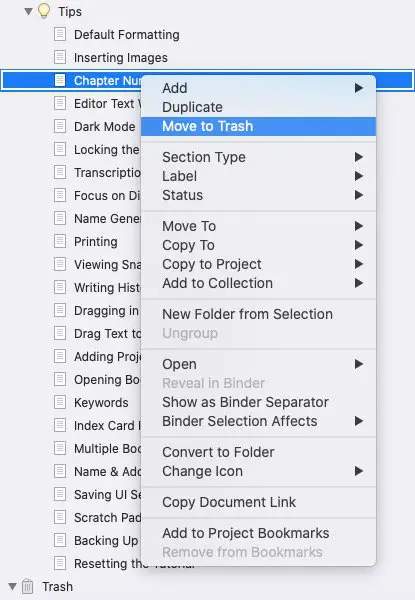
- Right-click or two finger click (if your Mac trackpad or mouse is set up for two finger click) on the document or folder to open the context menu. You’ll see two options. Looking down the menu, the third item is Move to Trash. Further down you’ll see Move to… > Trash.
- Select the document, folder, or image in the Binder. Click the Trash can button in the top toolbar.
- Select the document, folder, or image in the Binder. Drag the item to the Trash can/folder in the Binder.
- Select the unwanted file or folder in the Binder. Go to the Documents menu, then select Move to Trash (the last item in the Documents menu).
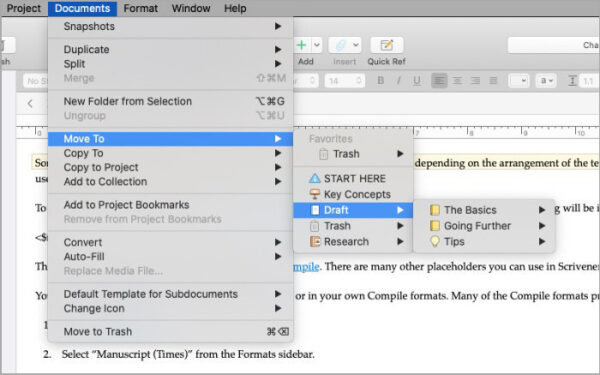
- Select the file that you want to delete in the Binder. Go to the Documents menu. Select Move to…, then Trash (Documents > Move to… > Trash).
- In the Binder, select the file that you want to delete. Hit Command + Delete on Macs or Control + Delete on Windows.
How to retrieve files from Scrivener’s trash
Moving files and folders out of Scrivener’s trash is very simple. The following methods are quick and easy:
- Select the Trash in the Binder to open it, then do one of the following.
- Select the file that you want to move out of the Trash. Go to the Documents menu. Select Move to…, then choose the folder where you’d like the file to appear.
- Select the file that you want to move out of the Trash. Right-click or two finger click the file. Select Move to… then select the folder where you’d like the file to go.
- Select the document, folder, or image in the Trash. Drag the item to the appropriate place in the Binder.
A suggested alternative to using the Trash
I’ve found that the Trash is not always the most appropriate place for me to send files or folders that I remove from my manuscripts.
If I think there’s any chance that I might need the deleted scene in another place, I’d rather not send it to the trash.
While it’s usually a good idea to not empty the trash until the project is completed, accidents can happen. If the trash is emptied and I later remember a scene that I had tossed, I may not be able to retrieve it.
An older project backup might contain the item in the trash, but I wouldn’t necessarily count on it.
I might lose track of dates and times, resulting my not being able to remember when the scene was moved to the Trash and therefore, which backup might still contain the scene in the Trash.
To reduce the chances that I might lose the unused scene, I will create a folder labeled Extra Items. With that folder selected, I go to the Inspector and uncheck Include in Compile.
Then, instead of moving those unneeded scenes to the Trash, I move them to my Extra Items folder. For each document I add to the Extra Items folder, I also uncheck Include in Compile.
Unchecking Include in Compile keeps the Extra Items folder and the documents inside it from being included when the manuscript is finished and compiled.
If I come to a place in my manuscript where the previously unused scene would work, I can drag it from the Extra Items folder to any other location in the manuscript.
If you do that, remember to go back into the Inspector for the scene you reclaimed and check Include in Compile to have it included in the final manuscript.
A final note about using the Trash in Scrivener
If you find Scrivener’s Trash near the bottom of the Binder and you’d like to relocate it, you can do that. You can’t move the Trash out of the Binder but you can drag from the lower part of the Binder toward the top.
Just select Trash and drag it wherever you wish, so long as that location is not within the Draft folder. You can drop the Trash folder above or below the Draft folder.
For official documentation on using Scrivener, click here.
A note about this tutorial. All of our Scrivener tutorials are personally written based on our own experience with Scrivener. If you would enjoy more in-depth training, we recommend Joseph Michael’s Learn Scrivener Fast Course.

