If you have done any research at all on Scrivener, you may have read or heard the complaint that it is overwhelming and difficult to use. In this article I’ll show you how to make Scrivener easier to use.
Table of Contents
Scrivener’s purpose is to simplify how you manage the details, research, and parts of the stories or articles you write. In this article I’ll attempt to remove, or at least reduce the intimidation you may feel when you first open the app.
The information in this article is intended to get you started successfully using Scrivener, but is not a detailed how-to article on all of its features.
Make Scrivener easier for new users.
I’ve been a Scrivener user for several years – first the Windows version, then the Mac and iOS versions. Through my own experience I’ve come to believe that Scrivener is only difficult to use if you start out believing you have to know how to use every feature before you can get any benefit at all from it. You can’t attempt to eat the proverbial elephant in one sitting. The same idea applies to Scrivener.
Don’t be afraid of Scrivener.
I’ll be honest with you. Scrivener can indeed be overwhelming if you try to learn and use every feature of it before you start using it on a basic level. This is particularly true for those users whose computer experience has mostly consisted of emailing, light use of Microsoft Word, or browsing the Internet. My first piece of advice is to not be afraid of Scrivener.
Don’t try to learn all of Scrivener’s features before you begin to use any of them.
Until recently, the Windows version of Scrivener lacked some features when compared to the Mac version. That problem has been rectified now that version 3 of Scrivener for Windows has been released. Most features that I mention are available in version 3 of Scrivener for both Windows and Mac. The exception is mentioned under Hide the Unimportant Sections later in the article.
Its basic features can be as simple to use as Microsoft Word or LibreOffice Writer. If you are to any extent proficient in using Word, LibreOffice, or Apple Writer, you can use Scrivener.
I suggest you start out with Scrivener, thinking of it as an advanced word processor. Concern yourself with learning to use it that way. Then, as you come to understand more about the software, you can dig a little deeper into its features like research management, character or POV tracking, and more.
When you see that you’d like to have another feature available to you, take a few minutes to learn about that one thing and begin using it. Learn one feature at a time. Scrivener can be very useful even when using it below its capabilities.
If you have every available feature panel set to be visible in your workspace on the screen, then yes, it may look like too much to handle. But you can very easily change what is visible so that you only have the basics visible.
At the very low cost of $49 for the Mac or Windows version, I consider Scrivener to be a good value even when I’m not using its full feature set.
You can write entire novels in Scrivener without using even half of its features. Using only its basic features set up in a rather sparse layout, you can still have the ability to view and rearrange your manuscript in outline form, as digital 3X5 cards on a corkboard, or simply as typed scenes.
Set Scrivener up just how you want it.
One of the beauties of Scrivener is how flexible it can be for almost any type of writing. Scrivener uses layouts to control what is visible on the screen.
Set aside some time to relax and slowly browse Scrivener’s features.
You can create and save different layouts for different types of writing. For example, if you write non-fiction, you can set it up so that you can see a PDF or other research document in one area while you type the article in a second area.
For fiction, you can create a layout that is as basic as you want. Or you can create one that allows you to see a list of scenes or beats, character profiles, notes, and an outline at the same time you type the current scene in progress.
When you first install Scrivener and open it on your computer, you will see the default layout. But “default” doesn’t mean you have to keep that layout. You can delete it or rearrange it and save the newly arranged one as an optional layout so that when you’re ready to write, you don’t have to waste time changing things around. Just select the layout you want for the project you’re working on and get writing. More on that later.
A short introduction to Scrivener’s layout capabilities
Please read this section with an open mind. I’m going to mention some possibilities, then I’ll show you how to simplify Scrivener until it suits your needs.
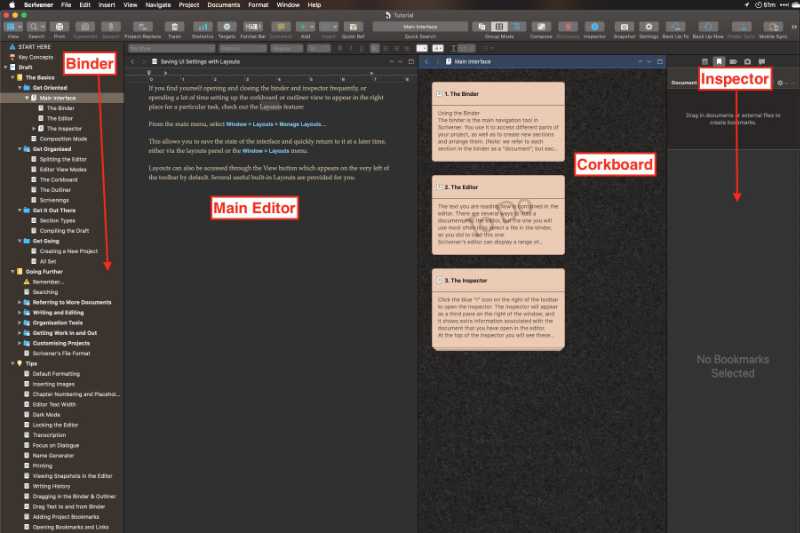
There are three main areas to the Scrivener workspace when the default layout is used.
Moving from left to right, first is the Binder, where you can see your book arranged by chapter and scene or almost any other way you wish to arrange your writing. This is also where you add new folders or text files for sections, chapters, beats, scenes, etc..
The Binder is one place where you can rearrange parts of your book by simply dragging that file up or down. For example if you write your book with each scene being a different text file, and you decide you want to move that scene to a different chapter, there’s no cutting and pasting required. Just click it with your mouse and drag it up or down to wherever you want to be.
Changed your mind? Just drag it back to its original location.
To the right of the Binder is the Document area. There are four display options for the Document area.
- Display the Editor where you would actually type your scenes, sections, etc..
- Open the Outliner if you are one who prefers to outline your work.
- Display the Corkboard view which allows a you to use digital 3 x 5 cards to organize and rearrange your thoughts.
- Split the Document area vertically or horizontally and show either the Editor, Corkboard, or Outliner in one half and one of the others in the other half.
The choice is yours and no particular arrangement is forced upon you.
Let’s say you’re making good time writing, but you want to be sure that you maintain continuity. Say you pause occasionally and take the time to locate and read over an earlier chapter or scene. You can save much of that time by splitting your window and displaying your current writing in one half and the earlier chapter or scene in the other.
Your earlier work is right there ready for you without you having to leave your current work and open the earlier one.
The third section in the default layout is the Inspector panel where you can keep notes, meta data, character info, photos and much more. The Inspector loads by default along the right edge of the screen.
The most basic Scrivener layout
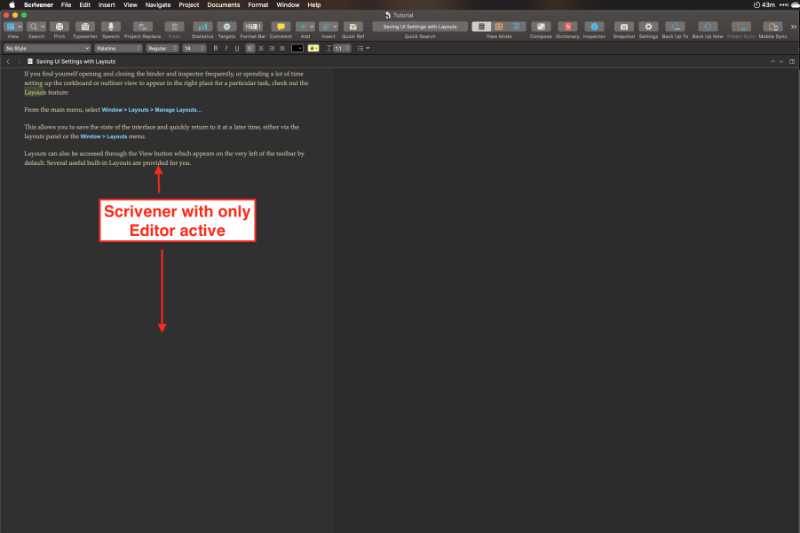
If you prefer a more uncluttered work area, you can lay out the work area in Scrivener with nothing more displaying than the editor panel.
I write mostly on my Mac computer. In fact, I am writing this very article in Scrivener on the Mac. I have saved different layouts for different purposes. For example, I have one for a fiction series I’m writing. That layout includes all I need to keep track of all the moving parts of those stories.
I have created another layout which I use for non-fiction that requires keeping track of a lot of research, website references, photos, etc..
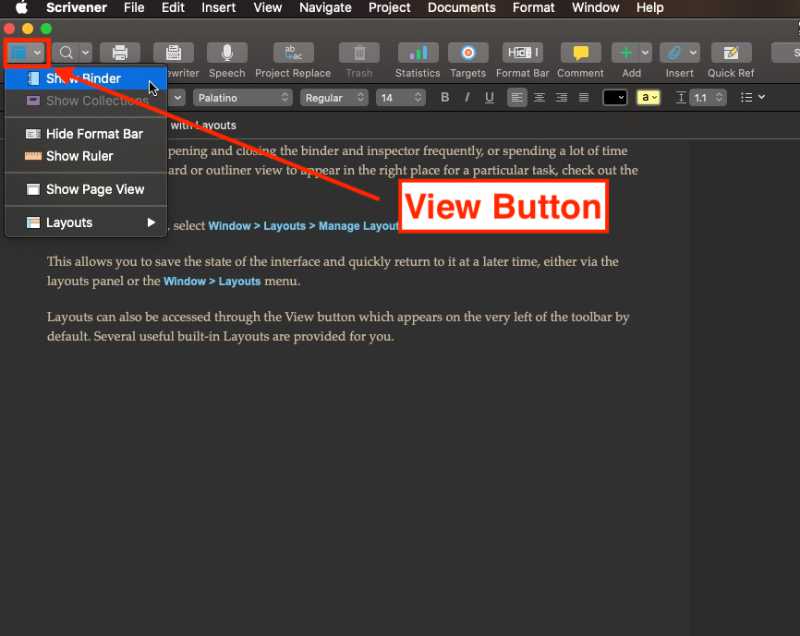
For work such as this article or those for The Techie Senior Tipsheet, I use a basic layout with just the Editor. I hide the Binder, but can easily bring it back into view by clicking the Blue View button in the toolbar (first button from the left) and select Show Binder.
I also hide the Inspector. I can bring it back into view by clicking the blue Inspector button.
Hide the unimportant sections in Scrivener
If you prefer to write with no onscreen distractions, you can use Composition Mode which basically is full screen mode displaying nothing but the editor. The top menus, Binder, etc. are still available if you need them, but they are not permanently displayed by default.
In Scrivener V3 for Macs, you can open Composition Mode using the keys Option + Command + F or from the View menu.
In Scrivener V3 for Windows, use F11 to open Composition Mode.
Scrivener for Mac also offers Full Screen Mode, which takes up the entire window. This is the one disparity between V3 for Macs and V3 for Windows that I mentioned earlier.
In Full Screen Mode, you can hide the Binder on the left, the Inspector on the right, and the toolbar across the top. With them hidden, you have very little in the window other than your work. You can even use the split window feature that I described earlier in Full Screen Mode.
You can open Full Screen Mode on Macs from the View menu, with the keyboard shortcut Command + Control + F, or F11. (You may need to hold the fn key at the same time.)
As mentioned earlier, in Scrivener V3 for Windows, F11 opens Composition Mode. Although Scrivener V3 for Windows doesn’t have a separate Full Screen Mode in its menu system like the Mac version, you can closely simulate the same effect as Mac’s full screen by turning off everything you don’t want to display and saving it as a layout.
We’ll look at layouts a little later in this article.
Saving your own Scrivener layout
If you have Scrivener installed and want to experiment with different layouts, go to the Window menu next to Help at the top, then down to Layouts. You’ll see a selection of layouts that come with Scrivener. Click on one and try it. Click on a different one. Compare the two. This is a great way to see what Layouts are.
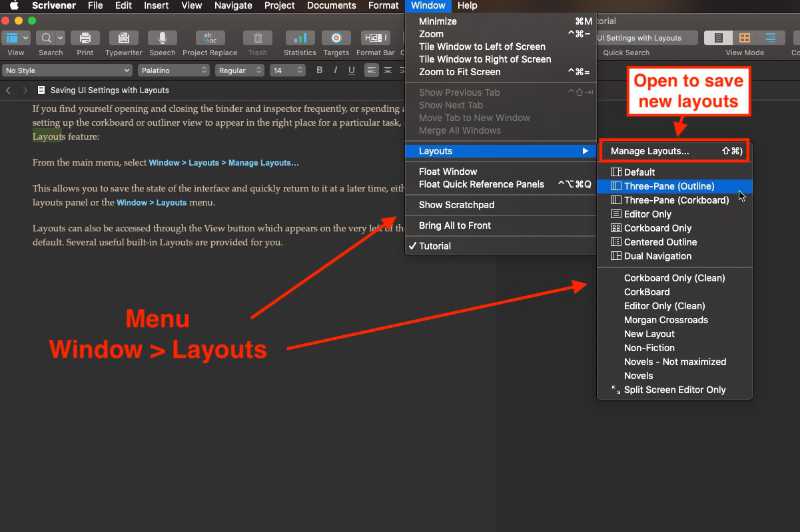
To manage your layouts, including creating and saving your own, go to Window in the top menu and mouse over Layouts. Another menu will slide out.
The first item on that menu is Manage Layouts. That’s where you can save new layouts, select a different one to use, or delete existing layouts.
If you began your day working in one particular layout and subsequently hid or otherwise rearranged things, you can save that arrangement as a new layout, then use it again anytime you need it.
To set up your own basic layout, I suggest you first open the default layout by clicking the View button, the first button on the left side of the toolbar. You may also choose it via the top menu at Windows > Layouts.
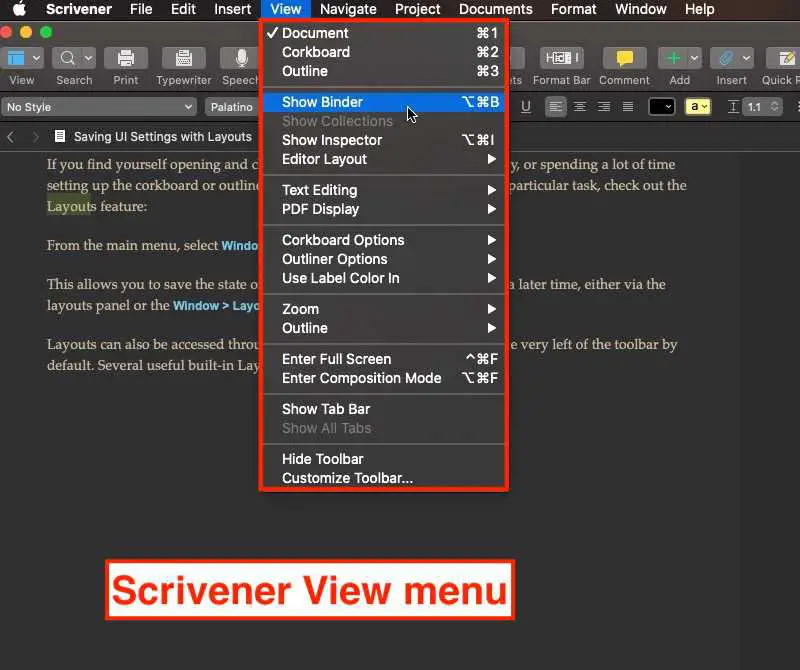
Now, if you want to hide the Binder (the navigation list on the left), use one of the following methods.
- Click the View button on the left end of the toolbar. Items on the list that are currently visible will say Hide Binder or Hide Format Bar, etc.. If the section that you wish to hide is visible, click it to hide it. The link will change from Hide to Show.
- Go to the top menu and select View, then look for the same Show or Hide items as you saw under the View button in the previously described method.
To show or hide the Inspector (the additional info panel on the right), use one of the following methods.
- Click the Inspector button on the toolbar. It is a blue button with a lower case i. If the Inspector is displayed, clicking the button will hide it. If it is hidden, the button will display it.
- Go to the top menu and select View, then look for Show Inspector or Hide Inspector, whichever one is appropriate in your case.
Once you have the window displaying only those parts that you wish to see, you can save that layout by going to the Window menu at the top, then Layouts.
From the Layouts sub-menu select Manage Layouts. Then, from the Layouts panel that opens, click the + icon in the lower left. Name your layout in the outlined box and hit enter to save it.
You will see your layout at the bottom of the existing list of layouts. You can use it at any time by clicking the View button then Layouts and select your new layout from the list.
Note that the View button only allows you to select existing layouts. You must use the Layouts > Manage Layouts panel under the Window menu to create new layouts or delete existing ones.
Find and explore Scrivener’s settings
I would advise anyone who wants to explore their options in customizing Scrivener exactly how they want it to take some time exploring the app’s settings. You can get there from the menu on a Mac at Scrivener > Preferences.
In Scrivener V3 for Windows you’ll find almost exactly the same settings under Options in the File menu.
Each tab in the settings/options panel has a list down the left side. Click on any of those items to explore the settings that are available for each of them.
Please don’t look at the large array of settings as something you have to learn and master before you can use Scrivener with any level of proficiency.
Don’t look at them as things you must do. Instead, look at them as exactly what they are – options that you can accept or ignore, options that help you make your copy of Scrivener your own.
Taking a few minutes to explore the settings is one way to familiarize yourself with Scrivener in a safe way. If you try a setting and don’t like the change that it made, just go back and undo the change you made.
Be careful with the backup settings and those that help you save your work. But most others won’t cause the earth to spin off its axis if you make a temporary change for testing purposes.
A final word about simplifying Scrivener
I’ve just shown you the most important step in making Scrivener useful and comfortable to you. Take a look at the layout options that are available to you. Then take a relaxed look at the settings that are available to you.
If you do it in a relaxed way, I bet you’ll sense that Scrivener just might be easier to use than you thought.
A note about this tutorial. All of our Scrivener tutorials are personally written based on our own experience with Scrivener. If you would enjoy more in-depth training, we recommend Joseph Michael’s Learn Scrivener Fast Course.
You’ll find more of our Scrivener articles here.
