If you need a little help coming up with character names, Scrivener’s Name Generator may be just the boost you need.
Table of Contents
Scrivener’s name generator – what it is
It can provide a long list of potential character names. Users can choose from the following nationalities and types of names, in addition to adding their own lists.
- Catalan (female, male, surnames)
- Finnish (female, male, surnames)
- Forenames (female, male)
- German (male)
- Hindi & Indian (female, male)
- Irish (female, male, surnames)
- Italian (female, male, surnames)
- Japanese (female, male, surnames)
- Literary surnames
- Polish (female, male, surnames)
- Popular British (female, male, surnames)
- Popular London (surnames)
- Popular US (female, male)
- Potential dictionary surnames
- Spanish (female, male, surnames)
The Scrivener Name Generator can mix and match names. For example, you could request a list of name suggestions with Italian forenames and Polish surnames.
How to use the name generator in Scrivener
The Name Generator in Scrivener works the same in Windows and Macs.
You can access the name generator by going to the Edit menu, then Writing Tools > Name Generator….
When the Name Generator opens, you’ll see a large blank area on the left and a number of settings on the right.
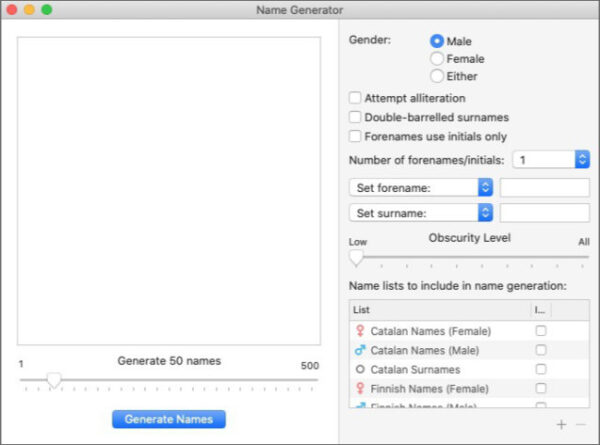
The generated names will fill the blank area on the left. First, you’ll adjust the settings on the right side according to your needs.
The first section labeled Gender will probably be set to Either if you’ve never opened the name generator. You can choose Either, Male, or Female.
If you’d like to experiment with alliterative names, you can check the box for Attempt alliteration.
You can choose to create double or hyphenated surnames by checking the box next to Double-barrelled surnames.
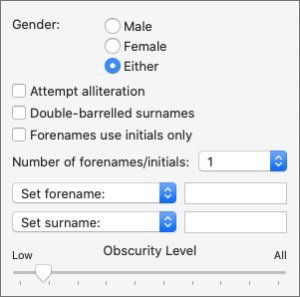
You might want to forego actually choosing forenames and use initials instead. You can have the Name Generator do that by ticking the box for Forenames use initials only.
I’d say it’s most common to see or hear two initials used in place of forenames, at least in the United States. Scrivener gives you the option to choose one, two, or three initials.
You select how many initials to use in the Number of forenames/initials: setting. Click the dropdown box and choose 1, 2, or 3.
If you have an idea how you would like to start a character’s name, you can tell Scrivener to use those letters when it generates names.
Just below the setting for forename initials, you see a dropdown box and a blank text box. By default, the dropdown box will say Set forename:. The text box will be empty.
Leave it as is if you want the forename and surname to come from the lists at the bottom.
If you want to choose the first name and have Scrivener present you a list of full names that begin with your chosen forename, keep the dropdown box set to Set forename:.
Later, when you click the Generate Names button, the large panel on the left will show name suggestions with your chosen first name and a generated last name.
If you click Set forename:, you’ll see three other options. They are:
- Forename starts with:
- Forename ends with:
- Forename contains:
Those choices do just what they suggest. To start the forename with one or more letters, select Forename starts with: and type the beginning character(s) in the empty box.
To end the forename with specific characters, select Forename ends with: and type the beginning character(s) in the box.
If you want the forename to contain a certain string of characters, select Forename contains: and fill in that string of characters.
You have exactly the same options for generating surnames. Use the same instructions, but in the Set Surname box.
You can use those forename and surname settings together or not at all.
You can determine (to an extent) how common or unusual the generated names are by setting the obscurity level which is just below the Set surname: setting. Move the slider toward the left for more common names. Move it toward the right for more unusual names.
Before you can generate a list of names, you must choose one or more name lists from the box in the bottom right.
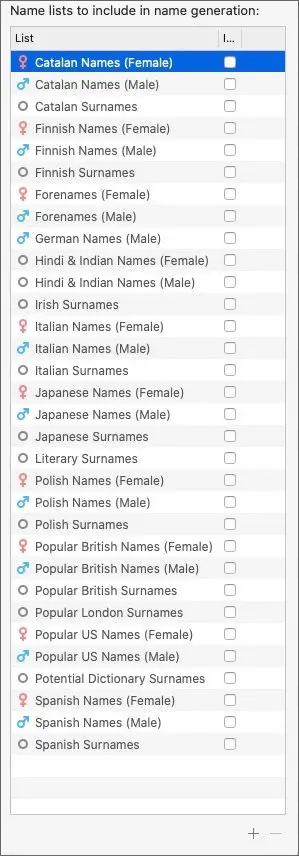
Specifically, you must select at least one surname list. A grey circle icon before the list indicates it is a surname list.
You must select at least one gender list that matches the Gender: selection you made at the top of the settings panel. If you selected Male or Female, you must select a male or female forename list, accordingly. If you select Either, you can select any forename list.
You cannot generate names until you select the list(s) to use as sources.
You can control how many names are generated by adjusting the slider just above the Generate Names button. Move it left for fewer names and right for more. You can request lists containing one to five hundred names.
Check one of more of the lists, then click the Generate Names button at the bottom left.
Deleting generated names
Once you have generated your list of potential names, you can copy all or part of them and paste them elsewhere.
You can also right-click a generated name to research it’s possible existence online.
However, for some reason you cannot delete names from the generated list except by generating a new list.
The names you’ve generated will carry over from one project to the next. If you want to keep the names you generated in one project for use later, I’d suggest you copy the names into a text file somewhere. Otherwise, if your next project requires a completely different assortment of character names, you will lose your existing list when you generate the list in the new project.
Note that when a list of generated names is replaced, the names are not removed from the names lists in the lower right corner. They are just removed from the collection of names that Scrivener generated for you.
How to add your own names list to the Scrivener Name Generator
Scrivener will allow you to add your own list of names that you created or acquired.
Your list should be saved as .csv (Comma Separated Values) file. You can create the list in a text editor by typing the names in a long line, each separated by a comma. If you create your list that way, you should save your file with the .csv file extension.
If you’d prefer to create your list in a slightly more visually organized way, you can do so in Microsoft Excel, LibreOffice Calc, OpenOffice Calc, Apple Numbers, Google Sheets, or any similar spreadsheet software. Just type your names in separate cells on one row. Save it as a .csv file.
Whichever method you use to create your list, make a note of its location on your computer.
To add the name list that you created or acquired, click the + symbol in the bottom right, below the name lists. A Finder window will open where you can browse to your list and open it.
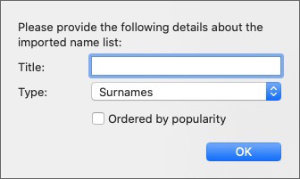
When you click the Open button in the Finder window, a small panel will open. In that panel, type a name for the list in the first box.
Next, in the dropbox, choose whether the list is one of Male forenames, Female forenames, or Surnames.
Check the box labeled Ordered by popularity if you have listed the names on your list from most to least popular. This allows the Obscurity slider that we mentioned earlier to work with your list.
How to delete your custom names list
You can delete the list that you created and added by clicking the – icon below the names lists in the bottom right corner.
If you need to correct a custom list that you added, you’ll delete the list first, then upload your corrected list.
Learn how to make Scrivener easier to use.
You’ll find official documentation for Scrivener here.
A note about this tutorial. All of our Scrivener tutorials are personally written based on our own experience with Scrivener. If you would enjoy more in-depth training, we recommend Joseph Michael’s Learn Scrivener Fast Course.
