It’s a common practice to use the Save As function in Windows and Mac apps to save work under different file extensions or types. On Windows computers the way to save files with different names, locations, or extensions is readily available in most software and practically second nature to most users. On Mac computers, however, Save As is available but hidden. Keep reading to learn how to Save as in Apple Pages. I’ll also show you how to use features that are similar to Save As.
Table of Contents
How to Save As in Apple Pages
If you’ve made the switch to Macs from Windows computers, you are probably accustomed to being able to change the name, the location, and sometimes the file extension using Save As.
Apple Pages also allows you to change the name and location for your file via the Save As… function. But changing to a different file format is done in other ways.
Before we go into the particulars of using Save vs Save As…, you should be aware that when you use Save on a current document Pages keeps revision history on that file. If you use Save As… instead, your revision history is not maintained. If it is important to you that your revision history stays in place, use Save and not Save As….
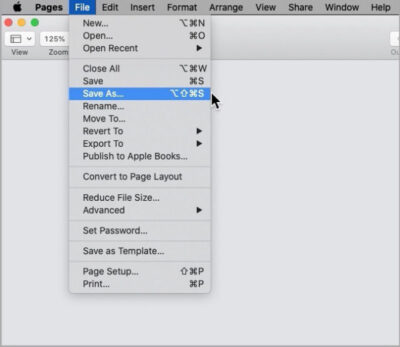
There are two primary ways to Save As in Apple Pages. When the file is first created, you use Save… from the File menu. In this one case, Save… (with the ellipsis) is the same as Save As…. A Finder panel opens where you can name your file and choose a place to store it.

After a file has been saved one time, if you go back to the File menu, you may not notice, but Save… has changed to Save (without the ellipsis). I’ll explain the difference shortly.
You can use the following methods if you need to save your Pages file under a different name or location.
Method one – Save As in Apple Pages
- Go to the File menu.
- Find Duplicate.

- Hold the Option key down. Duplicate changes to Save As…
- Click Save As…. A Finder panel will open.
- Name the file and choose a location to save it.
Method two – Save As in Apple Pages
- Click the file name at the top center of the Pages window. A small panel will open in the same location with two empty boxes and a dropdown list.
- Type your new file name in the top line.
- If you wish to tag your file, type a tag name in the second box.

- Click the drop-down at the bottom of the box to choose a location to save the file. Pages will display a list of recent locations.
- If you don’t want to save to any of those recent locations, click Other to open a Finder panel.
Note: In tests that I did in preparation for this article, I found that if you change the name and location when using the file name panel at the center top of the window, Pages treats it as Save As…. You will lose your revision history. If you change the file name and nothing else, Pages will treat it as Save. You will retain your revision history.
Method three – Save As in Apple Pages
You can also use the keyboard shortcut Command + Option + Shift + S to open the Finder panel where you can give your file a different name and/or location.
How to simply rename an Apple Pages file
You can use any of the following methods to rename an Apple Pages file. Revision history is maintained when you rename the file. If you go back and restore your file to a state that existed prior to the name change, you will see the contents of the file restored, but the new file name remains.
Method one – rename .pages files
Click the current name at the top center of the window. Type in your new file name.
NOTE: I mentioned this previously in the Save As… section, but I believe it’s important enough to repeat. If you change the file name and do not change the location of the file, you will retain your revision history. However, if you also change the location, you have done the same as using Save As… and your revision history will not carry over to the newly renamed and relocated file.

Method two – rename .pages files
You can use Rename… from the File menu, but in reality it does nothing more than highlight the same file name location that you used in method one. I’d suggest skipping the File menu and just click straight on the file name as instructed before.
Method three – rename .pages files
Like any other file, you can always locate your file in the Finder and rename it there.
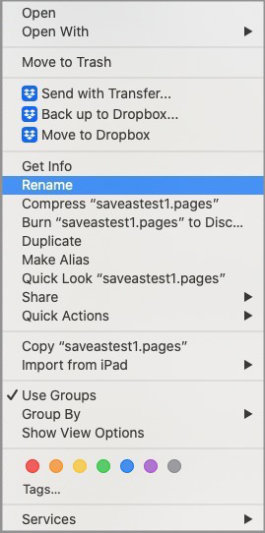
Just right-click the file name and select Rename. Type in your new file name.
When simply renaming your file, be sure not to delete or change the .pages extension.
How to duplicate Apple Pages files
Duplicating an Apple Pages file may seem the same as clicking Save, but it isn’t exactly. When you duplicate a file, revision tracking will start over with the current state of the duplicate file while leaving the original file and its revision history intact.
To duplicate a Pages file, use one of the follow methods.
Method one – duplicate .pages files
- Go to the File menu.
- Select Duplicate.
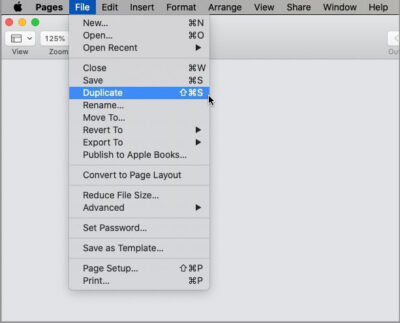
- You’ll see the original file name highlighted at the top of the document with the word copy added to the file name.
- Accept the current file location or choose a new one.
Method two – duplicate .pages files
You can also duplicate a Pages in Finder from the right-click context menu.
- Locate your file in Finder.
- Right-click the file name.
- Select Duplicate from the menu.
You should see a new Pages file in the same location as the original. It will have the same name with copy added to the end. This method doesn’t give you an option to select a new location for the file as the previous method did. But you can always move the file anywhere you wish just as you would any other file.
How to export Apple Pages files to different formats
If you want to convert your Pages file to a different file type, you can do so by exporting the file.
Pages will allow you to export your file to the following formats.
- Word
- EPUB
- Plain text
- Rich Text Format
- Pages ’09
To export your file to one of allowed formats, open your file in Pages.
- Go the File menu.
- Mouse over Export.
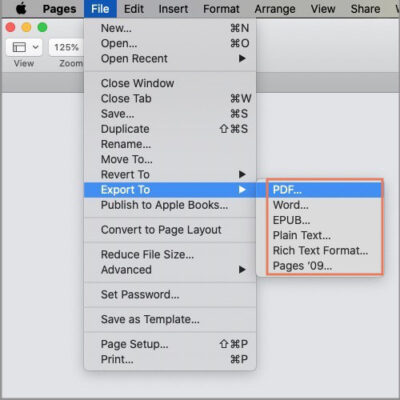
- Select the format you wish to export to.
- A panel will open that displays different options, depending on which format you chose.
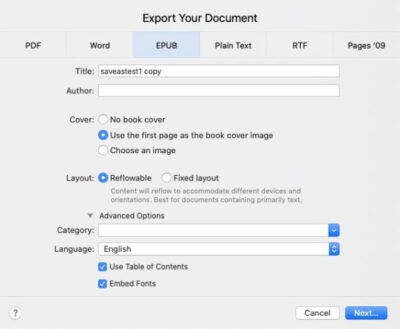
- Set the options as needed.
- Click the Next… button.
- Navigate to the location where you want to save your export file.
- Click the Export… button to send the new file to that location.
We have a separate guide for exporting from Apple Pages to PDF here.
Final notes
In Apple Pages Save, Save As, Duplicate, and Rename all do similar things. However, each of them is slightly different. Just remember to use Save if retaining revision history is important to you.
