Sometimes we need to rename one of our Scrivener projects but are afraid we could lose our work in the process. It’s very easy to rename a Scrivener project. In this article you’ll learn how to do it quickly in Scrivener v3 for Macs and Windows.
Table of Contents
Locate the project that is to be renamed
Before you proceed to change the name of a Scrivener project, be sure the project is not open on any computer.
You’ll need to know the exact name of your project and where it is stored because Scrivener projects cannot be renamed within Scrivener. Instead you’ll rename it in Finder (Mac) or File Explorer (Windows).
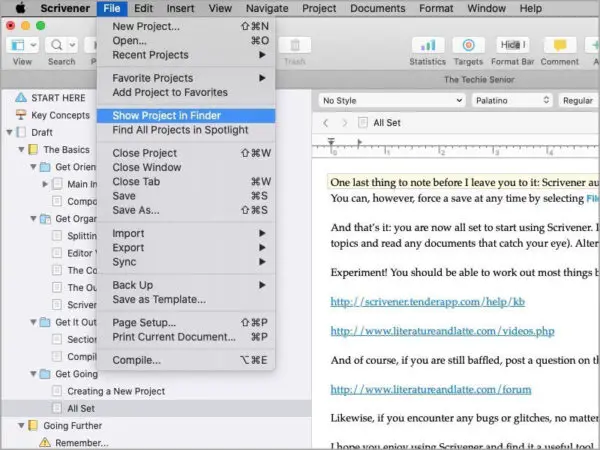
If you’ve been opening your project using File > Recent Projects for a while, it’s possible you’ve forgotten where the project is stored on your computer.
If that’s the case, open the File menu and select Show Project in Finder (Mac) or Show Project in File Explorer (Windows).
Change the name of your Scrivener project
If you know the name and location of your project, navigate to it.
In Windows, the project icon will look like a folder and will have .scriv added to its name.
In Scrivener for Macs, the project icon looks similar to a text icon with the Scrivener S in the center. It will also have .scriv appended to its name.
To rename the project, simply select the project without opening it. Right-click the project name and select Rename. Type your new project name.
It is very important that you do not remove .scriv from the project name.
Do not remove .scriv from the project name. Just rename the part that precedes .scriv.
What happens when I rename a Scrivener project?
It is possible for the meta title of the project to be different than the project name. For example, if your project is named book1.scriv, you could enter custom meta info in the Compile panel that gives the actual book title.
This is a handy way to remember which book you are working on—book1—but have the liberty to change the actual title of the book if you wish to.
Scrivener will keep track of your project and all of its parts. If, when you created the project, you did not create custom meta info (such as a custom title), Scrivener will use your project name as the meta title.
In my experience, if I customize the meta information in the Compile panel, that information will remain after the project is renamed in Finder or File Explorer.
However, if I’ve left the meta title information up to Scrivener based on the project name, I see that the meta title on the Compile panel is changed after the project is renamed.
Scrivener will update existing backup names as well.
As always, it is crucial that you keep your projects clearly named and organized.
Using Save As… to change Scrivener project names
It is possible to use Save As… as a means to rename a project. You can do that if you wish.
In my opinion, it is best not to use Save As… to rename a project unless you absolutely do not intend to continue updating the original project. That is because Save As… causes a new project to be created.
Any new work that is created in the new project is exclusive to that project and will not be shared with the original project. Likewise, no work done in the original project will be shared with the newly renamed project.
Having said that, there are times when it might be appropriate to do so. An example would be when you get to the point in your manuscript where the third act should begin and you decide you’d like to try two different versions of the third act.
As long as you do not change the first two acts, you could write the originally planned third act in the original project.
Then you could write the alternative third act in the project you created via Save As…. Acts one and two would be the same in both versions—provided they were both left unedited—but the third act would be different.
It would be up to you as the creator to keep the two separate. That’s just another example of the versatility that Scrivener offers.
You might also be interested in how to delete a Scrivener Project or how to share Scrivener files between computers.
Literature and Latte, the creators of Scrivener, make Scrivener users manuals available in PDF.
A note about this tutorial. All of our Scrivener tutorials are personally written based on our own experience with Scrivener. If you would enjoy more in-depth training, we recommend Joseph Michael’s Learn Scrivener Fast Course.
