In a perfect world we’d never get our Scrivener project files mixed up. They would all be clearly identifiable with descriptive names. But what if we created a new project for each rewrite of a book and now we find ourselves with a folder full of questionable or confusing projects? Then might be the time to delete a Scrivener project or two.
Table of Contents
Where’s the Scrivener project delete button?
With its complexity, you’d be forgiven for thinking there might be a button inside Scrivener that would allow you to instantly delete a project. Unfortunately, there is no such button.
Just as if you were working in Microsoft Word, LibreOffice Writer, etc., you can delete words, scenes, and more within Scrivener. But just as you can’t delete the Word or Writer file within the app, you cannot delete the project itself inside Scrivener.
How to delete a Scrivener project
To delete a Scrivener project, first be certain the project is not open in Scrivener. If the project might be open on a computer other than the one you use (such as a collaborator), be sure the project is also closed there before you delete it.
Since it is technically possible to have two projects of the same name stored in two different places on your computer, it is important to verify which project you want to keep and which you want to delete.
You’ll delete the project in Finder on Macs or in File Explorer in Windows.
Where is the Scrivener project stored on a computer?
When you create a new project in Scrivener, you are given the opportunity to choose where the project will be saved. After a period of time, it’s possible to forget exactly the location you chose in the beginning. It’s easy to find where the file in located, though. We’ll look at two ways to locate a Scrivener project.
Locate the project on your computer
If the project you wish to delete is currently open in Scrivener, go to the File menu, then select Show Project in Finder (Macs) or Show Project in File Explorer (Windows).
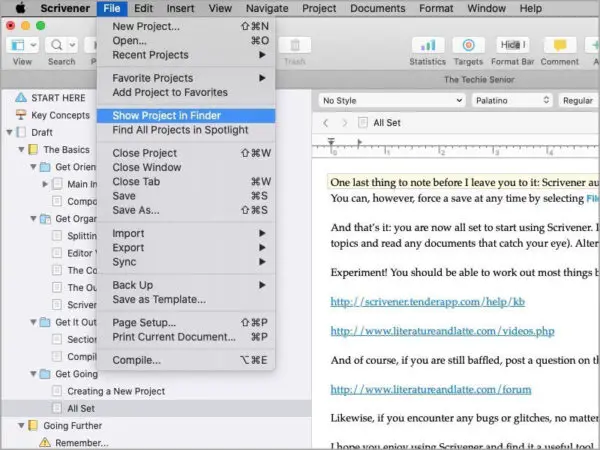
On a Mac computer you’ll see the entire path to your currently open project in the bottom bar of Finder, just below the list of projects.
On a Windows computer you’ll find the path to your currently open project at the top of the File Explorer window.
On Macs, the project will have a package icon that looks similar to a text file icon. In Windows the project will have a folder icon. The project name will end with a .scriv extension on Windows and Mac. Make a note of the entire path to the file. You will need that information later.
Close the project in Scrivener.
Do not delete a Scrivener project that is currently open on any computer.
To find a project that is not currently open, you’ll need to search for it in Finder on Macs or File Explorer on Windows computers.
If you know the exact full name of the project, such as myproject.scriv, you can type that name into the search bar.
If you can’t remember the exact name of the project you can do a wildcard search for it by typing *.scriv into the search bar in Finder or File Explorer.
That should bring up a list of all Scrivener projects that are stored on your computer, attached external drives, and cloud storage such as iCloud or services like Dropbox and Google Drive if you have their helper app installed.
Delete a Scrivener project
If you followed the instructions for finding the location of a currently open project, open Finder or File Explorer and follow the path you wrote down. Otherwise, follow the instructions above for searching for the project in Finder or File Explorer.
When you locate the .scriv, right-click it and select Move to Trash (Mac) or Delete (Windows).
Your project will be deleted.
If you suddenly realize that you deleted the wrong Scrivener project, you should be able to find it in the Trash (Mac) or Recycle Bin (Windows).
On a Mac, right-click and choose Put Back or drag the file out of the trash.
On a Windows computer, drag the file out of the Recycle bin.
Deleting Scrivener project backups
You may also have a backup of the project. For better protection of your work, the backup should not be stored in the same location as the main Scrivener project.
To locate the backup of your project:
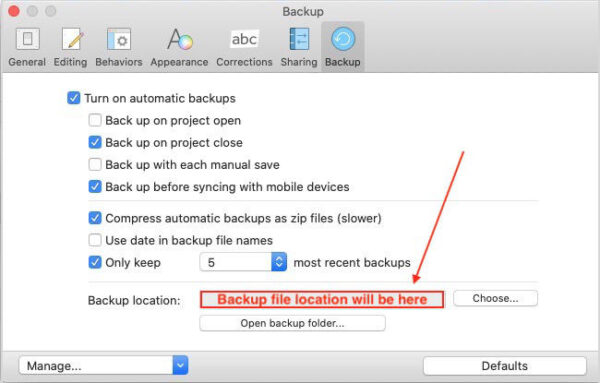
- In Scrivener v3, go to Scrivener > Preferences (Mac) or File > Options (Windows).
- Open the Backup tab.
- Near the bottom of the panel find Backup Location.
- You can click in the box to see the path to the backup. Below that box you can also click the button labeled Open Backup Folder.
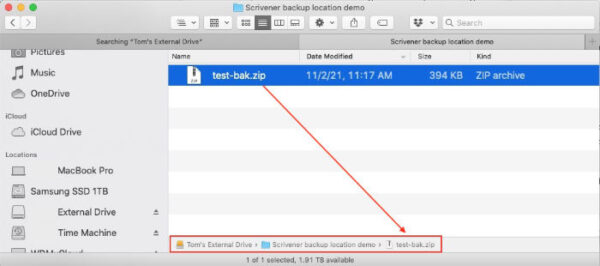
Finder or File Explorer should open to the location of your backups. Scrivener backup files will have -bak and possibly a number appended to the file name and will end with .zip similar to this: myscrivenerproject-bak.zip.
If you do not wish to keep the backup of the project (*.scriv) that you deleted earlier, you can locate that project backup file here and right-click to Move to Trash (Mac) or Delete (Windows).
Clear the recently opened files list in Scrivener
The project you deleted will still show in your recently opened projects list under the File menu. If you work on several different projects, the deleted project should soon fall off the Recent Projects list as you open and close other projects.
If you find that it does not fall off the list, you can go to the File menu, select Recent Projects, and at the bottom of the list, click Clear menu.
The Recent Projects list will rebuild itself as you open projects going forward.
If the Scrivener project that you deleted has also been formatted in Vellum for Macs, you may be considering deleting your book in Vellum.
You might also be interested in how to move your work from Scrivener to Word.
You can find more Scrivener information in the creator’s knowledge base.
A note about this tutorial. All of our Scrivener tutorials are personally written based on our own experience with Scrivener. If you would enjoy more in-depth training, we recommend Joseph Michael’s Learn Scrivener Fast Course.

