You can make bigger text in Microsoft Word but why would you want to? MS Word normally opens with the default font set at 11 or 12pt. This is fine on computers with lower resolution displays. However, because manufacturers are continually pressing toward ways to make websites and anything else on a computer display crisper and sharper, screen resolutions have increased over past decade.
Table of Contents
Generally, the higher the screen resolution is for a particular display or monitor, the smaller the text will appear. This is true for text on most websites, documents written in software such as Microsoft Word, and apps that allow us to read digital books or presentations in PDF.
You may wish to format your documents with larger fonts if your work is to read by older people or anyone with sight challenges. If you are an older person whose eyesight isn’t what it used to be, or if you are a person of any age with vision issues, then you may need to increase the font size in your documents.
We’ll look at two scenarios and show you how to adjust your font size accordingly.
Note: These instructions are based on Microsoft 365 Word, but should be similar in the past several versions.
Here is an easy way to increase the font size of a word or any size selection of text in MS Word.
You must first select the text that you wish to format. Click your mouse or trackpad just before the first word you want to format. Hold the shift key down and click at the end of the last word for which you want to increase the font. Your selection should become highlighted.
If you prefer, you can also select text by clicking and dragging your mouse or trackpad to include every consecutive word until all of your desired selection is highlighted.
You may need to change the font in an entire document. If so, the fastest way is to use Command + A on a Mac or Control + A in Windows to select the entire contents.
How to make bigger text in Microsoft Word
Using the instructions above, select the text that needs the font enlarged. Your selection can be anything from a single letter to the entire document.
A universal way to make text larger or smaller on computers.
This method is not specific to Microsoft Word or any other app. It works in Windows and on Macs.
After you’ve selected the portion of your document where you want to increase the font size:
- Hold the Control + Shift keys on Windows or Command + Shift keys on Macs.
- While holding those keys down, tap the > key to enlarge the text in your selection.
- Also while holding those keys down, tap the < key to reduce the font size in your selection.
This key combination works in most software apps on Windows and Macs. Now, on to methods that are specific to Microsoft Word.
The simplest method to make text larger in Microsoft Word using the ribbon:
- Click the home tab to view your desired settings in the ribbon.
- Open the Home tab in the ribbon area and look for the text management area of the ribbon.
- Look for a drop-down box for font selection and a number of other controls to bold, italicize, and underline text.
- Just to the right of that box is another small drop down box that will either have a number showing your current text size or will be blank if your selected text already contains text with more than one size.
- Click the box and choose the font size that you desire. The larger the number, the larger the letters will be.
Enlarging text in Microsoft Word using the right-click context menu.
You may also use the context menu which is accessed by right-clicking on your selected text.
- Right click the text and select Font… from the menu. Clicking Font… opens the same box you previously saw in the instructions for bolding, italicizing, and underlining.
- The first box in the first row of controls allows you to change the font.
- Use the third box in the first row to change the size of your selected text. As with the method using the ribbon controls, the font size box will either have a number displaying the current font size or will be blank if your selection already contains text of more than one size. Select the font size that already displays and type in your preferred size, or if the box is blank, just place your cursor inside the blank box and type in your chosen text size.
How to make a font bigger than 72 in Microsoft Word.
There are times you might need a very large font size. That could happen if you are designing a poster or something similar that requires some of the words to be printed in large letters.
At first glance it seems that MS Word does not allow font sizes larger than 72pt. That is a rather large letter size, but often not large enough for banners on posters, etc..
There is good news, though. It’s not obvious at first glance, but it is possible and very easy to set your font sizes larger than 72pt in Microsoft Word. Here’s a very simple way to do that.
In the previous section you learned how to increase the size of your text.
- To set your text larger than 72pt, just follow the previous instruction, then, instead of clicking on the drop-down box to choose a font size, just select the current font size that displays in the drop-down and type in your preferred size.
- If the box is empty (because your selection contains more than one font size), just locate your cursor in the box and type in your preferred size.
Microsoft Word will accept any font size up to 1638.
A 1638 font size is much too large for a standard sheet of paper. However, it is available if your printing equipment is able to handle that size font.
How to change the default font in Microsoft Word
In most cases the default font choice in Microsoft Word is Calibri. This means any time you open a standard document template in Microsoft Word and begin typing, you’ll be using Calibri. You may want a different font for your default choice.
You’ve seen how to change the font on a per selection or per document basis. In the following instructions, you’ll learn how to change the font for all future documents.
There is no need to select text or have a certain document open. Just open a blank document in MS Word, then do the following.
To change the default font in Microsoft Word for Windows:
Open the Home tab of the ribbon.
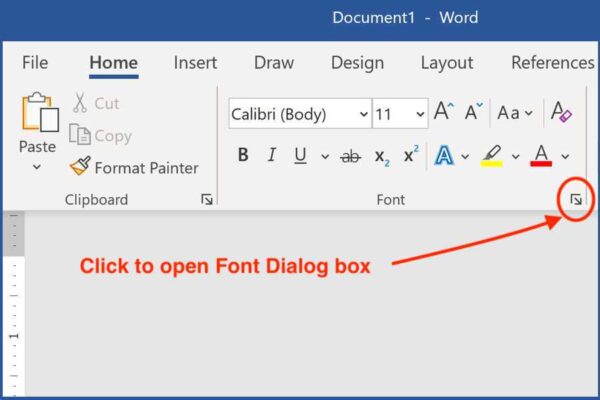
- Open the font settings dialog box by clicking the very small arrow/corner icon in the lower right corner of the font control section of the ribbon.
- Make your font selection from the drop-down selection.
- In the lower left corner, click the Set As Default button.
- Select whether you wish to make the change for this document only or for all future documents. You’ll want to select for all future documents if you want to have the settings you chose automatically whenever you begin a new document.
There are two ways to get to the Font box:
- 1) From the Format menu at the top of Microsoft Word, choose Font… or,
- 2) Right-click anywhere in the document and choose Font… from the context menu.
- Be sure the Font tab at the top is chosen.
- Select the font you wish to be default in future documents.
- Select the Default… button in the lower left corner.
You’ll be given the choice of changing the font for the existing document only, or for all documents that use the normal template. The second option will cause all future documents to open with your newly chosen font as the default.
In Microsoft Word for Mac or Windows, you can also change your default font size at the same time if you wish.
Make text bigger on screen but not in print
If you are working in MS Word and need to make the text on your computer screen easier to read without changing it in the printable version, you can easily do that using Word’s Zoom feature.
Zooming into a document makes the entire document, including the text, larger.
There are two ways to zoom into a document in Word.
- In the lower right corner of the screen, there is a slider with a – and + at the ends. Drag that slider toward the left to reduce the document size and right to increase it.
- In the ribbon, open the View tab. Click on Zoom. You will have the option of setting the zoom to several percentage points – 75, 100, 125, 150, and 200. You can set to a specific percentage by typing a number into the small box. You can also set it so the entire document fills the window vertically or horizontally (Page width or Whole page).
Note: These instructions are based on Microsoft 365 Word, but should be similar in the past several versions.
You’ll find more Microsoft Word hints here.
Try the Microsoft Quick Start Guide for the Web version of Word.
