Inserting images in Scrivener is easy, but users should be aware of the technical differences in the methods before adding images in their Scrivener projects. In this article we’ll look at three ways to insert images in Scrivener and what makes each method useful in different situations.
Table of Contents
Inserting Images in Scrivener – First Things First
The first thing to consider when inserting images into Scrivener projects is what Scrivener’s purpose is and what it is not.
Scrivener was designed to help writers become better organized and more efficient. It can help writers manage their research, beats, characters, and more.
Some writers expect Scrivener to behave as an end-to-end WYSIWYG (what you see is what you get) writing and layout tool. It is not. It is an incredible tool writers can use to manage their writing projects. But it is not a proficient layout tool— WYSIWYG or otherwise.
To be fair, Scrivener is capable of exporting passable eBook files which are usually fine for uploading to sales outlets. It can export basic PDF print files which can work for your paperback copies if you don’t require extensive interior design work. Both types of files can have minimal graphics inserted such as small pieces of art on chapter pages, etc..
If you expect Scrivener to wrap text around images within a paragraph, you’ll be disappointed. As of this writing, Scrivener cannot do that. Images within text files can only be inserted between paragraphs. I doubt that will change any time soon.
Writers who have their hearts set on seeing their finished books sporting elaborate layouts with unusual graphic elements and other flourishes should look to layout software such as Adobe InDesign or Affinity Publisher (a great piece of software at a great price, by the way).
Vellum can be a great choice as well. And it’s very easy to learn and use.
Layout design apps allow their users to design books and other printed matter just about any way they can imagine. Such apps have their own learning curves, but helping users create artistic graphic layouts for documents is their purpose.
You may write books that require a lot of photos. If so, you can definitely insert those photos in Scrivener so you’ll have them in the right place within your manuscript. You just won’t be able to be very creative with their placement, especially in any artistic way.
Let’s see how to insert images in your Scrivener project.
How to Insert Images in Scrivener
We’ll look at three ways to insert photos in your Scrivener project. Visually, the end result is the same, but there are differences in the methods that may cause you to prefer one over the others.
Insert Image From File…
If you use this method, your images will be immediately embedded in the page. Start by clicking in the document where you want the image to appear.
Drag an image from your computer into the document, or:
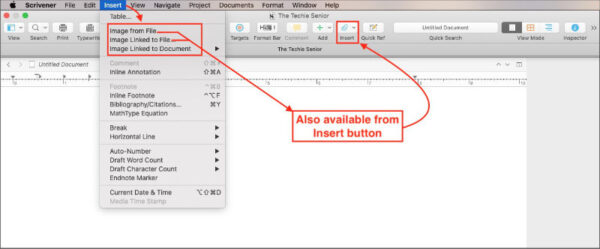
- Go to the Insert menu
- Click Image from File…
- Locate your desired image
Your image should appear between two paragraphs. Remember, you cannot insert images in the middle of a block of text such as inside a paragraph.
Insert Image Linked to File…
One of the best reasons for using externally linked images is the fact that doing so can greatly reduce the size of your Scrivener project file. Since you’re linking to a file, rather than embedding it, it does not significantly add to the size of your project file until you compile your project. At that point, Scrivener will embed all of your linked images into your final compiled document.
This method is useful if the image you are inserting is used in more than one place within your document. It can also come in handy if your project is a work in progress and you think you might need to update it before you export the final version.
The image will be visible in your document wherever you insert it. You can edit the image or even change it entirely. So long as you don’t change the file name or the file path to the image, your document will display the current version.
To insert an image using this method:
- Click in your document where you want the image to appear.
- From the Insert menu, select Image Linked to File…
- Locate your image.
The image will be inserted into your document.
Insert Image Linked to File… and Insert Image From File… are also available using the Insert button in the toolbar.
Insert Image Linked to Document…
This method is similar to the previous one. You could use an image linked either to a file or to a document when your project has the same image repeated often. Perhaps you have an image that you want inserted on the first page of each chapter.
ou could use either method for inserting the image and accomplish the same thing. Both could be updated.
The main difference is that when you insert an image linked to a file, the file can be located anywhere that your computer has access to. It can be on your hard drive or stored in the cloud.
Linking to an image stored in the cloud would make it possible for someone to work on the image without access to your computer. Whatever changes your graphic artist makes to image on the cloud server, would show in your project the next time you open it in Scrivener.
Not so when linking to a document. It might be confusing at first thought, but in this instance, Scrivener appears to see images as documents.
When you insert an image linked to a document, in reality, you’re linking to an image that is stored within your current Scrivener project. Your project is the document you’re linking to.
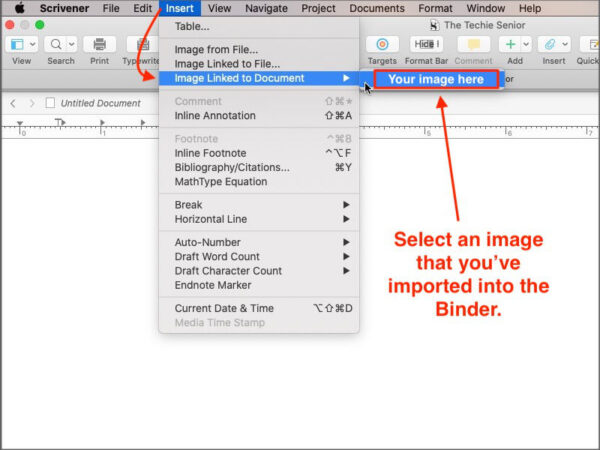
To insert an image linked to a document:
- Click in your document where you want the image to appear.
- From the Insert menu, select Image Linked to Document…
- Locate your image.
You should see your chosen image right where you want it.
NOTE: It is technically possible to have someone work on an image that is stored in your project if the work files are stored in Dropbox or some other cloud service. But I would advise against that arrangement.
It is never a good idea to have a Scrivener project open on more than one device at the same time. That could possibly happen if you were in Seattle writing your book, your artist was in Atlanta, and both of you attempted to have the project file open simultaneously.
Importing images into Scrivener’s Binder
By default, Scrivener imports images into the Research folder. You can insert a new folder anywhere outside the Draft folder and import your images into that folder.
For example, you could create a new folder inside the Research folder, name it Images, then import your images into that folder.
To import images in Scrivener’s Binder:
- Click on your new Images folder. Go to File menu > Import > Files….
- Browse to the image you want to import.
- Click the Import button
You’ll find your image safely stored in the new folder you created.
Now, when you want to insert that image in your project:
- Click where you want the image to be.
- Go to the Insert menu.
- Select Insert Image Linked to Document….
- Select the image you wish to insert.
As with the other methods, you should see your image placed in your project. If you don’t go back and be sure your image is in the folder you chose to insert from.
Compiling Scrivener Projects With Linked Images
The Compile process should not be complicated by any of the methods we’ve discussed. If you chose to use linked images, when you compile your project Scrivener will embed the images wherever you’ve inserted them. They will no longer be linked to your project or to outside locations.
If you need help getting started with Scrivener, you might enjoy our article How To Make Scrivener Easier for New Users.
A note about this tutorial. All of our Scrivener tutorials are personally written based on our own experience with Scrivener. If you would enjoy more in-depth training, we recommend Joseph Michael’s Learn Scrivener Fast Course.

