Borders can be helpful in making your document pages more visually appealing. I’ll show you how to insert a border in Word.
Table of Contents
The screenshots used in this tutorial are from Microsoft Word for Macs. The same settings are available in Word for Windows.
Insert a border around a Word document
To insert a border around the page, open the Design tab. Click the Page Border button. You’ll find it toward the right end of the ribbon.
In the Borders and Shading panel that opens, be sure the Page Border tab is selected.
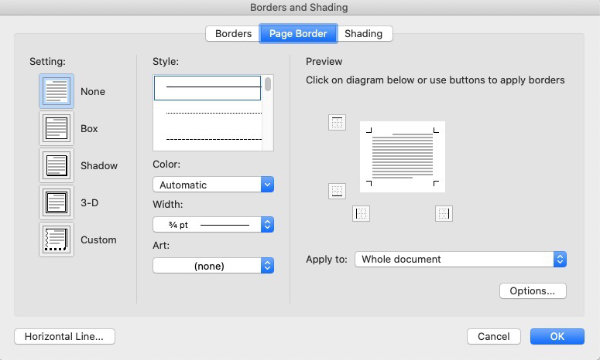
In the Setting column, select the type of border you’d like. There are five choices:
- None – disables borders
- Boxed – simple line borders
- Shadow – places simulated shadow on the right side and bottom
- 3-D – borders that may have a slight three dimensional appearance, depending on the line style you choose
- Custom – lets you create borders on less than all four sides. Useful if you only want borders on the sides, for example.
In the center column there are four sections.
- Style lets you select from a variety of line styles such as solid, dotted, dashed, multiple lines, etc.
- Color allows you to set any color you wish for the border.
- Width adjusts how heavy the border line is.
- Art allows you to choose from a variety of art shapes to use in place of lines.
Using the border preview settings
The third column contains the settings that tell Word which sides of the document you want borders to appear.
The first section is labeled Preview. You’ll see a box with horizontal lines representing text. On the left of that box there are small buttons at the top and bottom corners. Click the top button to apply a border to the top. Click the bottom to apply a border to the bottom.
Likewise, there are two buttons at the bottom of the Preview box. Click the left one to add a left border. Click the right button to add a right side border.
You will notice that the Preview will show borders on all four sides if Boxed, Shadow, or 3-D is selected in the first column. Clicking the buttons around the Preview in the third column will automatically change the setting in column one to Custom.
Below the Preview box in the third column, you will find a setting labeled Apply to. There are four choices available.
- Whole document – applies your chosen border to each page of the document.
- This Section – If your document contains multiple section, This Section applies borders to pages in the current section of your document.
- This section – First page only – applies borders to just the first page of the current section.
- This section – All except first page – applies borders to all pages in the current section except the first page.
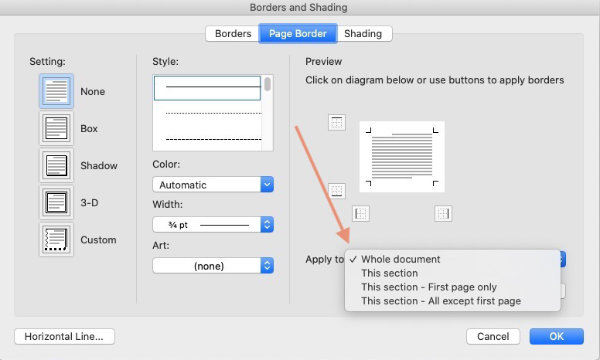
Note that if your document contains only one section, the settings above will apply to the entire document. That is because in Word, the entire document is treated as one section unless it has been divided into multiple smaller sections.
Control the border’s distance from page edge
Below the Apply to setting, there is a button labeled Options.
The top section of the Options panel lets you set the width of the margins. You can set them so that they are measured outside the border from the edge of the page. You can also set them so they are measured inside the border from the text.
There are four settings for top, bottom, left, and right. In each of those, you would type in the number of points (pts). The higher the number, the larger the margin. You can also use the arrows within each setting to increase or decrease the size of the margin.
Just below those settings, there is a setting labeled Measure from.
- Choose Text to set the distance between your text and the border.
- Choose Edge of page to set the distance from the edge of your page to your border.
In most cases, I believe you get better results measuring from the edge of the page.
The second section is labeled Options. The settings that are available depend on whether you chose Text or Edge of Page. With either one, you can set the distance between the border and text or edge of page from 0 to 31 points.
If you choose Edge of Page, your only available setting will be Always display in front. This setting tells Word to have the border in front of the text if the distance between the border and the edge of the page is greater than the page margin.
Unless you’ve applied a different margin to a specific paragraph, the text will obey the general margin setting that you’ve applied to the document.
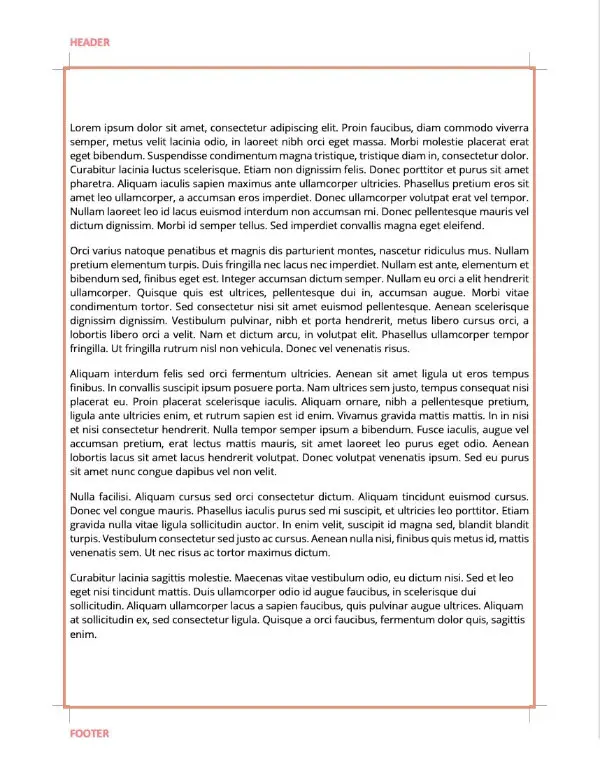
In most cases, you will want to set your border distance from the edge so that the border is somewhere inside the page margin.
If you choose to measure your border distance from the text, three more options will become available. They are:
- Align paragraph borders and table edges with page border – keeps borders outside the text.
- Surround header – causes the header to be inside the document border. Uncheck to exclude the header.
- Surround footer – causes the footer to be inside the document border. Uncheck to exclude the footer.
- Always display in front – Keeps the border in front of the text.
When you’ve selected all of your settings, click the OK button to close the Options panel.
Click the next OK button to activate your settings.
You can also place borders around text boxes, images, shapes, and more.
