Most people who write have an occasional need to find and replace words in their documents. A single page document in Word or a similar app would be easy to search. It can be a bit more complex when you need to find and replace in Scrivener, where you might be searching across dozens of scenes or chapters, each one contained in a folder or text document.
Table of Contents
In this article, I’ll show you how to easily search and replace in Scrivener.
How to find and replace in Scrivener
As with many tasks in Scrivener, there are multiple ways to search. We’ll look at the methods that I believe are most useful overall. These instructions apply to Scrivener version 3 on Windows and Macs. First we’ll look at doing a simple search without replacing the word.
How to search without replacing in Scrivener
Sometimes we just want to search for a word and won’t need to replace it. For example, when we’re writing a document like a novel, we may just need to remind ourselves what happened when a particular character was present in a scene many pages back. In that case, we’re just using the character’s name as a locatable marker to remind ourselves what happened at that place in the story.
To find a word in a single document within a Scrivener project, first be sure the single document (scene, chapter, etc.) you wish to search is open. With it open, the simplest method is to click the Search button in the toolbar. *If the Search button is not visible in your toolbar, right-click the toolbar. Locate the Search button and drag it down to the sample toolbar near the bottom of the toolbar settings window.
The Search button is a split, or two-part, button. If you click the left side with the magnifying glass icon, the Binder will open with a search bar at the top. You can select a single document or multiple documents to search.
To search a single document, click the document and type your search term in the box across the top of the Binder. To search multiple documents, select one, then while holding the Control key on Windows or the Command on Macs, select the other documents that you wish to include in the search.
If instead of clicking the left side of the Search button, you click the down arrow on the right side, you can select Search in Project to open the same search facility as the magnifying glass icon – the Binder with a search bar at the top.
How to find and replace in a single Scrivener document
To find and replace in a single Scrivener document, you can use any of the following methods to open the search panel.
- Using the Search button in the toolbar, click the down arrow on the right side of the button. From the menu that appears, click Search in Document.
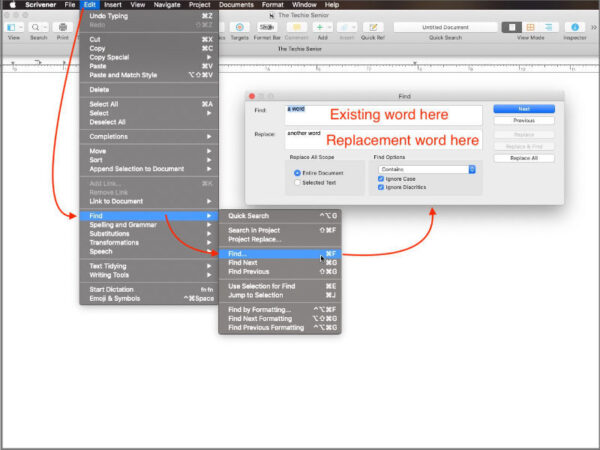
- Go to the Edit menu at the top. From the Edit menu, select Find, then Find…. (Edit > Find > Find…).
- Use Control + F on Windows or Command + F on Macs.
The same search panel opens with any of those methods. In that panel, type the word you wish to find in the top box, then use the Next and Previous buttons to move through the document. Below the boxes where you place the search terms, you’ll see settings that allow you to search the entire open document or a selected section of text within that document.
Use find and replace in single documents or the entire project.
In the section labeled Find Options you’ll see ways to narrow your search.
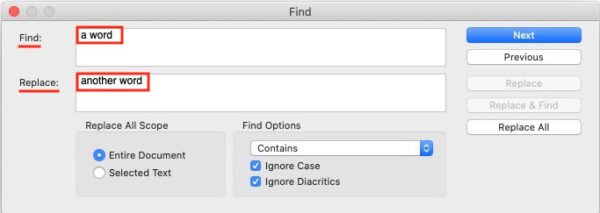
Type the word you want to replace in the top box and the word you wish to be the replacement in the bottom box.
On the right side of the search panel, you’ll see buttons that allow you to navigate through the search results. You can click the Replace All button to instantly find the original word and replace it with the new one. You can also use the Next and Previous buttons to navigate to each original word individually. This allows you to be sure you really want to make the change in each particular case, to replace some and not others.
How to find and replace in an entire Scrivener project
There are times when you need to find and replace a word throughout an entire project. Maybe you used the word just once. Or perhaps you used it many times.
An example of when the word might have been used many times would be the name of a character or town in a novel. Perhaps you named a character John, then eighteen chapters into the book, you decide Jon would fit that character better. You might use the find and replace options to replace John with Jon.
Another example would be when you give the small town in your book a name, then discover that another author has already used that name for a town in several of her books.
In both cases, you’d want to use the Project Replace… feature. To open the Project Replace panel, use your choice of the following methods.
- In the top menu click Edit > Find > Project Replace….
- Click the down arrow on the toolbar Search button. Select Project Replace….
The top half of the search panel contains two boxes. In the top one, labeled Replace, you type the existing word or phrase that you want to replace. In the second one, labeled With, you should type the new word or phrase you wish to use.
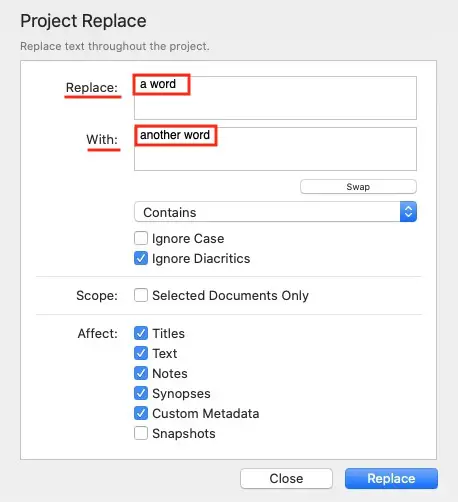
If you accidentally type the words in the wrong boxes—you input them backward, click the button labeled Swap to swap the terms without having to retype them.
You should also see a dropdown box that probably says Contains if this is the first time you’ve used this feature. If you click that dropdown box, you’ll see Contains with a check mark beside it and four more choices:
- Starts with
- Whole word
- Ends with
- Regular Expression (RegEx).
Choose any of those to further narrow your search.
You can tick the boxes Ignore Case and Ignore Diacritics if you wish. With Ignore Case checked, both john and John would be found. With Ignore Case unchecked, a search for john (with a lower case j) would not find John (with an upper case J).
In the Scope section of the Project Replace panel you can check the box beside Selected Documents Only if you wish to search only certain documents and you first select those documents in the Binder. If you leave that box unchecked, Scrivener will search the entire project.
In the Affect section, you’ll see a list of items that can be included or excluded during the search. Check them to include them in the search. Uncheck them to exclude them. Those items are:
- Titles
- Text
- Notes
- Synopses
- Custom Metadata
- Snapshots
At the bottom of the panel you’ll see a button to close the panel without searching. Click Replace to follow through and complete your search and replace.
We have more Scrivener tutorials here.
You can find more documentation about Scrivener at LiteratureAndLatte.com
A note about this tutorial. All of our Scrivener tutorials are personally written based on our own experience with Scrivener. If you would enjoy more in-depth training, we recommend Joseph Michael’s Learn Scrivener Fast Course.
