People who are new to Microsoft Word may not know that they can add pictures to Word documents. Whether it’s graphics for event posters, brochures, or photos of the grandkids, Word makes it easy to add photos.
Table of Contents
In this article I’ll show you how to add photos using the ribbon in MS Word.
How to add pictures to Word Documents
To insert a photo into your Microsoft Word document, go to the Ribbon and select the Insert tab. The first section from the left is for inserting pages, the second is for inserting tables, and the third is for inserting art. This is where you’ll find the button to insert pictures. (On Macs, you can also select Pictures… from the Insert menu at the top of the window.)

Click the Pictures... button and you’ll be given three or four options, depending whether you are using Word for Windows or Word for Macs. Both have these choices:
- This Device… (Windows) or Picture from File… (Mac) Select this option to insert an image that you already have on your computer. A Windows Explorer or Mac Finder window will open that will allow you to locate and insert your photo.
- Stock Images… Select this option to insert a stock image that Microsoft has arranged for you to use. The images are searchable and can include photos, icons, stickers, and more.
- Online Pictures… Select this option to insert an image from a website on the Internet. They include Wikimedia, free stock photo providers and more. See “Something to Consider” later in this article for more information about these photos.
On Mac computers you have a fourth option called Photo Browser…. It is actually the first in the list when you click the Insert Picture button on a Mac. When I use that option, it opens a small display window where I can choose images from my iCloud photos.
Dressing up your images
Once you’ve inserted your pictures, you can move them around and change their sizes. Move them by clicking and dragging the image. You can move them around on a page or drag them to another page. Large images will normally display singly. Smaller images can be inserted side by side, have text wrapped around them, etc..
You can resize them by clicking on one of the small square handles that are on each corner, the center of each side, and the center of the top and bottom.
If you click one of the corner handles and drag inward directly toward the opposite corner, the image should resize but keep its proportions. It should look correct at any size that will work in a Word document (up to the original size of the image). I’ve found that occasionally the resize won’t maintain its proportions. In those cases, it’s usually because I did not drag in quite the optimal direction. You can move the corner up, down, or side to side or use the side handles to correct the problem.
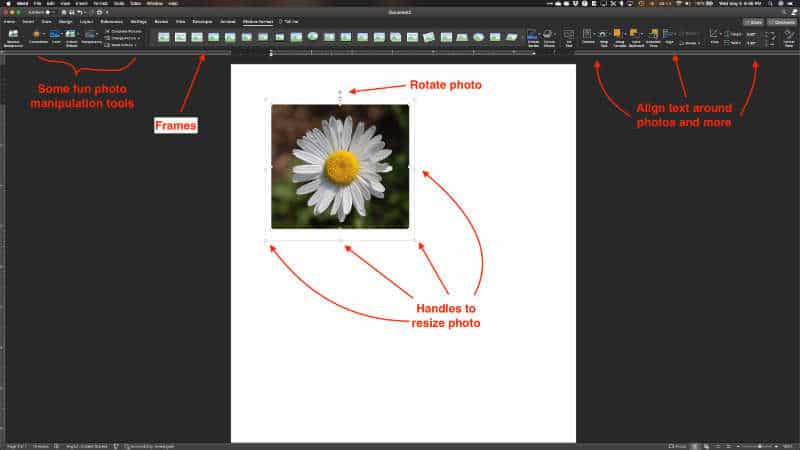
If you click the side middle handle and drag left or right, the image will be become narrower or wider, but keep the same height. If you drag the top or bottom center handles up or down, the image will keep the same width but change the height. Either of these will distort the image and gave results that would probably be undesirable.
You’ll also notice a very small icon with a circular arrow. Click that icon and move it in a circle to rotate the image 360 degrees. You can stop anywhere along the way so that your image sits slightly askew, upside down, or in any other orientation along the circle.
Microsoft Word is not by any means in competition with apps such as Photoshop as an image manipulation app. But it does have a decent assortment of tools that can help you present your images in a more attractive way.
Once you insert your image you may see that the ribbon has changed from the Insert tab to the Picture Format tab. If it did not make the switch automatically, open the Picture Format tab by clicking on it.
I won’t go through all of them and their details here, but from the Picture Format tab MS Word allows you to make changes to your images such as adjusting the color, adding square or oval frames, adding shadows and transparencies, and much more. The Picture Format tab also offers tools to change how text wraps around photos.
Take time to play around in the Picture Format tab. Be sure you select your image in your document before you open the Picture Format tab. Do that by clicking on the image.
Something to consider about licenses for Word images
I am not an attorney and what I am about to say should not be taken as any form of legal advice in any nation where this article is read. If I were creating a document for any form of commercial or public use (or any other use that required licensing), I would try to verify the license requirements for any of the images provided by Microsoft Word in the Stock Images or Online Images categories.
I have tried to ascertain the legal permissions that Microsoft grants for the images inserted via the Stock Images option but have found little specific information. Apparently Microsoft has licensed the images in the Stock Images feature for use in projects or documents produced in some Microsoft Office software.
The Online Pictures category is different. Those images are provided by Microsoft’s Bing search engine. There is no copyright warning below the Stock Images I discussed in the previous paragraph, but on the window where you select Online Pictures from Bing, there is a small print warning at the bottom, below the insert button that says, “You are responsible for respecting others’ rights, including copyright.”
Each of the images that are shown in the Online Pictures area has a small icon/button with three horizontal dots in the lower right corner of the image. If you click that those three dots, you will see an underlined link. Hold your mouse on that link for a second or two and you should see the full link to the image.
After viewing a number of those images’ links, it is obvious to me that many of them come from Wikimedia. That’s a great source of free images but some of them have licensing and/or attribution requirements. Other images that I checked were obviously from personal or commercial blogs. Personally, I wouldn’t use those images unless permission is granted by the owner of the image.
Checking the Creative Commons tick box should restrict what’s presented to Creative Commons images. Creative Commons images generally have more liberal licenses. However, because there are several different Creative Commons licenses, I would still recommend you familiarize yourself with the particular license that has been assigned to your chosen image, especially if you intend to use the image in any way that is covered by the terms of the license attached to that particular image.
You’ll find more helpful tips for Microsoft Word here.
