Line spacing in Scrivener can be a bit confusing until you learn how it works and the places where it can be adjusted. In this article I’ll show you how to double space in Scrivener.
Table of Contents
We’ll look at setting the line spacing in the Main Editor where only you and/or your collaborators will see it. Then, we’ll look at setting line spacing in the final compiled product which your readers will see.
Note that screenprints used in this article are from Scrivener v3 on a Mac. The visual design of the settings panels is different in Scrivener v3 for Windows, but the settings, buttons, etc. are present on both platforms.
How to double space in Scrivener
Line spacing in Scrivener’s user interface affects how text is portrayed in the Main Editor where you type your work. It is not necessarily a set-once-for-everything deal.
You can set line spacing in Scrivener’s interface on a per-document, per-project, and default basis.
Set Scrivener line spacing per document
Line spacing changes on a document basis are made in the Main Editor.
A document in Scrivener is any single page of text. If you right-click a folder and select Add New Text, you are adding a document to your project.
To change the line spacing, in the Editor, you’ll first need to be sure the format bar is visible.
To make the Scrivener’s format bar visible:
- Go to the View menu.
- Select Text Editing.
- Select Show Format Bar
If you see Hide Format Bar, that indicates the format bar is already activated.

If you have selected Show Format Bar, but the bar appears to be greyed out or inactive, click anywhere in the document. That should activate the format bar.
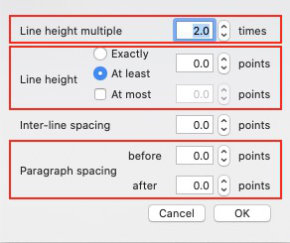
You’ll find the line space setting near the right end of the format bar, between the font settings and the list setting icon. The line space setting can recognized by a small icon next to it that consists of two horizontal lines with a vertical two-headed arrow between the lines. You should also see a number indicating your current line spacing setting. Click on that number to open the options that are available.
At the bottom of the list of line spacing choices, you can click Other… to open a small panel that allows you to choose the line spacing by multiples such as single, 1.2, 2.0, etc.. You can also set line spacing and the distance before and after paragraphs by points.
It is best to set the line spacing before you start typing. Doing so causes any text you type in that document to use the line spacing that you set.
At any point in the document, you can change the line spacing, say from double to single. The paragraph you are typing and any that follow will use your new spacing.
If you want just one paragraph to be single, then to return to double, simply change the line spacing at the beginning of the next paragraph.
If you get halfway through a document and decide you’d prefer some text to have a different line space setting than the current one, you can simply select part or all of the existing text, then change the line spacing. (You can select the text by left clicking the mouse at the top of the document and dragging to the end. You may also click anywhere inside the document and use Control + A on Windows computers, or Command + A on Macs.)
Set Scrivener line spacing per project
Setting your line spacing on a per-project basis is very similar to how you set it per document. The difference is where the settings are.
To change the line spacing per project:
- Go to the Project menu.
- Select Project Settings.
- Select Formatting from the list on the left of the panel.
Before you can change any of the text or line settings, you’ll have to tell Scrivener that you want to change the settings that will apply to any future documents within the current project.
- In the top half of the wide right column of the settings panel, look for a line that says, “Use different default formatting for new documents in this project.”
- Tick the box just before that line. Until now, the actual text settings area has been greyed out and unavailable. Ticking the box activates that settings area.
To set the line spacing, do it exactly as you did in the document Editor in the previous instruction.
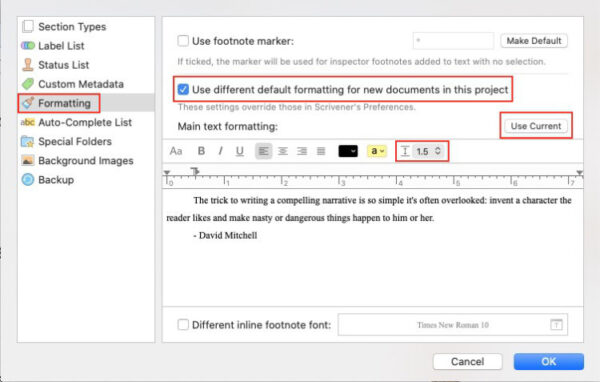
If you have set your chosen line spacing in the current document, you can click the “Use Current” button just above the editor settings area to automatically set the Project settings to match your current document.
The difference in adjusting the settings here versus the document Editor is that changing it in the Project settings causes any future documents added to the current project to use those settings.
NOTE: The line spacing in the existing documents within the current project will not be changed.
Set Scrivener’s default line spacing
Setting the default line spacing in Scrivener is done just like the per project method, but in a different place.
- To set the default line spacing:
- Go to Scrivener > Preferences on a Mac or File > Options on a Windows computer.
- Open the Editing tab, then the Formatting tab at the top of the Editing panel.
- You will see a settings window just like the one you used in setting Project Settings. Set the line spacing that you wish to be the default for any future projects here.
If you wish to use the settings that you have applied to your current document as your new default settings, find the button labeled “Use formatting in current editor.” When you click that button the existing default settings will change to match those in your current document.
NOTE: The settings you make here will be applied automatically to any future projects. Note that your new settings will not retroactively adjust the settings in previous projects. In the next section I’ll show you how to manually apply your new default settings to a specific existing project.
Assign new Scrivener default line spacing to existing documents
As I said earlier, Scrivener will not automatically apply your new default settings to the current or already existing projects. But there is a way you can manually apply your new default settings to any document or project.
We’re looking at this method as a way to apply your chosen line spacing to documents that existed in your project prior to you creating new default settings. Be aware that any of the default text settings—font, alignment, etc.—will be applied in the conversion process unless you preserve your existing settings.
- Open the project that you wish to update to the new default settings.
- In the Binder, select all of the documents that you want to apply the new default settings to.
- Go to the Documents menu.
- Select Convert.
- Select Text to Default Formatting.
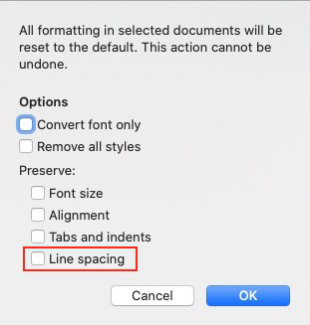
- A small settings box will open that allows you to set certain rules for converting the formatting in the documents you have selected.
- In this case of updating the line spacing in existing documents, be sure Line Spacing is not selected under Preserve:. Click OK.
The documents you selected should now be formatted according to the settings you created as your new default, but with the exceptions you selected in the Convert Text settings.
Set Scrivener line spacing for compiling
In Scrivener, the process of exporting your project to an eBook or PDF for printing is called Compiling. In this article we’re looking at the process of setting line spacing and not the entire compile process. I’ll assume that you know how to select the documents you want to include in your published work.
HINT: One way you can mark any document for inclusion in the Compile process by ticking “Include in Compile” in that document’s Inspector panel.
Setting line spacing for the Compile process is a little more involved than setting it for your manuscript in the Editor.
The process differs slightly from print books to eBooks. Neither is especially difficult. But it does take a little more time and attention to detail.
One thing to consider from the beginning is that the font size we set for our eBooks may not be the size our readers see. That is because most eBook readers “reflow” the text when the reader makes changes to their reading preferences. For example, they allow the reader to change the font size to accommodate accessibility or the reader’s preference. That usually results in more or fewer words per digital page.
The text will also flow differently from one eReader to another depending upon the size of the device, the size of the font, how it manages images, etc..
If your reader chooses a larger font, your preferred line spacing may be less important at one font size than another.
Set Scrivener line spacing when compiling to eBook
You’ll need to determine the format you want to compile for. For standard reflowable eBooks you’ll probably want to use ePub.
For a long time Amazon required .mobi files (either by upload or via their conversion system), then they began accepting .ePub files as well.
At present, .mobi files are only accepted for fixed format books. If you write genre fiction, you probably don’t need (or want) fixed format books.
Amazon will accept .ePub files for reflowable books.
Some book aggregators such as Draft2Digital have ebook file creators that you can use. Every eBook aggregator or distributor that I know of will accept properly created .ePub files for upload.
When you are ready to compile to eBook:
- Go to the File menu. Select Compile….
- The Compile settings panel should open. At the top you should see a dropdown box labeled “Compile for.”
- Click in that box and select the format you wish to create.
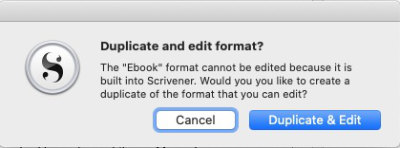
- In the left column, double-click eBook.
- A small warning may come up at this point telling you that you cannot edit the Ebook format. It will ask you if you want to create a duplicate which you can edit. Click the button labeled “Duplicate and Edit.” You will then be able to edit that choice.
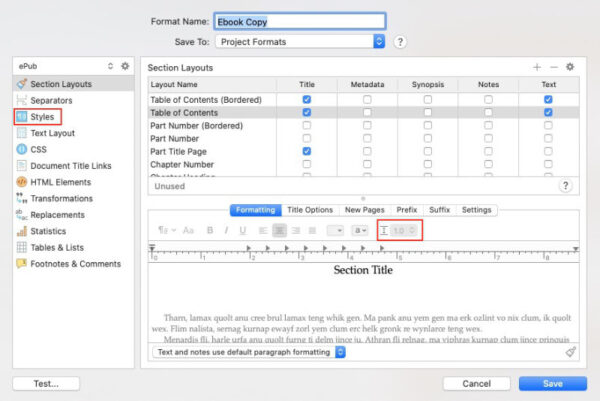
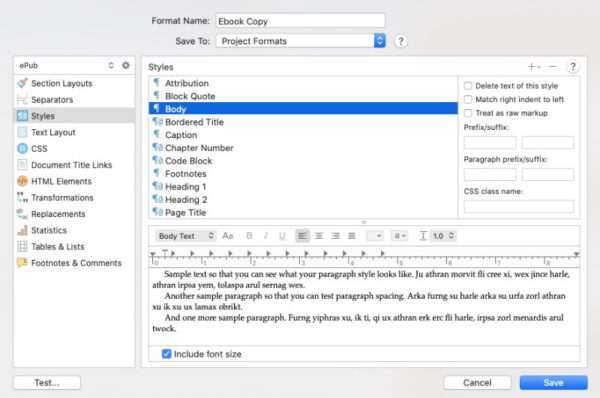
- A new settings panel will open. In the left column select Styles.
- In the center section under the Styles label, select Body. This will activate the editor settings area in the lower half of the settings panel.
- Just as you did with the Main Editor and the Project Editor settings, select the line spacing list and choose your line spacing.
- Click Save.
- Click Compile on the next panel. The panel should close and your .ePub should be created.
Set Scrivener line spacing for compiling to print or PDF
The only difference you’ll find setting the line spacing between eBooks and PDF or Print is in selecting the correct “Compile to” option.
- Go to File > Compile….
- Click the box at the top and select Print or PDF. If you plan to send your compiled PDF to Amazon KDP or some other printer, just select Print.
- In the left column double-click one of the paperback sizes.
- In the next box that opens, select Styles from the left column.
- In the top half of the right column select Body.
- The editor settings below will activate.
You will select your line spacing option here the same way you did with any of the previously described methods.
A final word on line spacing in Scrivener
For my purposes, I keep the line spacing in the Main Editor set to 2.0 when I am drafting an article or manuscript.
I don’t see much benefit in adjusting the line spacing on eBooks for the reasons I gave earlier relating to the user’s ability to change font sizes on their devices.
However, line spacing is more important in the design and layout of a print book. In that case, I would suggest you do a test compile to PDF or Print and see how it looks. If you’re not happy with the results, go back into the compile settings and make adjustments until you achieve the appearance you are after.
If you find compiling in Scrivener to be a bit more challenging than you like, I suggest you read our article on formatting a book with Vellum, my preferred tool for eBook and print book formatting.
Download PDF copies of the Scrivener user manuals here.
A note about this tutorial. All of our Scrivener tutorials are personally written based on our own experience with Scrivener. If you would enjoy more in-depth training, we recommend Joseph Michael’s Learn Scrivener Fast Course.
