Formatting a book for print is not an easy task. Yet those writers who have chosen to be indie authors will at some point need to format their books for publication. Some will choose to only release their books in eBook format. Those who want to be active in a wider publishing arena will also release their books in printed form.
Table of Contents
Indie authors wear a lot of hats. They write. They research. They market. They do at least some level of editing. And they have to either have their books formatted for sale or learn a way to do it themselves.
They may get by with simply uploading their Microsoft Word file to Amazon or some other distribution outlet or aggregator and use whatever conversion tool is available to provide an eBook file. But for those authors who wish to publish their work in paperback or hardcover, one of the most dreaded tasks is formatting a book in such a way that it looks professionally done when printed.
An online search will produce any number of articles that discuss methods for using just Microsoft Word to format the book. Some of those methods will help you format a book, but not one that will hold its own in competition with another that has been professionally designed and formatted.
There is a way to produce a nice looking print book with Word and some other apps which we’ll look at later in this article, but for most people who try it without professional assistance, the result will be lower quality than they had hoped for.
There are software programs such as Scrivener, Calibre, and Sigil that will help to format manuscripts into ePub and .Mobi eBook formats. (I am not a Calibre or Sigil user. I cannot offer a valid opinion on those apps and mention them here only as other options for eBook conversion help.)
There are several page layout apps that will help you format your book into a design that looks good and a format that book printers can use.
Adobe InDesign (available on a monthly or annual subscription basis), Affinity Publisher (available for a very reasonable one-time price), and Scribus (open-source and totally free) are three apps that can handle the job of formatting a book such as a novel.
The biggest issue with those apps that stands between indie authors and a properly formatted book file is the learning curve. All of them have significant learning curves before a person can confidently produce a printable one page document, much less a print-ready file for a book of two or three hundred pages.
There is another way to do the job that is much easier than any of those apps. Vellum is a piece of software that is practically a magician in formatting book interiors. When I say that, I’m thinking primarily of indie novelists who want their new book to have an interior design that can hold its own next to books published by mainstream publishers.
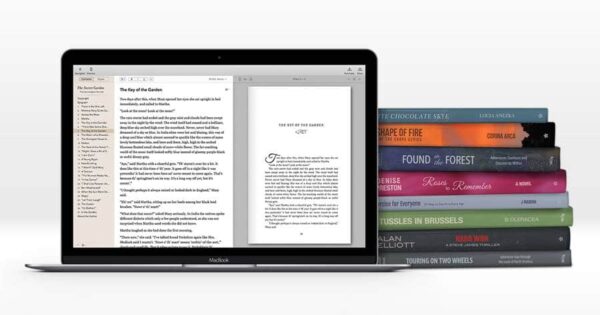
Vellum can handle almost any fiction or non-fiction, including images within the pages. It is not intended for glossy table-top photo books that come in uncommon or very large formats. It could work for some children’s books but it may not be the best choice for children’s books that would normally be produced in square formats.
Vellum will import your .docx file.
But for fiction, I love it and personally use on my own projects. I have Adobe InDesign and Affinity Publisher installed on my computer, but I am very happy with the results I get with Vellum and use it to format my own books into eBooks and print. It is a massive time saver.
What is Vellum for Mac?
Vellum is software created by the company 180g, which was founded in 2012 by former Pixar Animation Studios employees, Brad Andalman and Brad West. It allows creative writers to very quickly convert their Microsoft Word files into eBook and print formats at the same time.
Vellum is for Mac only, but can be used on Windows by using a “virtual Mac”. You can do that by renting time on a cloud based Mac at a business such as MacInCloud.com and installing Vellum there.*
How to use Vellum.
Vellum allows you to tweak its settings to make certain changes to fonts, headers, footers, chapter beginnings, and more. The first step, though, is to get your book manuscript ready to be imported into Vellum.
You’ll need to be sure that your file is saved as a .docx file. That is a Microsoft Word file type, but other applications such as Apple Pages, LibreOffice, OpenOffice, and Scrivener can also save as .docx.
A few basic tasks before you import your file into Vellum.
Vellum will begin to perform its magic on your book manuscript immediately after it imports your original file. It will first attempt to divide your book into chapters or sections by looking for styling markers such as headings.
For best results, start by properly formatting your edited manuscript file before exporting it from Word. Edit first. You can certainly do a final edit in Vellum, but it is really not designed as a writing tool as much as it is a formatting tool. Except in the case of minor edits—missing or misspelled words, etc.—you’d probably be better off doing your edits in Scrivener, Word, Pages, LibreOffice, or whatever other app you used to write your book.
You will greatly simplify the process by setting your chapter titles as a Heading 1 in Microsoft Word. If your chapters don’t have titles, but use chapter one, chapter two, etc., just select whatever wording you use and set it as Heading 1.
If you use Heading 1 for any other reason than chapter titles in your manuscript, it could cause difficulties. I suggest you use Heading 1 only for chapter titles. Replace any other uses of Heading 1 with a different heading style. That is because Vellum looks for Heading 1 tags in your .docx file to determine the beginning of chapters. There are ways to work around the issue, but doing this one task before you import your file into Vellum will save a lot of unnecessary work later on.
By the way, if you use chapter number along with a chapter title, you should have them on one line. The example Vellum gives is “Chapter 1 (or One): Chapter Title.”
If your MS Word file has a table of contents, it is best to remove it from the file before you import it into Vellum. This is because Vellum will automatically create a table of contents from your chapter headings/titles.
Do not include a table of contents or title page in your .docx file. Vellum will create them.
For the same reason, you won’t need a title page. Vellum will create one based on the document information you entered in your Word file (in MS Word at File menu > Properties… > Summary tab). If you did not fill in that information in Word, you will be able to do it in Vellum. Either way, you won’t need a title page in your .docx file.
If your chapters have sections or scenes, it is recommended that you use *** as a separater in your .docx file. There is no need for blank lines before or after them. Vellum will automatically see *** as an indication of a section or scene break and will insert an ornamental divider with proper line spacing.
Some authors use multiple line returns to create a space between sections or chapters. You’ll have easier and faster success with Vellum if you use proper page breaks in your .docx file.
Important: Vellum sees three or more consecutive blank lines as a scene break. If you see undesirable page breaks in the middle of a chapter, it may be that Vellum found multiple consecutive line breaks, saw them as a page or section break, and formatted the page accordingly.
How to import your .docx file into Vellum
Importing your .docx file into Vellum is very simple. There are three ways you can import a file.
- When Vellum first opens, a splash page will open in the center of your screen. At the bottom of that page is a button that says Import Word File. Click that button and locate your file to import.
- Instead of using the button described in number 1 above, go to the File menu and select Import Word File…
- Locate your Word file and drag it onto Vellum’s flower icon in the Mac Dock.
How to Use the Vellum interface
The Vellum interface is made up of three main areas. You should see a Navigation pane on the left. In the center is the Editor, which contains your book file as you imported it, including basic formatting such as italics. On the right is the Previewer pane where you can see what your book will look like on several different devices.
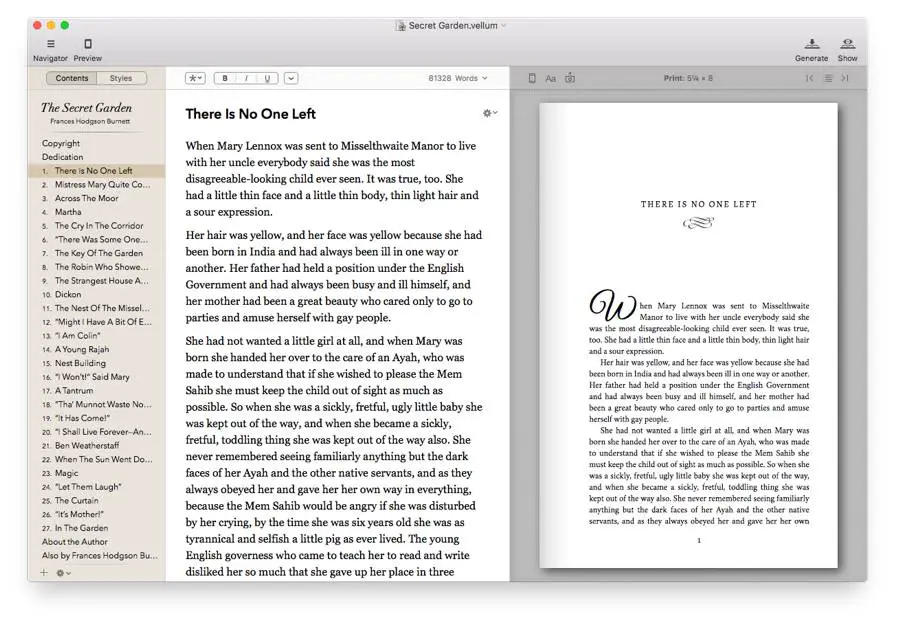
The Editor pane is open all the time. If, for some reason, you don’t see all three panes, look in the top left, just under the red, yellow, and green Mac window control buttons. You should see Navigator, Previewer, and Chapter.
The Navigator icon turns the Navigator pane on and off. It will be the pane on the left. Previewer, just as it sounds, turns the Previewer on. It will open to the right of the Editor pane. Chapter adds a new chapter at the bottom of the chapter list in the Navigator pane.
The Navigator pane is exactly what it sounds like. Click on any front or back matter page or chapter in the Navigator, and that page or chapter will open in the Editor. If you have the Previewer open, the selected page or chapter will open in both the Editor and the Previewer.
You can scroll through the text using the Editor pane. But if you want to go through your book as it would look in an eBook or in print, you move through the pages of your formatted book in the Previewer pane. Using a mouse or trackpad, hover over or touch the pane about halfway up the right side until an right-pointing arrow appears. Click that arrow to move forward through the book. Do the same on the left to find a left-pointing arrow that will move backward through the book.
You may also cycle through your book by chapter in the Previewer. Just above the Previewer, on the right side there are three icons. The first is |<, then an icon with stacked lines preceded by dots, then >|. Click the first icon (|<) to go backward by one chapter. Click the third icon (>|) to go forward by one chapter.
Click the center icon—the one with stacked lines preceded by dots—to open a list of your chapters. Click on any chapter title to instantly move to that chapter, just as you would in the Navigator panel.
NOTE: If you prefer to have less activity on the app window, you can leave the Navigator closed and navigate through the chapters using the icon you just read about. You will have to have the Navigator open to change your book’s styling, though. More on that a little later in this article.
The Editor pane in the center is a text editor only. It displays the text divided into chapters, paragraphs, scenes, etc.. You can select text and apply bold, italics, underline, etc. there. You can add images, links, block quotes, alignment changes, and more in the Editor pane. You will see the changes applied to the document in the Editor pane similar to how they would look in Microsoft Word. To see what those changes will look like in your final document, look at it in the Previewer pane.
Note that the Previewer and the Editor pane do not scroll together. If you happen to be reading along in the previewer pane on the right and you notice a misspelled word, you can’t correct it in the Previewer pane. You must find the errant word in the center Editor pane and correct it there. You may have to scroll up or down in the Editor to find the exact text you see in the Previewer. When you make changes in the Editor, you will see the same changes in real time in the Previewer.
If you click a chapter title in the Navigation pane, both the center Editing pane and the Previewer pane will open to that chapter. But if you click through an entire chapter in the Previewer pane and on into the next chapter, the Editing pane will not follow you.
If you find yourself scrolling through the formatted pages and you stumble upon an error, and discover that the Editor pane and the Previewer aren’t displaying the same chapter, click the correct chapter in the Navigator to open both panes in the same chapter.
Merging chapters in Vellum
Sometimes, when the Heading 1 style was not used or when there were multiple blank lines instead of page breaks, your book may have a chapter split into two. If Heading 1 was not used, your book may also have two or more chapters combined into one.
This problem is normally easily resolved in Vellum if there is only one instance of combined or separated chapters.
To combine two chapters that should have been one.
- Go to the Navigator pane and click the first chapter in question. Hold down the shift and select the other chapter in question. (If there are three or more consecutive chapters that should be combined, hold the Command key as you click the title of each errant chapter.) All selected consecutive chapters should be highlighted in blue.
- From there, right click on the selected chapters and from the right-click menu, select the last item—Merge Selected Chapters.
Instead of using the right-click menu, you may also select the desired chapters and from the Chapter menu, choose Merge Selected Chapters.
To split a chapter that should have been two or more chapters.
In the chapter that imported two or more as one, go to the location where the next chapter should have begun. Click your mouse or trackpad in the exact location where you want to split the wrongly divided chapter.
- With your cursor in the right location, right click and choose Split Chapter at Cursor.
- You may also click at the location where you wish the chapter to be split and from the Chapter menu, select Split Chapter at Cursor.
If a Vellum imported a chapter as one that should have been three or more, repeat the instructions just given at each place where a new chapter should have begun.
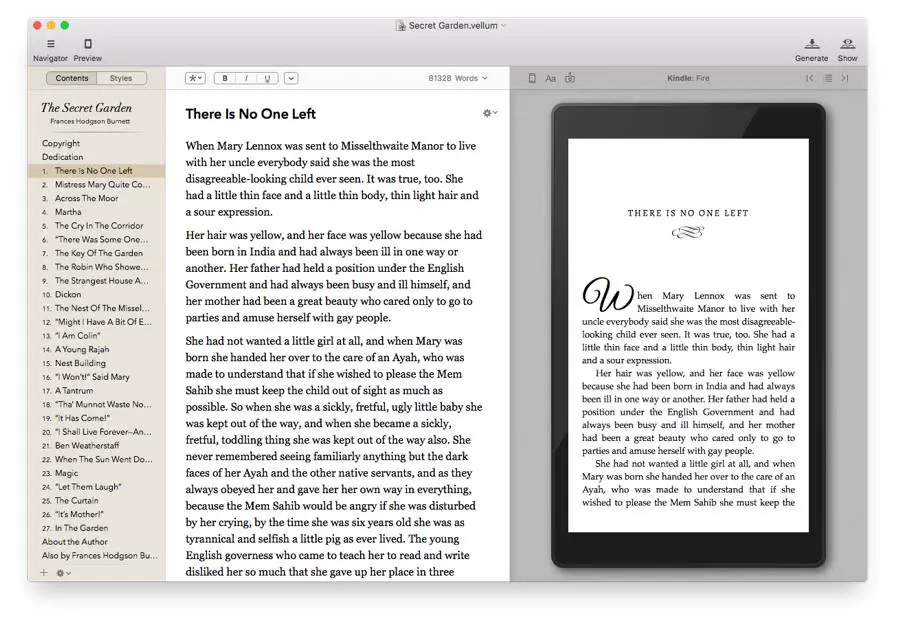
See how your book will look on devices
The Previewer pane will show your book as it would look in various eBook readers and in print. Just above the top left corner of the book page, you will see an icon that looks like a mobile device. Click that icon and you’ll this list of possible device emulators:
- Kindle Fire
- Kindle Paperwhite
- iPad
- iPhone
- Nook Simple Touch
- Kobo Clara
- Android Tablet for Google Play.
Then, below a dividing line, you’ll see Print. Click that choice to have the Previewer pane display your pages as they will look in your printed book.
While your book will include most of the same decorative flourishes, etc., the word flow will be different from one eBook type to another, and different yet in print. If you think your book doesn’t look like a printed book—no headers and footers are visible, for example—be sure you’ve set the Previewer to display print.
Just to the right of the mobile device icon that allows you to select which emulator you wish to use in the Previewer pane, there is an icon with a uppercase A and a lowercase a (Aa). When you click that icon you will see two choices for varying degrees of accuracy in the Previewer.
- The top choice, Draft, gives you a close but not exactly accurate portrayal of how your book will look on the chosen device.
- The lower choice, Proof, gives you a very accurate portrayal of your book’s appearance in any of the device choices, as well as in print.
Select print size in Vellum
Vellum has a wide range of trim sizes available for print. You’ll find them in Print Settings under the File menu. When you first open the Print Settings dialog box, you’ll see just thumbnails labeled as four trim sizes – 5 X 8, 5.25 X 8, 5.5 X 8.5, and 6 X 9 inches.
In the top right corner of the Print Settings box, you’ll find two adjoined buttons labeled cm|in. Click the cm button to see similar sizes in metric measurements.
As of the date this article was written, Vellum allows these available print sizes in inches(cm):
Popular Trim Sizes
- 5 X 8 (12.7 X 20.3)
- 5.25 X 8 (13.3 X 20.3)
- 5.5 X 8.5 (14 X 21.6)
- 6 X 9 (15.2 X 22.9)
Additional Trim Sizes
- 5.06 X 7.81 (12.9 X 19.8)
- 5.5 X 8.25 (14 X 21)
International Sizes
- 4.72 X 7.48 (12 X 19)
- 4.92 X 7.48 (12.5 X 19)
- 5.83 X 8.27 (14.8 X 21)
- 5.31 X 8.46 (13.5 X 21.5)
Mass Market Paperbacks
- 4.12 X 6.75 (10.5 X 17.1)
- 4.25 X 7 (10.8 X 17.8)
- 4.37 X 7 (11.1 X 17.8)
Large Print Options
- 5.5 X 8.5 (14 X 21.6)
- 6 X 9 (15.2 X 22.9)
- 6.14 X 9.21 (15.6 X 23.4)
See how your formatted book looks
If you’ve imported your .docx file and have followed the suggestions we talked about, you should be able to see that your .docx file has been transformed into a file that looks like a book when viewed in the Previewer pane, a book that is almost ready to upload to Amazon, Ingram Spark, or your other distributors.
You may be happy with the appearance of your book just as it is. If so, you may skip ahead to see how to export your printable file. If not, there are a number of ways you can change the look of your book’s pages.
How to change the design of pages in Vellum
I mentioned earlier that you can make changes such as adding block quotes to your text in the Editor pane. You also have several choices how those block quotes will look in your finished document. Those choices are found in the Styles options panel. These instructions apply to Vellum v2. You’ll find this information updated for Vellum v3 in our article How to Customize Your Book Design in Vellum v3.
When the Navigation pane is open, you’ll see a split button at the top of it that says Contents|Styles. Select the Styles button and you’ll be presented with a list of styling items on the left and a carousel-like display of various available styles that you can choose.
You can select style choices for:
- Heading
- First Paragraph
- Paragraph After Break
- Ornamental Break
- Block Quotation
- Verse
- Photograph
- Portrait
- Caption
- Header and Footer
- Body
Some items in the list will have more styling choices available than others. You’ll see that reflected in the number of images the carousel includes for that particular item.
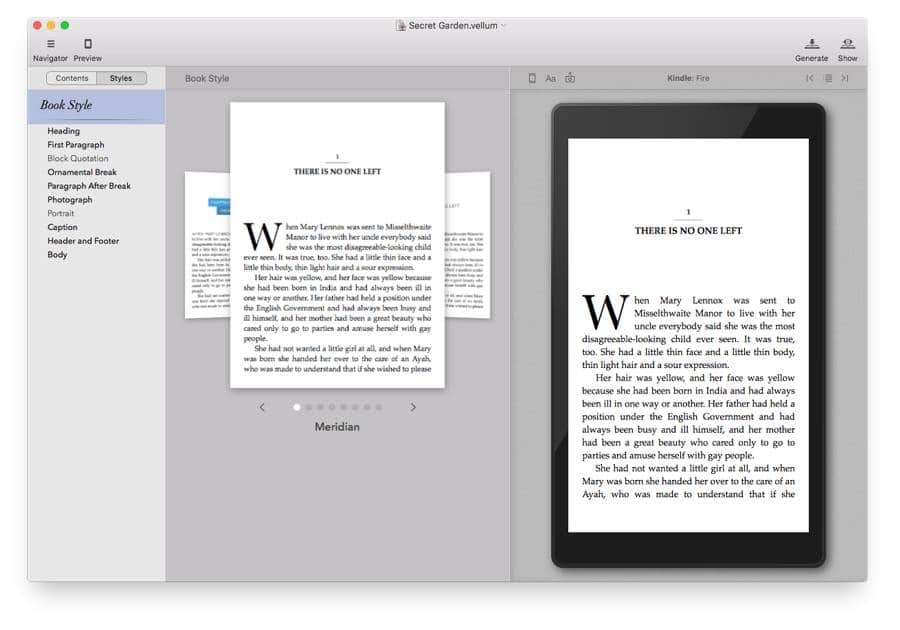
As you go through the choices, you’ll see a demo image in the carousel we mentioned before that shows how that choice looks on the page. Look to the right on the Previewer pane and you’ll see it reflected in your actual document.
Choose the one you want to change from the list on the left and go through the choices in the carousel until you find the one you like. Stop the carousel there, click another item from the list on the left, go through the carousel again to select the version you like. Keep doing that until you’ve styled your book file the way you want it.
There is no button to click to verify the change. Just be sure you stop the carousel on the option you like best for each item. Do be sure you save the document, though.
If you should decide later on that you’d like a different design on a particular part of the page, just open the Styles panel. Choose the item you wish to change from the list on the left and navigate through the carousel until you see a style that you like better. Stop the carousel. Whatever change you made is now reflected throughout the book. As of this writing, there is no way that I am aware of to apply one style to one chapter and another style to a different chapter.
NOTE: Most styling choices that you make apply to both the print version and the eBook version. An exception is Header and Footer settings, which apply only to the print version. There will be no header or footer in the eBook versions.
Be aware that Header in the style options list is not the same as a heading. A heading is the chapter number and title on the first page of a chapter. Headers are the title, author’s name, and page number at the top of each page except the first page of a chapter.
Add chapters to a book in Vellum
You may find it necessary to add a chapter to your book after you import it into Vellum. Here are two simple ways to do that.
- With your document open, go to the Chapter menu. The first item on the menu is Add Chapter. Click Add Chapter.
- With your document open, click the gear icon at the bottom of the Navigator pane. The first item on the menu that falls down will be Add Chapter.
No matter which method you use, the new chapter is added just after the last existing chapter. You can easily move it anywhere you’d like by clicking and dragging it up into the the position you’d like.
Add front and back matter pages.
Vellum allows you to add the following front or back matter pages to your book, all with the click of a couple buttons. The pages will automatically be inserted in the traditionally accepted location for each one.
- Blurbs
- Half Title
- Title Page (Beginning with Vellum v3.3, you can also include your series title on the Title Page.)
- Copyright
- Dedication
- Epigraph
- Table of Contents. Subheads that are included in your book will be included in the hidden Logical TOC (NCX file) which is used by ebook readers and is required by all ebook distributors.
- Foreword
- Introduction
- Preface
- Prologue
- Epilogue
- Afterword
- Endnotes
- Bibliography (Vellum v3.3 or later)
- Acknowledgments
- About the Author
- Also by
- Full Page Image
- Unncategorized
Here are two simple ways to add any of the pages in the list above.
- At the bottom of the Navigator pane, click the gear icon. Click Add Element. A menu will pop out that will allow you to add any of the items in the list above.
- In the Chapter menu at the top of Vellum, select Add Element. The same list of pages will pop out. Click the one you want to add. It will be inserted in the normal place.
You may also insert more than one front or back matter page simultaneously. Here are two way to do that.
- At the bottom of the Navigator pane, click the gear icon. Click Add Multiple Elements. A menu will open with the same list of front and back matter pages as above. Beside each page item there is a check or tick box. Click the box beside each page you want to add to your book. Click the Add button.
- In the Chapter menu at the top of Vellum, select Add Multiple Elements. You will see the same full list of available front and back matter pages open in the Navigator pane. The same list of pages will pop out with a checkbox beside each one. Check those that you want to add. Click the Add button.
With either method, all of the pages you selected will be inserted in their commonly accepted locations.
Adding bookstore links in Vellum
You can add bookstore links to your book files in Vellum. Because this article is about formatting your book for print, we have not included that information here. Vellum can automatically add the correct link to your book in Amazon, Kobo, and other booksellers, but only in the eBook version.
If you wish to have a web address where people can find your books, it might best to add that information in a page promoting your books. One idea might be to add an Also By page from the list of available front and back matter pages. Add a link to the appropriate page on your website.
Export Vellum files for publishing.
Exporting the files you’ll need for your book distributors is very simple. Once you have your book formatted to your satisfaction, go to the File menu and near the bottom, click Select Platforms…
You’ll see several choices for eBooks:
- Kindle
- Apple
- Nook
- Kobo
- Generic
Below that list, you’ll see Print with your chosen page size indicated. (If the page size is incorrect, look back in this article to Select Print Size in Vellum to see how to correct that.)
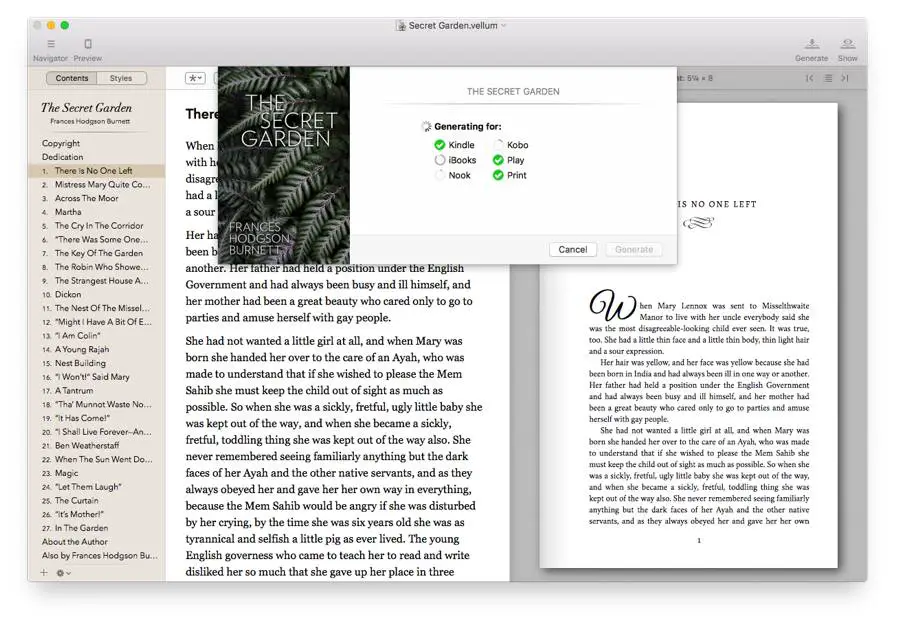
If the only file you need at this time is your print file, leave the top boxes empty and tick the box for print. If you would like to have eBook files and the matching print file, tick them all.
- Now, go back to the File menu and choose Generate Books….
- A box will open asking you to choose a folder or directory where you want the files saved. Click the Choose button.
- The button will change to Generate. Click that button. You’ll see a list of the files you requested Vellum to produce for you. Each one will have a progressing icon showing how fast it is producing the file.
- When the files have been produced, the box will change and display a button that allow you to see the files in the folder you chose in the earlier steps.
The files in that folder are ready to upload. If you asked Vellum to produce eBook files, you’ll find each file appropriately named for the distributor it is intended for.
The print file will be the only PDF in the folder. It can be uploaded to Amazon KDP, Ingram Spark, Lulu, and any other print on demand facility that accepts PDF files.
Notes
(On March 31, 2021 I received notice of an update to Vellum that solves the following issue with PDFs when submitting to IngramSpark. I have not yet had a chance to test it, but their statement says that Ingram no longer throws an error and accepts the files without issue.) When you submit the PDF to Ingram Spark, a warning may pop up about there being an issue with the PDF file. Vellum says to ignore the warning and submit the file. I’ve had that very experience and have found that there is no problem at all with the file. Ingram and Amazon both accept the file. I’ve also submitted another person’s book to Lulu.com. They accepted the file and there was no issue at all with the finished book that might have been due to the PDF.
If you just want to format beautiful eBooks, you may want the Vellum eBooks version. But if you want to use Vellum to format your books for print, you’ll need the Vellum Print version.
Other options for formatting a book for print
This has been a long article with a lot of useful information. I’ve tried to write it in a way that is not overwhelming. Vellum is really simple to use and the information you’ve just read can help you use it successfully if you just go through it step by step.
I recognize that Vellum won’t be for everyone. Some authors would rather stick to more familiar territory and try to do it on software that they are accustomed to. That may be Scrivener, or it may be Microsoft Word.
If you decide Vellum is not the right choice for you, or if you just prefer to go a different route, you might want to consider purchasing prebuilt templates to format your manuscripts. They are available for Microsoft Word, Apple Pages, and InDesign. I have not personally used them, but I know that the person who sells them has a long and respected history in the indie publishing world and does everything he can to help writers produce professional quality work.
Joel Friedlander’s Book Design Templates is one exceptional source for those templates. You can find out more there.
* For information on how to use Vellum on a Windows computer via MacInCloud.com, you’ll find a good explanation on author Paul Teague’s website.
