You can change the page color in Google Docs just as you can in full standalone word processing apps such as MS Word. If you need to include text boxes with a different background color, that is a simple task, also.
Table of Contents
Change the page background color in Google Docs
Follow these simple steps to change the background color in Google Docs.
With your document open…
- Open the File menu.
- Select Page Setup.
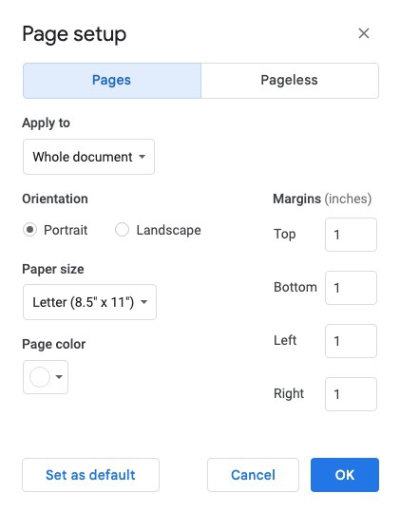
- Be sure Whole Document is selected in the Apply to setting. If Selected content is selected, you will not be able to change the page color.
- With Whole Document selected, down the left side of the settings panel, below the Paper size setting, you should see the label Page color. Click on the button below that label. The center of that button indicates the current color of your page background.
A color selection panel will open with many colors to choose from. There are three ways to choose a color.

- Pick one from the default selection that you see when you open the color panel. To apply one of the colors to your document, just click on the colored circle to choose that color.
- Click Custom just below the preset colors in the panel. There, you can type in your RGB or Hexadecimal numbers. You can also drag the small circle around in the color box until you see the color you want.
- You can use the Eyedropper tool to select any color from your current computer screen. You can click the Eyedropper icon in the same panel where you set RGB or Hexadecimal numbers. Or you can select the tiny eyedropper icon at the bottom of the initial color selection panel. Both eyedropper tools do the same thing.
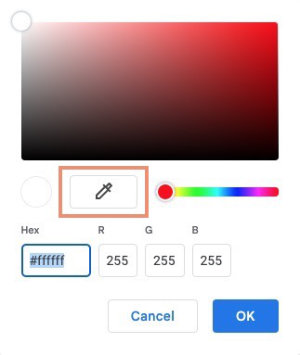
The Eyedropper tool can only be used to copy a color from your computer’s current window. To copy the color, first, click on the Eyedropper tool. Then click on the desired color that you see on your screen.
You will see the color you chose in the center of the Page Color button in the Page Setup panel, indicating that your page will be that color.
No matter which method you use to select a background color, the color won’t be applied to your document until you click the OK button in the lower right corner of the Page Setup panel.
Note: There are other color-picker tools that you can use to select colors. Some are apps; others are browser extensions or plugins. They will show you the hexadecimal or RGB codes which you could copy and paste into the Custom panel.
The Eyedropper tool in Google Docs is not that versatile.
If you try to open another browser tab or something like a color palette to copy from, it won’t work. When you click the Eyedropper tool, your cursor will change in such a way that it can no longer select other items.
If you have other files open in the same window, they will disappear when you click the Eyedropper tool.
If you open the Eyedropper tool but decide you no longer need it before you’ve selected a color, you can close it by hitting the Escape key.
If you open the Eyedropper tool but decide you no longer need it before you’ve selected a color, you can close it by hitting the Escape key.
How to set a new default page color in Google Docs
You can set your new page color as the default by clicking the Set as Default button in the lower left corner of the Page Setup panel before you click the OK button.
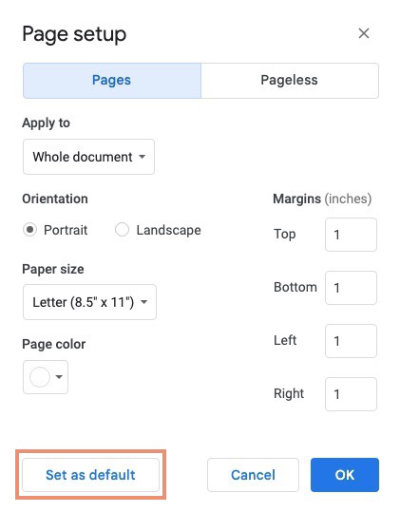
Bear in mind that the Set as Default button sets all settings in the Page Setup panel as the default, not just the background color. Your currently selected Page orientation, Paper size, Page color, and Margins will all become the default when you click the Set as Default button.
How to undo a page color selection
If you’ve selected a page color and immediately decide you don’t like it, you can undo it by clicking the Undo button on the left end of the toolbar. Control + Z on Windows or Command + Z on Macs should also undo the color if you’ve immediately decided you prefer a different color.
If you have made too many changes in your document to use the Undo button, you can also go through the same steps you used to change it and select white as your page color to set it back to the Google Docs default color.
Color a text box background in Google Docs
To insert a text box in Google Docs, use the following steps.
- Open the Insert menu.
- Choose Drawing.
- Choose New.
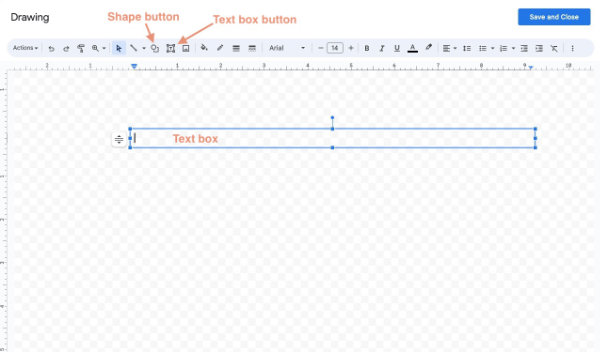
- In the panel that opens, select the Text Box button. It is a square button with tiny squares at each corner. There is a T in the center of the button.
- With your mouse, click anywhere in the document and drag until you see the text box at the size you want.
- Type your text in the box. (You can wait and add your text after the box is saved to the document. If you do that, you may have trouble finding your text box without a border or background color. Keep reading to learn how to solve that problem if it occurs.)
- If you intend to have a border or background color in your text box, it will be best to do that now. You can use the directions that follow this section to set the border and background colors for your text box. When you are ready to return to your document, click the Save and Close button in the top right corner of the Drawing panel.
Changing the background color of a Google Docs text box is simple. Like Microsoft Word, Google Docs refers to the background color in text boxes as a Fill color.
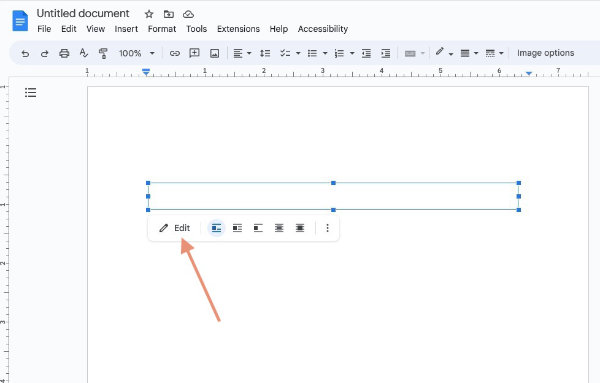
As mentioned earlier, it is easiest to set the Fill color when you create the text box. If you do not set a fill color or border before you Save and Close the Drawing panel, your text box may be invisible in the document. It will be there; if you don’t see it, click in the document where the text box should be. You will see the text box.
Just below the text box, there should be a small toolbar. Click the Edit button in that toolbar. That will take you back to the Drawing panel where you created the text box.
To change the Fill color in the text box:
- Click the text box. If you don’t see it, click on the panel where you believe the box should be. You should see a heavier blue outline around the box.
- Click the Fill color button in the Drawing toolbar. A panel with two tabs will open.
- Open the Solid tab to choose a single color for the background.
- Open the Gradient tab to choose from a selection of gradient presets.
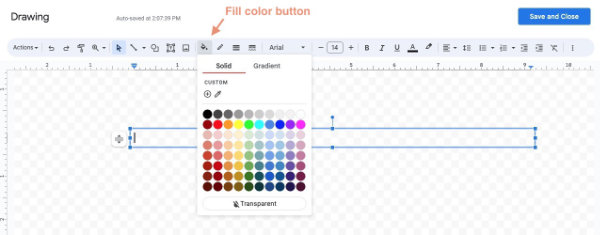
You may use your own custom color for solid colors or gradients by clicking Custom in either tab.
In the Drawing panel, the button that looks like a pencil (just to the right of the Fill button) lets you set the border color for your text box.
Just as you did with the page background, you can click the Eyedropper tool in either tab to select from colors that exist in your current window.
You can also click the Transparent button at the bottom of the Fill color panel if you want readers to see your main document through the text box.
Remember to click the Save and Close button to save your changes before returning to the document window.
You can change the paper size in Google Docs.
You’ll find the official Google Docs documentation here.
