If you want to dress up Scrivener’s layout, one thing you can do is to change the background in Scrivener. In this tutorial, we’ll concentrate on changing the background of Scrivener’s work area, not in finished documents.
Table of Contents
How to Change the Background in Scrivener
One facet of Scrivener’s versatility that even some long-time users don’t know about is the ability to change the background colors in different sections of the work area.
Scrivener calls the design and arrangement of the work area a layout. You can change the color of the background in most areas of a layout. In some of those areas, you can also insert a texture image in the background. I’ll show you how to do that plus a little secret that can allow you to have a full background image in some areas.
The magic all happens in the Options/Preferences panel.
- In Windows, go to File > Options. On Macs, go to Scrivener > Preferences.
- In the Options/Preferences panel, select Appearance.
In the Appearance panel, you’ll see a list of areas down the left side. The first item is General Interface. There are no colors to set there. However, the last setting on that page allows you to adjust the opacity of label colors that are used in backgrounds.
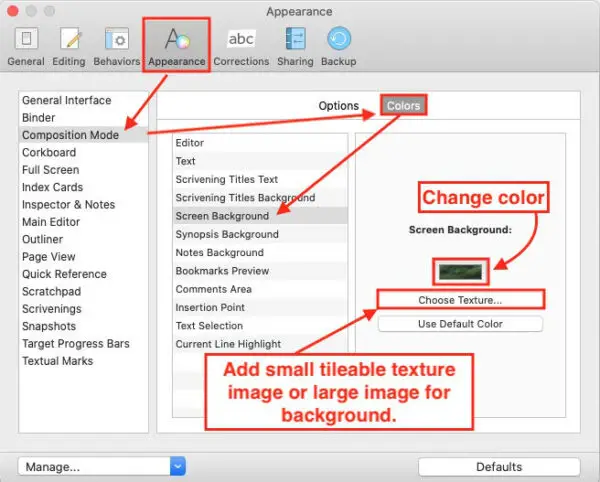
As you click through the list down the left side, you’ll see that some of the areas listed there have two columns for their settings in the right side of the panel.
It’s Scrivener. Set it up the way you want it!
If you click on Binder in the left column list, you’ll notice the right side of the settings panel has three tabs at the top. Select Colors.
You should see Binder Background and Search Results Background listed in the center column. Select one of those and in the third column you’ll see the name of the area that you clicked from the center column. Below that is a small rectangle that should be the same color as the current background.
Click that rectangle to select the color you’d like for the background of the Binder or Search Result Background, whichever you selected. If you want to change back to the original default color, just click the button below the color rectangle. It is labeled Use Default Color.
We won’t go through every item listed in the left column. But here’s a hint to speed up your search for backgrounds in which you can change colors. If you click on an item in the left column and no tab labeled Colors appears in the right side as it did for the Binder we looked at earlier, you won’t be able to change the color of the background in that area. Move on to the next area.
If you see a Colors tab, look in the center column for any item that ends with “background.” That will find most places backgrounds can be changed. For example, Main Editor has two background areas.
Composition Mode in the left column has four different background areas listed that can be colored. (Even though it’s not openly indicated, Editor in the Composition Mode list also has a background that can be changed. There may be other exceptions, as well.)
The method for changing the background color is the same for any of those.
Add background textures in Scrivener layouts
Some areas will also have a button labeled “Choose Texture…”. If you click that button you’ll go to File Explorer on Windows or Finder on Macs. You are expected to choose a texture image.
Texture images are small repeatable images that are used to fill an area without having to use a giant image. They may be very small, like 1/2” X 1/2” or smaller (but usually measured in pixels).
They repeat vertically and horizontally to fill the space where they are inserted and are usually designed in a way that makes them fit together seamlessly so they look like one large image rather than repeated images.
Textures are sometimes used to give the appearance of gritty surfaces like sandpaper or stucco. They may also have the appearance of an embossed surface like floral designs. They sit behind the color layer so that you might choose a pink colored background that appears to have an embossed floral texture to it. In that case you’d choose both a color and a texture image.
If you insert an image other than one that is designed for use as a texture effect, it will still repeat vertically and horizontally until it fills the area, no matter how large or small. This could result in an unacceptable background of repeated race cars, horses, roses, or whatever is in the image you used as a texture.
A Google search for “background texture images” will bring up a long list of websites where you can download texture images.
How to use a large image as a background in Scrivener
That Choose Texture… button holds a secret that allows you set an image that covers the entire background of the area.
Let’s say you’re a person who is inspired by photos of beautiful scenery. You can use such a photo as the fixed width background that displays on either side of your Editor panel. If you use a photo that is large enough to cover the entire fixed width area you should see the background image on each side of the editor panel.
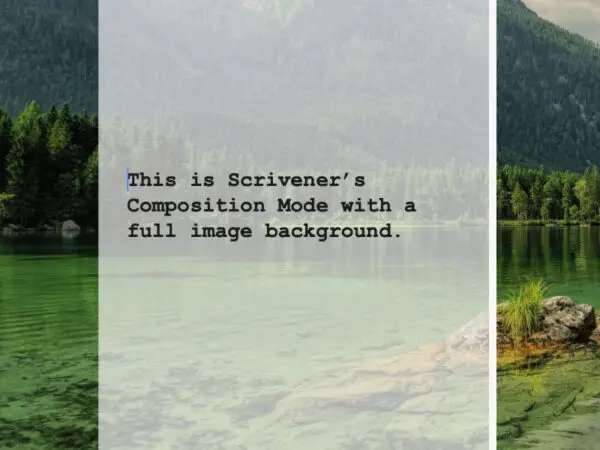
The key is to insert an image that is large enough that it appears only once and does not “tile” (repeat vertically and/or horizontally). If you use the Choose Texture… button to insert a very small image of mountain scenery, it will tile to fill the space, leaving you with a background of many small mountain scenery images. But if you insert a large version of the same image that does not repeat itself, you will have a background of a beautiful mountain scene.
This little trick really shines if you are one who frequently uses Composition mode, the distraction-free editing mode. You can turn it on by going to the View menu, then Enter Composition Mode.
To select the background color or image:
- Go to the Options/Preferences > Appearance panel.
- Choose Composition mode from the left column.
Be sure the Colors tab is selected in the right side of the settings panel. In the center column go down the list until you come to Screen Background. Be sure to choose Screen Background and not Editor Background. If you choose the latter, only the Editor area where you type your text will have a background image.
Click the Choose Texture… button and select an image that is large enough to fill the entire computer screen.
You will see the background image from side to side, top to bottom. You may be able to see it through the editor panel where you’ve been typing. If you look toward the right end of the footer (lower right corner of the screen), you’ll see a slider labeled Paper Fade that adjusts the background opacity of the Editor itself.
You can adjust the Paper Fade anywhere from Solid, where no background image shows through, to None, where the image shows through the Editor as it does on the right and left sides of the editor. Depending on the image you chose for the background, your text may barely be visible in the Editor. In that case, move the slider left or right to adjust the opacity of the Editor background the way you want it.

You can also set the color of the Editor background in Composition Mode. This is in addition to setting the image in the screen background. Just play with it until you find a combination of Editor background color and screen background image that is comfortable for you.
In Composition Mode, you could also have a solid color screen background and a background image in the editor if you wish. It’s Scrivener. Set it up the way you want it!
Set a Composition Mode background image per project in Scrivener
You can set a different background image in Composition Mode on a per project basis. This would allow you to have a different image for a romance novel project than for a paranormal project, for example.
To set the Composition Mode background image for a particular project:
- Go to the Project Menu.
- Select Project Settings…
- Select Background Images…
In the top portion of the settings panel, you are given these choices:
- No backdrop.
- Choose from disk…
- Use image from project…
The first option is obvious. To use a background image, select Choose from disk…. To use an image that has been imported into your project, select Use image from project….
One last piece of advice about background images in Scrivener…
The trick of having a full background image behind the Main editor does not work the same way it does in the Composition Mode editor. That is because as of the date this article is being written there is no way to adjust the opacity of the background in the Main editor.
To my knowledge, there is no way to set the Main editor’s background to be transparent as there is in Composition Mode.
If you’re interested in more of our Scrivener tips, read How to Make Scrivener Easier for New Users.
You can learn more about Scrivener at LiteratureAndLatte.com, the creators of Scrivener.
A note about this tutorial. All of our Scrivener tutorials are personally written based on our own experience with Scrivener. If you would enjoy more in-depth training, we recommend Joseph Michael’s Learn Scrivener Fast Course.
