It’s easy to change margins in OpenOffice Writer. In this article you’ll learn three simple ways to change them. You’ll also learn the process of setting your custom margins as the default.
Table of Contents
Change margins in OpenOffice Writer using the ruler
The simplest and fastest way to set margins in OpenOffice Writer is by using the horizontal ruler.
If you are accustomed to the ruler in Microsoft Word, you’ll find some differences in OpenOffice Writer’s rulers.
If you don’t see the rulers, you can activate them by going to the View menu, then clicking Ruler. OpenOffice uses the singular term Ruler, but it will open both rulers—the horizontal top ruler and the vertical ruler along the left side.
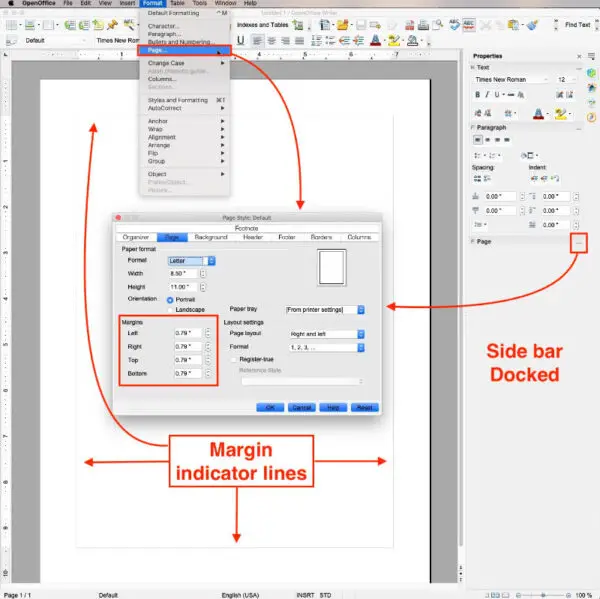
You can see the document’s current margins represented by a thin line near the top, bottom, and both sides. If you do not see the line, your margins are probably set to zero.
By default the ruler in OpenOffice Writer is a lighter color than the surrounding background. Hover your mouse over the left end of the horizontal ruler until you see a marker like a dark vertical line with an arrow facing toward the center of the document.

Click that marker and drag it inward from the edge of the document until it is where you want your margin to be. Repeat the procedure on the right side and drag it inward until that margin is where you want it.
To set the top and bottom margins, use the same procedure at the top and bottom of the vertical ruler.
If you want your page to have no margins, just mouse over the end of the ruler until you see the margin marker and drag it outward until it is at the edge of the document. The light colored line that marks the margins will not be visible if you have no margins set.
Set OpenOffice Writer margins using menus
You may occasionally need to set your margins to a specific measurement. For example, you may be submitting work to an editor who requires the top and bottom margins to be set to one inch and the side margins set to half an inch.
If you know exactly how large your margins should be, you can set them using the menu.
- Go to the Format menu, then choose Page….
- A settings panel will open. You should see the margin settings in the lower left area of that panel. If you don’t, click the Page tab at the top of the settings panel.
- To set the margins, just fill in your required settings for top, bottom, left, and right. You’ll set them using decimals. For example, if you want a half-inch margin, you’d type in .5 or use the small arrows at the right side of the setting to adjust it.
Be sure to click OK when you’re finished.

Manage OpenOffice Writer margins using the sidebar
You can also set specific margins from the Sidebar. If you don’t see the sidebar, open the View menu at the top and click Sidebar.
If the Sidebar opens as a floating panel and you’d like to dock it to the right side of the window, you can do that by clicking the menu icon in the corner of the panel (three horizontal lines with downward pointing arrow). Choose Dock from the menu choices.
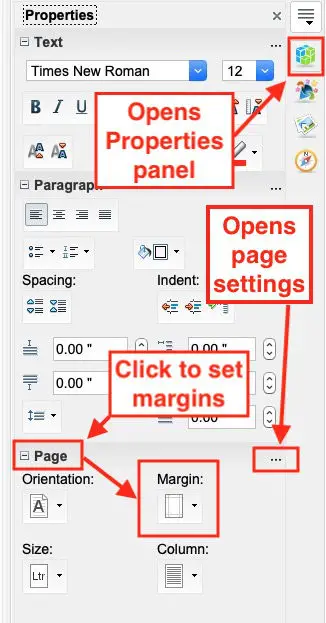
To set margins using the Sidebar, either click the menu icon and choose Properties, or click the green icon to open the Properties panel. This should work is the panel is docked or undocked.
There are three sections in the Properties panel—Text, Paragraph, and Page. You’ll need the Page section. If you see only those section labels and no settings, click the + next to Page to open Page settings.
You’ll see four icons in the Page section. They are labeled Orientation, Margin, Size, and Column. Click the Margin icon.

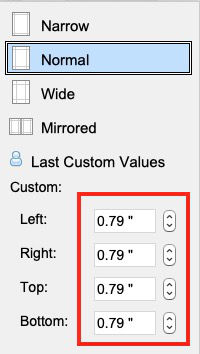
A small panel should open where you can insert your desired settings for top, bottom, left, and right margins.
In that panel you’ll see four presets. Narrow sets all four margins to half an inch. Normal sets all four to .79”, just over 3/4”. Wide sets the top and bottom to one inch, and both sides to two inches. Mirrored sets the top and bottom to one inch and both sides to 1.25 inches.

You can set custom margins by adjusting any of the presets. Do that by clicking the up or down arrows next to the setting.
If you look closely in the top right corner of the Properties section (to the right of the word Properties), you’ll see three tiny dots. Click the dots and you’ll be presented with the same Page settings panel that you used in the menu method we talked about earlier.
Change the default margins in OpenOffice Writer
I wish one could simply set the margins using one of the methods we’ve discussed, then click a button to set them as new default margins in OpenOffice Writer. It’s not quite that simple, though.
To set your own default margins:
- Open a Writer document and set your margins using any of the methods we’ve discussed.
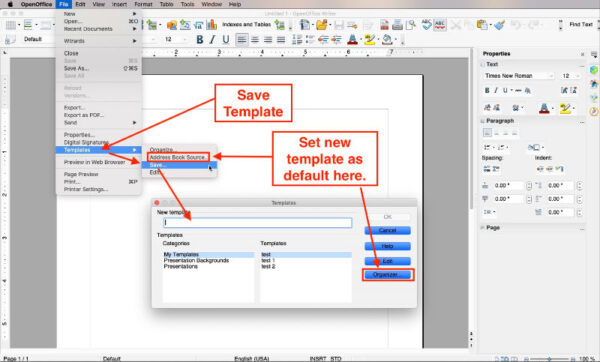
- With your margins set, open the File menu and toward the bottom of the menu, select Templates, then Save….
- In the box that opens, type your chosen template name in the top box. Then, in the lower left box, select My Templates and click OK.
In order for the margins you set in the template to become your default margins for future documents, you’ll need to set the template you just created as your default page template.

Do that by going to the File menu > Templates > Organize. In the left column of the box that opens, double-click My Templates. Choose the new template that you just created.
Below the Close button is one labeled Commands. Click the Commands button and from the list that drops down, choose Set as Default Template.
Any Writer documents that you create in the future will use the template you just created, complete with your custom margin settings. That template will be used until you set a different template as default.
If you write different types of documents that each have their own margin requirements, you can create a template for each one. Then, when you need Writer to use different margins, just use the method we just discussed to change the template to the one that works best for the document you’re about to create. For best results, select the desired template before you begin writing.
Changing margins can change the number of pages in your finished document. Learn how to insert page numbers in OpenOffice Writer.
You’ll find OpenOffice User Guides here.


