It’s not necessarily obvious how to add page numbers in OpenOffice, but it’s very easy when you know where to start. In this article you’ll learn how to easily insert page numbers in the header or footer of OpenOffice Writer documents.
Table of Contents
How to Add Page Numbers in OpenOffice Writer
The first thing to understand about page numbers in OpenOffice Writer is that you can insert them almost anywhere. While it’s common to place them in the header or footer, you could insert them in the center of the page if you desired.
For purposes of this tutorial, I’ll assume you want to place them in the header or footer.
Add a header and footer to your document
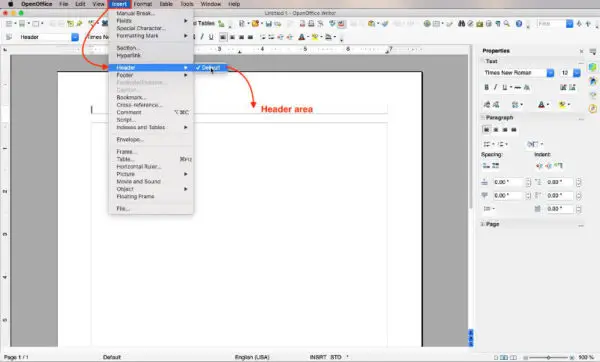
To get started, we’ll insert a header.
- Open a new document and go to the Insert menu.
- Find Header, then Default (which may have a check mark before it).
You should see a lightly bordered rectangle that has been added above the content area of your document.
Now, let’s use the same method to insert a footer. This time,
- Go to the Insert menu.
- Choose Footer, then Default.
Just as you saw in the header, you should see another lightly bordered rectangle inserted below the content area of your document.
Add the Insert toolbar
The default methods of inserting a page number aren’t always the same between the header and footer.
For the curious, in OpenOffice Writer for Macs, fields can be inserted in the footer via the right-click menu. That option is not available for the footer in OpenOffice for Windows or for the header on either Macs or Windows computers.
In this tutorial we’ll stick with methods that work on Macs and Windows computers.
So that you can follow along with the instructions, we want to be sure the Insert toolbar is visible in OpenOffice Writer.
Here’s how to make the Insert toolbar available.
- Go to the View menu.
- Choose Toolbars, then look down the list until you see Insert.
- Click Insert to add the Insert toolbar.
You should now see the Insert toolbar added to the existing toolbars at the top of OpenOffice.
Insert page numbers in the header
OpenOffice uses something they call Fields to handle page numbers. If I were to discuss all the ways OpenOffice uses Fields, you might fall out of your chair asleep before you’d finished reading. We’ll stick to fields as holders for page numbers.
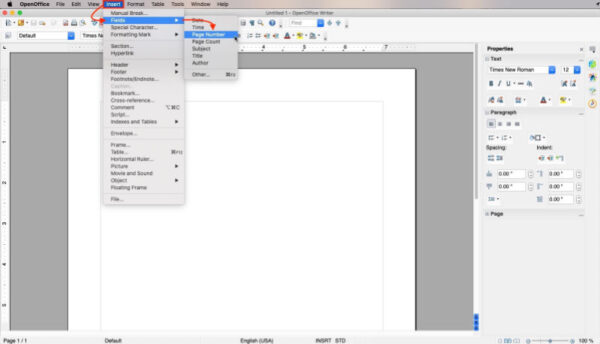
- Click inside the header that we inserted earlier.
- Go to the Insert menu.
- Choose Fields.
- ChoosePage Number.
You can use the left, center, or right align buttons in the toolbar to set where the page number shows.
You can also click inside the header, then go to the Insert toolbar that we added earlier.
- Look in that toolbar for a button icon that looks a bit like a tiny document with a plus sign in the top left corner. There is also a downward-pointing arrow on the right side of the button. If you mouse over it, the tooltip should say Insert Fields. Click that button.
- Choose Page Number.
Note: If you mouse over the button and the tooltip says Entry instead of Insert Fields, you’re not on the right button. Move toward the left until you find the Insert Fields button. The Entry button looks similar to the Insert Fields button, but its job is different.
Insert page numbers in the footer
The methods for inserting page numbers in OpenOffice Writer footers is exactly the same as it is for headers. Place your cursor in the outlined footer area and use either of the methods we used for headers.
Insert page numbers with page count
You can just as easily insert page counts in your header or footer. Those would be useful if you wanted your header to display page numbers along with the total number of pages in the document. For example, Page 1 of 12.

To do that, click in the header or footer and type the word “page”. Next insert the page number just as you did in the exercises above. Then type the word “of”.
Now go through the same steps that you did for inserting the page number, but this time, insert page count. So in your header or footer, you would have typed or inserted Page [page number] of [page count].
Insert author name with page numbers in the same header
We often see headers that contain the authors name aligned to the left, and the page number aligned right. If you are aligning only the page number left, center, or right, the process is as simple as selecting the page number and using the alignment buttons in the toolbar just as you would for text.
It is a little trickier if you want the author name left-aligned and the page number right-aligned in the same header.
Here is the easiest way I’ve found to do that.
- Click in the header.
- Type the author’s name and make it left-aligned.
- Insert the page number or page number and page count as we did earlier.
- Place your cursor between the author’s name and the page number.
- Hit the tab key once to center the page number.
- Hit the tab key twice to right-align the page number.
The process is the same if you want the page number on the left and the author name right-aligned. Just insert the page number then the author name. Place your cursor just before the author name and use the tab key to align it center or right.
Final notes about adding page numbers in OpenOffice Writer:
That’s all there is to inserting page numbers in OpenOffice Writer. After you’ve inserted them, you can use the normal formatting tools to change the font, font size, color, etc..
You can find OpenOffice documentation here.
Learn about headers and footers in LibreOffice Writer here.
