Vellum for Mac does an excellent job of formatting books for eBook and print. You may be one who uses it but like to tweak the default settings a bit. One of those settings is line height, or line spacing as Vellum calls it. Here’s how to change line spacing in Vellum.
Table of Contents
I’ve always been happy with the line spacing that Vellum uses by default. But I can see how a person might want to change it for some projects. Vellum can create large print layouts with a few clicks of a mouse, but you may wish to create your own using larger or smaller line spacing with larger fonts.
Should I increase line spacing in my print book?
I’ll show you how to adjust the line spacing but before you change it, there are a couple things you should keep in mind.
First, line spacing in Vellum only applies to print books. The reason is that eBook font settings are in the hand of the reader. Every eReader that I am aware of allows the reader to increase the font size which often results in an automatic change in line spacing. Because we have no control over the actions of our readers, we aren’t given the option to set line spacing for eBooks.
Second, remember that changes in font size or line spacing affect the total page count.
Larger fonts and higher line space settings frequently result in an increase in the total number of pages.
Since IngramSpark, Amazon KDP, and other print on demand (POD) book printers charge a base price plus a small cost per page, increasing the number of pages will result in your having to pay a higher price to print the book. You can try narrowing the margins to make up for the line spacing difference but there is only a small amount that you can decrease margins without negatively impacting the visual integrity of the finished product.
Vellum tries to use optimal settings for each size. If holding your printing costs down is important, you may want to see if there is a way you can work with the default settings.
How to change line spacing in Vellum
Vellum does not provide the fine tuning capabilities of InDesign or Affinity Publisher for the user. Instead, it takes it upon itself to calibrate the font size, line spacing, and other adjustments that it thinks are most appropriate for the trim size that you choose.
You can make changes to line spacing, but your changes will be relative to the pre-existing settings that Vellum set for you.
You cannot tell Vellum that you want line spacing to be X number of points, for example. Instead, what happens is you tell Vellum that you’d like your lines to be slightly closer or farther from each other. You increase or decrease the line spacing using a slider that does not give you specific numbers to work with.
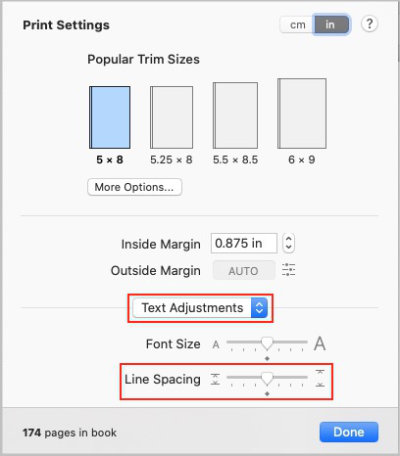
To change line spacing in Vellum, you’ll go to the File menu. Choose Print Settings…. From the top of the settings panel, you’ll see the Trim size settings. Next are the Inside Margin and Outside Margin settings.
Just below the margin settings you will see a drop-down box. Be sure Text Adjustments is showing in that box. If anything else is visible there, you won’t see the Line Spacing adjustment.
Assuming you’ve selected Text Adjustments, you’ll see two horizontal sliders. The bottom one is for Line Spacing. You’ll move the slider to the left to decrease line spacing and to the right to increase it.
Double-check that you are getting the desired result
Vellum can show you a representation of the finished product. To see that you’ll want to have the Preview panel open so you can see the effect your changes have on the layout as you make them. If it is not open, click the Preview button in the top right of the Vellum interface.

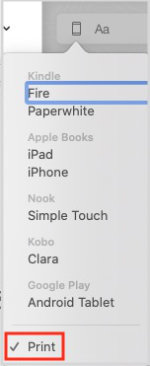
I would suggest you also set the Preview panel to display the Proof version of your book. To set the print display to Proof, look just above the Preview window. You will see two button icons. The first one looks like a mobile device of some kind. Click that button and look for Print, all the way at the bottom of the device list.
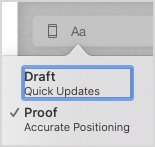
The second button icon shows an upper and lower case character like this: Aa. Click that button to display two choices. The first choice is Draft which is close to the final appearance. The second choice is Proof, which is more accurate. Choose Proof.
Now, move the slider left or right to decrease or increase the line spacing. The page preview will temporarily go blank then reappear with your new setting. Change the setting as many times as necessary until your book page looks the way you like.
For more info: Formatting books in Vellum v3.
