Vellum automatically sets margins for print books based on your chosen trim size and the number of pages. I’ve found that the default margins work for me. But if you prefer a different setting, you can easily change margins in Vellum.
Table of Contents
When is a book page’s margin too narrow?
Be aware that when you change margins in Vellum, you are changing them only for the print version of your book. Margins in eBooks are controlled by the particular device.
Vellum allows you to adjust the inside and outside margins separately. This is because the gutter margin—the margin against the binding—should be wider than the outside margin to accommodate the natural tendency for part of the page to be taken in by the binding and therefore, not visible.
If you’ve ever opened a paperback book with several hundred pages and found that the beginning of the lines on a right page or the ends of lines on a left page were almost out of sight, you’ve seen what happens when the inside margin is too narrow. The more pages there are in a book, the wider the gutter or inside margin should be.
Change Margins in Vellum
To adjust the print margins in Vellum, go to the File menu and click the last item, Print Settings…. You can also open the print settings panel by using Shift + Command + P.
The Print Settings panel will open. In the middle section of the panel you’ll see two adjustments. The first is labeled Inside Margin. The other is labeled Outside Margin. As we’ve discussed, Inside Margin is the gutter margin and therefore, normally the widest.
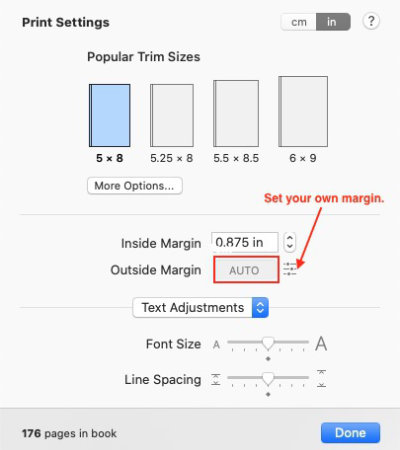
When you first open the Print Settings panel, the Outside Margin by default says Auto. If it does, click the icon just to the right of the setting. You can use the up/down arrows or simply type in your preferred margin.
How to return Vellum’s default margin settings
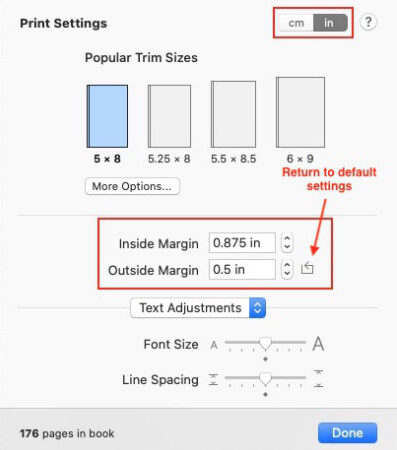
If the margins you choose don’t work out, you can return to the default settings for your chosen trim size. Just click the icon to the right of the settings box. It looks like a small box with an arrow on the top side pointing left.
Amazon KDP recommends inside margins be set from 3/8” (.375) to 7/8” (.875), depending upon the page count. By default, Vellum will normally set the inside margin a little higher. Vellum’s creators say that .875” should work for most books.
Change margin settings in Vellum from inches to centimeters
If you prefer to set your margins in centimeters instead of inches, click the cm/in button in the top right corner of the Print Settings panel. That will change all settings in the panel from inches to centimeters.
How page margins affect page count
If you don’t change the font size along with the changes in margin widths, a wider margin will result in an increase in pages. Conversely, a narrower margin will result in a decrease in pages. Vellum will automatically recalculate your page count based on all of the applicable settings applied to your book.
You can see the updated page count in the lower left corner of the Print Settings panel.
Learn more about customizing Vellum’s styles here.
