In this article we’ll look at hyperlinks in OpenOffice Writer. We’ll see what they are and how you can include them in your document. We’ll look at ways to use them as standalone links and in tables of contents.
Table of Contents
How to Create Hyperlinks in OpenOffice Writer
In case you aren’t familiar with hyperlinks, they are something you use every day when you’re browsing the Internet. It was a hyperlink that took you to thetechiesenior.com when you found us on Google, Bing, or some other search engine.
Hyperlinks can also help you navigate a document such as when you have a table of contents at the top with links to headings further down.
We’ll manually create a table of contents, then we’ll look at a more complex use of hyperlinks when we create an automatic table of contents.
Create outbound hyperlinks in OpenOffice Writer
I’m using the term outbound hyperlinks to refer to any linked text which, when clicked, takes you somewhere outside your document. That would usually be a website.
To create an outbound link, first select the text in your document that you wish to contain the link. I’ll use the following sentence to demonstrate creating a link within a sentence.
“I learned about this subject while viewing TheTechieSenior.com.”
In that sentence, I would select only the words TheTechieSenior.com because that’s all I want to be hyperlinked. The actual hyperlink to TheTechieSenior.com, behind the scenes, will look more like this HTML code:
<a href=“https://thetechiesenior.com”>TheTechieSenior.com</a>
Don’t worry, OpenOffice Writer will take care of the coding when you take the simple steps I’m about to describe.
To create the link, I would first select the text TheTechieSenior.com. With it selected, I could use any of the following three methods to insert a hyperlink that would actually take my readers to the website.
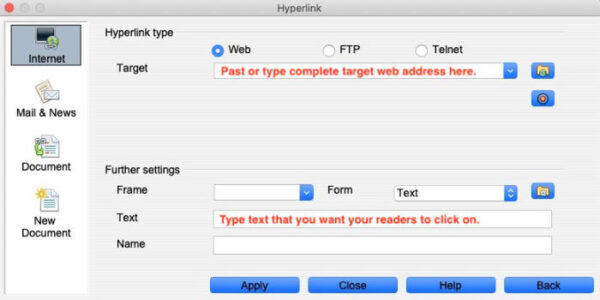
1) Go to the Insert menu and choose Hyperlink. A settings panel will open. Be sure Internet is selected from the four choices on the left side of the settings panel.
- Type your link in the top field labeled Target.
- Be sure to select Web above the Target field.
- Click Apply and Close.
2) Find the Hyperlink button in the toolbar. It is a round green globe icon with chain links across the lower half. (Honestly, to me the chain links look more like a pair of eyeglasses with round frames.)
- Click that Hyperlink button. The same link settings panel that you found via the menu in the first method will open.
- Type your link in the top field labeled Target.
- Be sure to select Web above the Target field.
- Click Apply and Close.

The hyperlink button in the OpenOffice Writer toolbar.
3) If you are thinking far enough ahead in your writing to know when you will need a hyperlink inserted, you can also simply stop typing just before the word(s) that you want to be hyperlinked.
Use either method described above to open the Hyperlink settings panel. But this time:
- Type your link in the top field, labeled Target.
- In the bottom half of the panel, under Further settings, locate a field labeled Text.
- Type the text you wish to attach to the link. That would be the words that you’d want your readers to click on to follow the link.
- Click Apply and Close.
How to remove a hyperlink in OpenOffice Writer
Removing a hyperlink is simpler than creating one. Just right-click anywhere inside the linked text and choose Remove Hyperlink near the bottom of the context menu that pops up.
There is no need to select the entire linked text before right-clicking.
How to link internally in OpenOffice Writer
Let’s say you have a simple document that is a few pages long and contains three or four sections. You’d like to have a simple table of contents at the beginning which would allow your readers to skip to the section that interests them.
There are two ways to do that. If your document is only a few pages long, you may prefer to manually create your table of contents.
You can easily create a simple table of contents by typing section titles on consecutive lines near the top of your document. An example might be:
Section One (You want this text linked to section one in your document.)
Section Two (You want this text linked to section two in your document.)
Section Three (You want this text linked to section three in your document.)
The trick is to have a heading at the beginning of each of the actual sections of text in your document that those headings at the top of your document refer to.
Those headings that are at the beginning of your actual sections should be styled using OpenOffice Writer’s built-in styles.
For now we’ll assume those sections are all of the same importance.
- Select the heading at the top of the first actual section of content.
- In the formatting section of the toolbar, click the Styles dropdown. It may say Default or something like Paragraph or Heading 1. It is usually just to the left of the font selection list.
- Click in the styles dropdown and select Heading 1.
- Do the same for each of the other headings.

Now, at the top of the document where you typed the three Section lines/titles, select the text of Section one.
- Click the Hyperlink button in the toolbar.
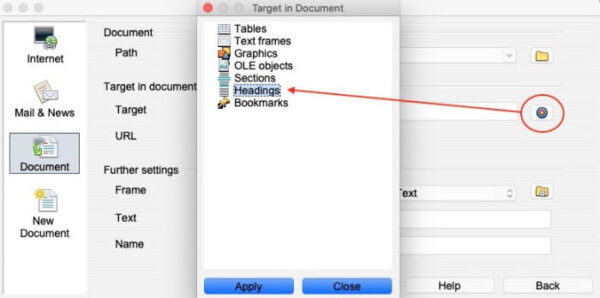
- Click the Document button in the left column.
- In the settings panel on the right, locate “Target in Document”.
- On the right side of that field click the blue button with a red bullseye icon.
- A box should open with a list of document parts. One of them should be Headings. Click Headings.
- A list of the section headings that you created earlier should appear. From that list, choose the section that matches the Section title that you selected at the top of your document.
- Click Apply and Close.
- Click Apply and Close on the next panel.
Do that for each section you listed at the top of your document. When you’re finished, you should have a clickable list of sections. Clicking any of them should take you straight to the corresponding section in your document. This manual table of contents will not have page numbers unless you include page numbers in the header text.
The method just described will allow you to select any text—even in the middle of a sentence—and link it to a section heading further up or down in your document. We placed three headings, one below the other, at the beginning then attached hyperlinks to them to hand-create a table of contents. But the method of attaching a hyperlink to the selected text could have been used anywhere in the document.
Creating an automatic table of contents in OpenOffice Writer
This method is more appropriate for long documents. It also requires you to style the section headings in the body of your document as described in the previous instruction.
The difference here is that you can automatically include sub-headings. To make the heading of a section a sub-heading, style it as a Heading 2 and sub-sub-headings as a Heading 3.
With the section headings properly styled, place your cursor where you want the table of contents to appear. Then either go to the Insert menu and select Indexes and Tables > Indexes and Tables… or click the large Indexes and Tables button in the toolbar.
In the settings panel that opens:
- Be sure the Index/Table tab is selected.
- The first section will be labeled Type and Title. From the Type dropdown list, choose Table of Contents.
- In the Title field, label it whatever you wish.

Open the Entries tab. Just below that tab locate a section labeled Structure and Formatting.
- You should see a column with Levels numbered one through ten.
- Choose “1” to link your main headings. In the Structure line, click in the very first small white box. Locate the Hyperlink button and click it.
- On the same line click in the very last small white box. Click the Hyperlink button again. This causes the entire line of text in your table of contents to be clickable.
- If you have sub-headings, choose “2” from the Levels list and repeat the instructions in the previous paragraph.
- If you have sub-sub-headings, choose “3” from the Levels list and repeat the same instructions.
You should now have a clickable table of contents wherever you placed your cursor at the beginning of this process.
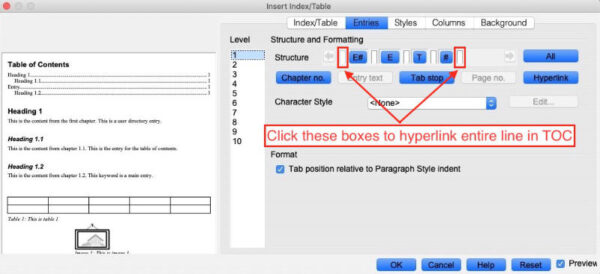
Warning: There is an arrow pointing to the left at the beginning of the Structure line and one on the other end of the line that points right. If either of those arrows is brightly colored (not the faded tan or grayish look), click the arrows to move to the ends of the line so you can be sure you really are clicking the first and last white boxes. Failure to do so could cause some part of your table of contents to not be linked. The white boxes that I’ve instructed you to click are very small—about the width of an uppercase M. They are intended to be clicked in, not typed in.
Final note about using tables of contents in OpenOffice Writer
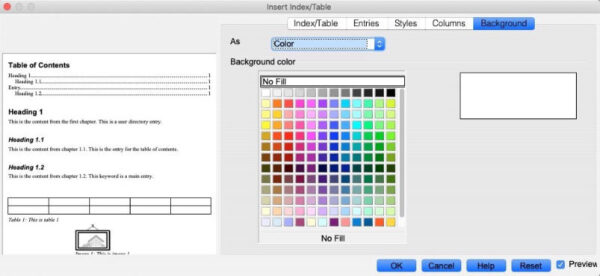
There is much more that could be written about inserting tables of contents. They can be styled and adjusted in a number of ways. I won’t cover styling completely here, but hopefully I’ve given you enough information that you can successfully create your own simple or complex table of contents.
You might also be interested in this article:
How to Easily Count Words in Microsoft Word, Apple Pages, LibreOffice, OpenOffice, and Google Docs
Learn more about official OpenOffice documentation here.
