People who need or want a free option to Microsoft Word often choose LibreOffice.
Table of Contents
LibreOffice includes a suite of apps that correspond to the basic apps in Microsoft Office – now called Microsoft 365. In this article I am focusing on Writer, the LibreOffice answer to Word.
I’ll answer eight questions regarding working in LibreOffice Writer. I’ve used the Mac version of LibreOffice to prepare this article, but the same features are available in the Windows version. Most of the instructions in this article are interchangeable between the Windows version and the MacOS version. Where they differ, I’ll try to fill in the blanks for you.
There is one thing you should be aware of before we dive into the instructions. In MacOS, the menus are always available at the top of the app, whether the Tabbed display (LibreOffice’s version of the Windows ribbon) is on or not.
In the Windows version of LibreOffice, the top menu seems to disappear when the Tabbed interface is selected. Actually, the menu itself does not technically disappear; it moves to the top right corner of the window. You should see a “hamburger” menu – that’s the icon with three or four horizontal lines which will let you change your view. Below that icon you will also see several different menus which change depending on which tab that you have chosen.
For example, if you choose the File tab, all the way to the right you should see a File menu drop-down. The same goes for all of the tabs. Select a tab, and you will find the corresponding menu all the way to the right. This will be the same menu that would normally display at the top when you are not using the Tabbed interface.
How to open a .docx file in LibreOffice Writer.
Opening a .docx file in LibreOffice is easy. Here are two equally simple ways to do it.
From the Start Center which displays when LibreOffice is first opened, choose Open File. Find the file you wish to open and click Open.
From LibreOffice Writer, go the File menu then select Open… or Open Recent… (if you’ve recently had the file open in LibreOffice.)
How to save as a .docx file in LibreOffice Writer.
While its default file extension is .odt, LibreOffice Writer can save files in a number of other formats, including several versions of Microsoft Word files. Among others, you can save your files as .docx and .doc, as well as Word template extensions .dot and .dotx. Here are two ways to save as .docx.
- To save as a .docx file, simply go to the File menu and select Save As… A box will open asking you where you want to save the file and what extension you’d like to use. Click the drop-down box and select “Word 2007-365(.docx)”.
- LibreOffice Writer has a interface option called Tabbed, which provides toolbars that function similarly to Microsoft Word’s ribbon. To turn that option on, go to View > User Interface > Tabbed. With the tabbed view active, select File from the tabs, then in the toolbar select Save As…. This will open the same box as earlier described where you choose the location and file type you wish to save.
Can LibreOffice open .pages files?
In my experience, the answer is not really. In LibreOffice on my Mac I can select a .pages file to open and LibreOffice will appear to open the file. In reality, all that opens is a blank document that appears to have the title yourfilename.pages. However, if you attempt to save that file as a .pages file, you’ll find that LibreOffice does not save it as a .pages file. It’s not actually opening .pages files, although it may appear to, and it cannot save as .pages.
The only workable option that I would recommend is to first export the .pages file to .docx, then open that exported file in LibreOffice Writer. If you do not have a Mac to export the file to .docx and you do not know anyone who can do it for you, there are online options available that claim to be able to make the conversion. I have not personally used any of those file conversion sites and therefore, cannot authoritatively recommend any.
How to delete a blank page in LibreOffice.
This answer assumes you have a page of text followed by a blank page, which is then followed by another page of text.
If the blank page is there because you ran out of space on the first page and continued typing, the background space between the first page and the blank page will be empty.
If the blank page is there because you manually inserted a blank page, that area between the blank page and the next page will have a dashed line across the space between the two pages.
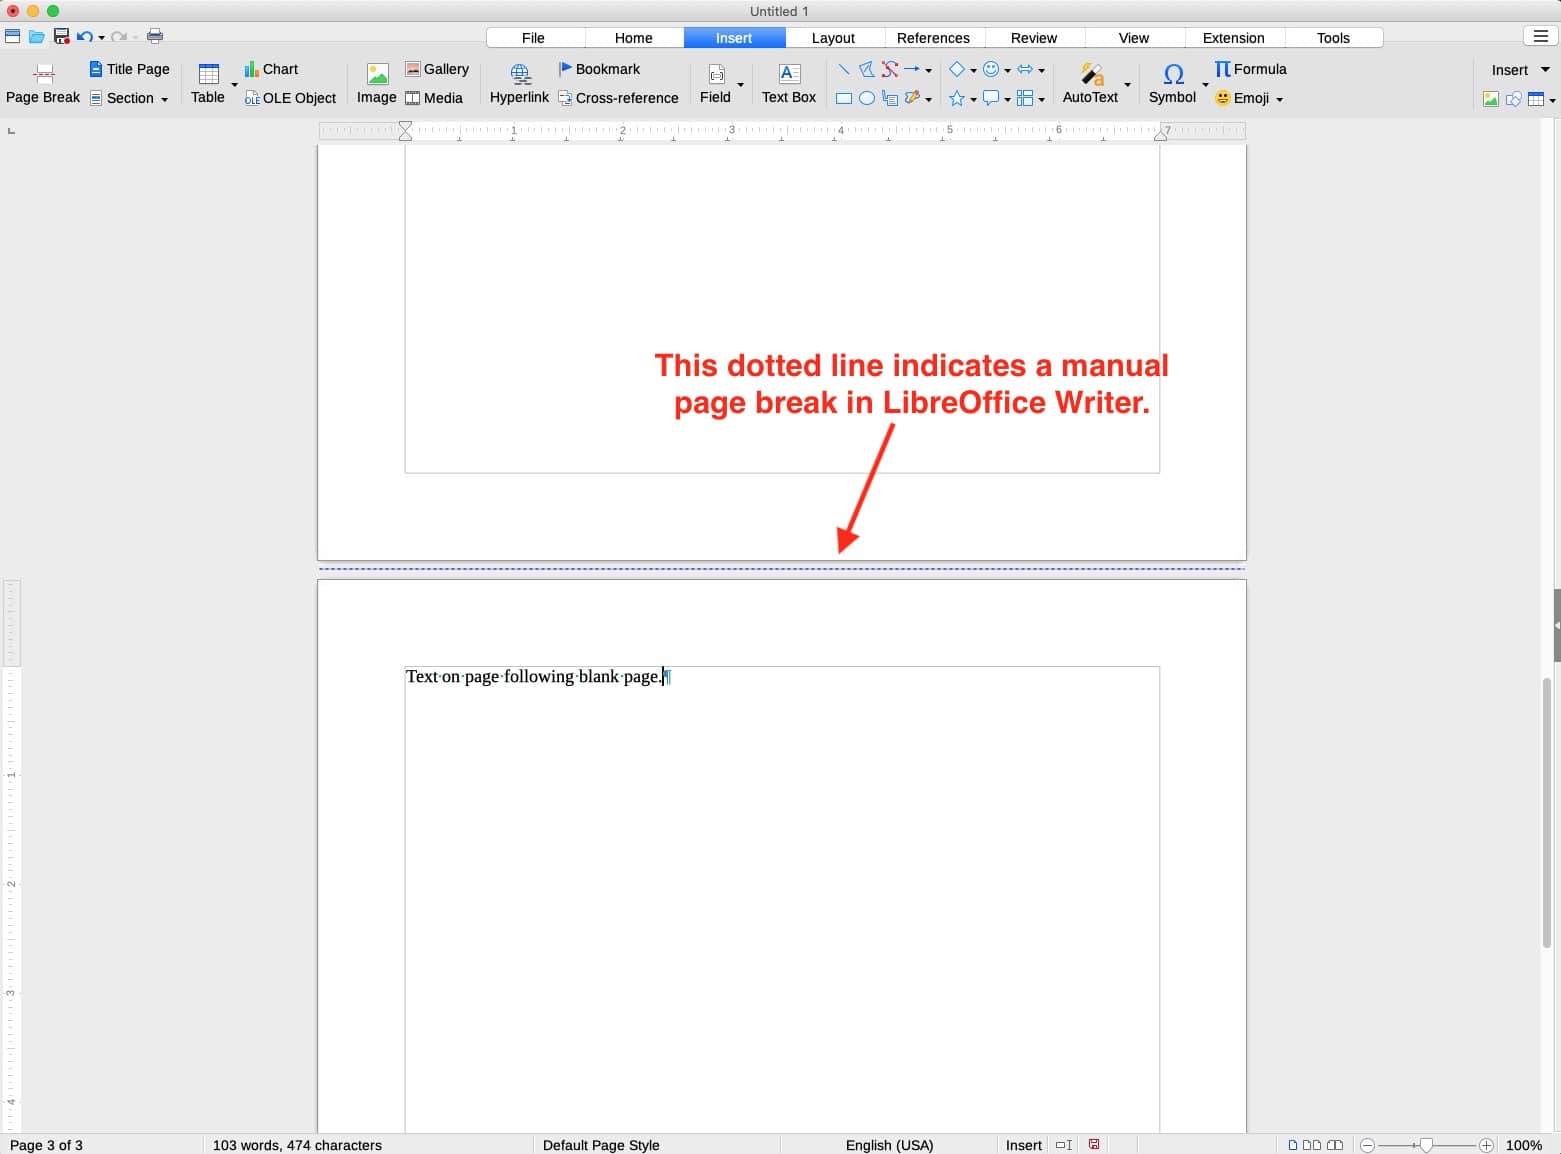
In either case, you can use one of the following hints to delete the blank page.
- On the page before the blank page, place your cursor after the very last character you typed. Use the right facing delete key, delete until the blank page disappears.
- On the page that follows the blank page, place your cursor immediately before the very first character on the page. Use the normal delete key (the one that deletes to the left). If you placed your cursor in the first character space on the page, then deleted, the blank page should have disappeared.
How to export from LibreOffice to PDF.
LibreOffice natively exports to PDF, but not to PDF/X. This will be important to you if you are an author who needs to provide a PDF file of your book to Amazon KDP or IngramSpark. Both of those companies and others prefer a PDF/X file for use with their print on demand equipment. At the end of this section, I’ll give you a possible work-around that could allow you to print from LibreOffice to PDF/X.
If you just need a PDF of your book to send to your street team or beta readers, PDF/X will not be necessary and LibreOffice will easily handle that task. The same applies for a person who needs to send a PDF of a basic report to someone.
If you do not require a PDF/X file, and you have no need to make particular technical settings for your .PDF file, here are three ways you can easily export your LibreOffice file to PDF. All provide the same end result.
- With your file open, go to the File menu, then Export…. A dialog box will open where you will choose “PDF – Portable Document Format (.pdf)” from the file type list. Click the Save button and your file will be saved as a .pdf.
- Go to the file menu, then Export As…. Select “Export Directly as PDF.” The same dialog box will open as in the previous hint. Choose “PDF – Portable Document Format (.pdf)” from the file type list. Click the Save button to save your file as a .pdf.
- With Tabbed interface selected in View > User Interface > Tabbed, select the File tab, then the PDF button. Again, the same dialog box as in the two previous hints will appear. Select “PDF – Portable Document Format (.pdf)” from the file type list. When you click the Save button your file will be saved as a .pdf in the location you have chosen.
Although PDF/X format is not available natively in LibreOffice as of this writing, other options are available that go beyond the basic PDF that we just discussed. If you need tagged PDF or one of the PDF/A formats, the following instructions will help you find those.
With your file open:
- Go to the File menu
- Select “Export As…”
- Select “Export as PDF…”
When you choose Export as PDF… a dialog box will open that provides a number of options such as image resolution, URLs within the document, and more.
Do NOT choose “Export Directly to PDF…”. That is the same method we discussed previously and has no technical format options available.
NOTE: There is a possible work-around that may allow you to convert your file to PDF/X even though LibreOffice does not natively do so. You may have PDF/X capability via your normal print menu if you have installed any app or outside print driver that provides for PDF/X printing.
You can tell if you do by going to File > Print…. You’ll have to look at the options on your particular computer. They could change from one computer to another simply because of the difference in software, printers, etc. that may be installed in one and not on another.
I am using LibreOffice on my Mac, so I can go to File > Print… then look in the lower left corner of the print dialog box where all Macs have a small drop-down menu that says PDF. This menu will contain the options that are available on my Mac for printing or converting to PDF files.
Because I also have Adobe InDesign installed on the same computer, I see “Save as Adobe PDF.” If I click that choice a small box opens that contains two drop-down menus. If I click the top one, a long list of PDF options opens. The first is PDF/X-3:2002. The second is PDF/X-1a:2001. Either of those should produce a PDF that will be acceptable to Amazon KDP or IngramSpark.
Remember, your computer will have options in the Print… menu that are particular to your computer’s setup and installed software. Even if you don’t have Adobe options on your computer it is possible that because of the software that is installed on your particular computer, you may have other options in the Print… menu that will allow you to convert your LibreOffice Writer files to a PDF/X file that will be accepted by print on demand services.
In this case the ability to convert your LibreOffice Writer file to PDF/X exists because of your computer’s print options, not because of anything special LibreOffice Writer is doing. LibreOffice would just be taking advantage of print options that exist separately on your particular computer.
How to add page numbers in LibreOffice Writer.
It’s easy to add automatically updating page numbers in LibreOffice Writer, but it’s not always intuitive at first to see how to do it. I’ll show you two easy ways to add page numbers, but first a note about where on your page to insert them.
The most common place to add page numbers in a document is in the header or footer. You can easily open the header or footer in LibreOffice Writer by clicking in those areas. A dotted line will appear that divides the header or footer from the body of the document.
- Along the dotted line you should see a light colored box with a small arrow and words that say “Header (default page style)” or “Footer (default page style).” If you click anywhere in that box a short list will open. In that list you’ll find “Insert page number.”
- If you are using the Tabbed user interface (which slightly mimics the Microsoft ribbon), with the header or footer open you can also add the page number by clicking the Insert tab, then click the arrow along the right side of the Field button. If you just click the arrow (and not the entire button), a menu should open that includes “Page Number.” This method and the one described in the following paragraph will allow you to insert the page number not just in the header or footer, but also anywhere within the body of the document.
- If you are not using the Tabbed user interface and instead have the standard menu at the top of LibreOffice, you can insert the page number by placing your cursor wherever you want the page number in your document. Then go to Insert > Page Number.
BONUS HINT: If you insert the page number in the header, footer, or on its own line within the body of the document, you can align it left, right, or center by placing you cursor immediately next to the page number, then:
- Align it left by using Control or Command plus L.
- Align it right by using Control or Command plus R.
- Center it by using Control or Command plus E.
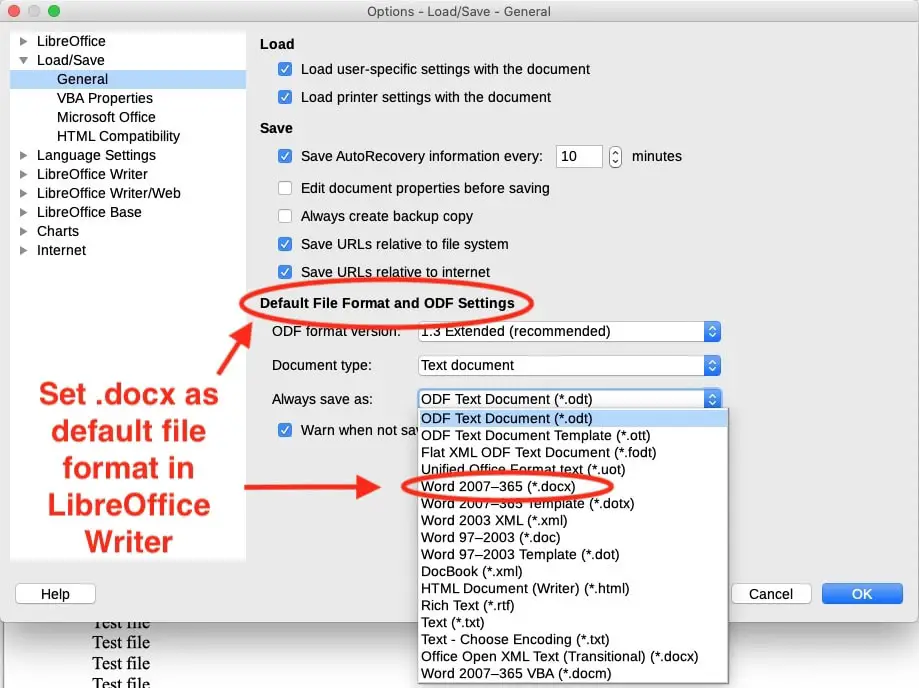
How to save as .docx by default in LibreOffice Writer.
If you want LibreOffice Writer to save your documents as .docx by default, you can make that happen.
- In LibreOffice Writer for MacOS:
- Go to the menu bar at the top.
- Choose LibreOffice > Preferences.
- In the menu on the left side of the preferences dialog box click the small arrow next to Load/Save to open it.
- With Load/Save open, click General.
- In the area to the right of the menus, look toward the bottom for a section titled “Default file format and ODF Settings.”
In that section you should see a drop-down menu labeled “Always save as:”. If you open that drop-down menu, you’ll see a long list of file formats that you can set as your default. The first Word option in the list (at the time of this writing) is Word 2007-365 (*.docx). Click that option and your future LibreOffice Writer documents should save as .docx by default.
In LibreOffice Writer for Windows you will find the same options as described above for the Mac version. However, as usual, you get to the options panel in a different way. In LibreOffice Writer for Windows, if you are using the Tabbed interface:
- Click the “hamburger” menu icon in the far top right corner of LibreOffice. It will look like a stack of three or four short horizontal lines.
- Choose Options from the menu that opened.
From there, the instructions in the previous paragraph will also apply.
In LibreOffice for Windows you can get to that same Options panel from the Tabbed interface by clicking the Tools tab, then look in the top right corner just below that hamburger menu. You should see a drop-down menu titled Options. Click it and follow the previous instructions.
If you are on LibreOffice for Windows and are not using the Tabbed interface, simply go to Tools > Options and follow the instructions given earlier.
How to set a default font in LibreOffice Writer.
In LibreOffice Writer for MacOS, go to the menu bar at the top. Choose LibreOffice > Preferences.
In LibreOffice Writer for Windows, if you are using the Tabbed interface, again, click the hamburger menu icon, then choose Options from the menu that opened. The other methods listed previously for finding the Options panel in Windows will work for this tutorial as well.
- In the menu on the left side of the preferences dialog box click the small arrow next to LibreOffice Writer to open it.
- Click Basic Fonts (Western).
- In the area to the right of the menus, you’ll see five fonts which can be set as default. They are Default, Heading, List, Caption, and Index.
To set any of the fonts and font sizes in that list as default:
- First click the Default button just under font size column. You will see some visual changes in the settings controls, including the Default button turning blue.
- Make your changes to the fonts and font sizes.
- Click the Apply button at the bottom of the Options panel.
- Click OK.
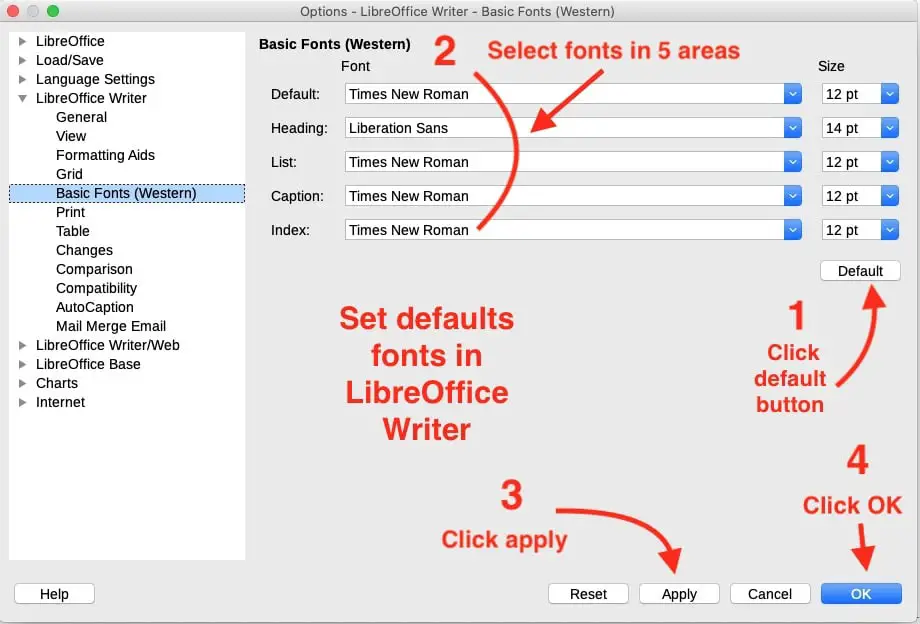
NOTE: If you change the fonts before you click the Default button, they will not be saved as defaults. Be sure to click the Default button, then make your changes and apply them.
Final comments
You should be more at ease with LibreOffice Writer now. You’ll more information about making the change from Microsoft Word to LibreOffice Writer here.
If you’re just learning what LibreOffice can do before you make the leap into it, you might want to download and install it on your computer. LibreOffice is a no-cost open source software project which means it won’t cost you anything to try it. Click here to download LibreOffice.
