For most casual users of MS Word, it’s probably not a problem that all of their letters or other documents are typed in Calibri font—the default font in Microsoft Word.
Table of Contents
But what if you type assignments for a class in which a different font is required, or perhaps you work from home and your employer requires MS Word documents to be written in a specific font?
If you are in the latter group and would like to know how you can set a different font as the default, keep reading.
How to change the default font in Word
Following are three easy ways you can change the font so that Word will automatically use it in future documents.
Method 1: Directly edit the style to change the default font in Word
The first method of setting your default font involves modifying the default formatting for Word documents. It is the same for Windows and Mac users.
Microsoft Word uses what it calls Styles to determine how documents will look. They can be extensive – covering fonts, font sizes, line spacing, paragraph spacing, and more. Many users make do with the default styles, never knowing that they can create their own for different writing tasks.
If you look in the Home tab of the Ribbon, more than half of it is taken up with style settings. You can recognize the most common ones by their large square shapes. They’ll have two lines of text on them. On each button on the top line will have some variation of AaBbCcDd. The second line will indicate the name of the style.
Each of those white squares is an icon that leads to the settings that comprise that particular style. The first one will be named Normal, unless the style has been renamed.
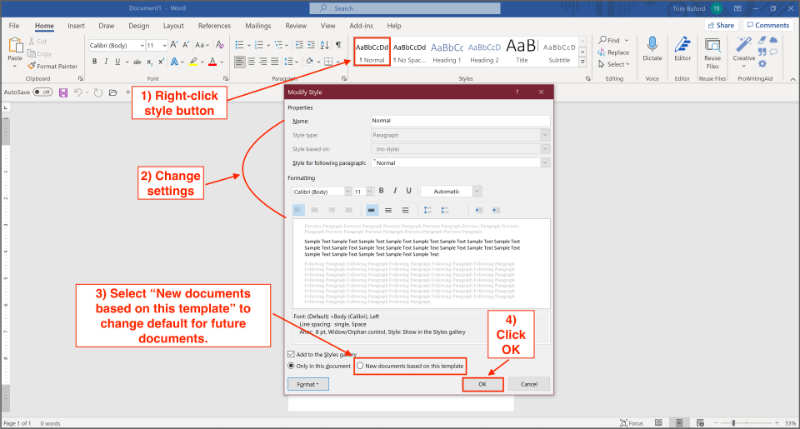
- Right-click the Normal style icon to open its settings. You should see the font settings on the first tab that opens.
- Look at the second section labeled Formatting. You’ll see settings there which allow you to change the font itself along with font size, line spacing, and more.
- Select the font you want from the drop-down list and click OK.
From now on, unless you create or choose a different style, your documents will use the Normal style with the font settings that you chose.
Method 2: Edit the MS Word style using the current document
The second method is just as simple and is also the same for Windows and Mac users. Type a document and set the font, line spacing, etc. the way you want them. Select the portion of the document that is formatted in the font and style that you want to set as default.
With that text still selected, right-click the same Normal style icon that you clicked in the previous instruction. You will see a short menu. The first item in that menu is Update Normal to Match Selection. Click that menu item. The Normal style will be updated so that any future documents that use the Normal style will use your newly chosen font and style settings.
Method 3: Change Word’s default font using font settings
On Windows computers the third method is different from Mac computers.
The third method for Windows users only is to open the Home tab of the Ribbon. In the Font section click the very small icon in the lower right corner with an arrow pointing toward the corner. (You can also hold the Control key and D at the same time to open the same settings panel.)

In the font settings panel, select the Font tab and adjust your settings the way you’d like them. Then click the Default button in the bottom left corner. You will be asked if you wish to apply your changes only to the current document or to all future documents using the Normal style.
There are more detailed settings such as character spacing available in the Advanced tab.
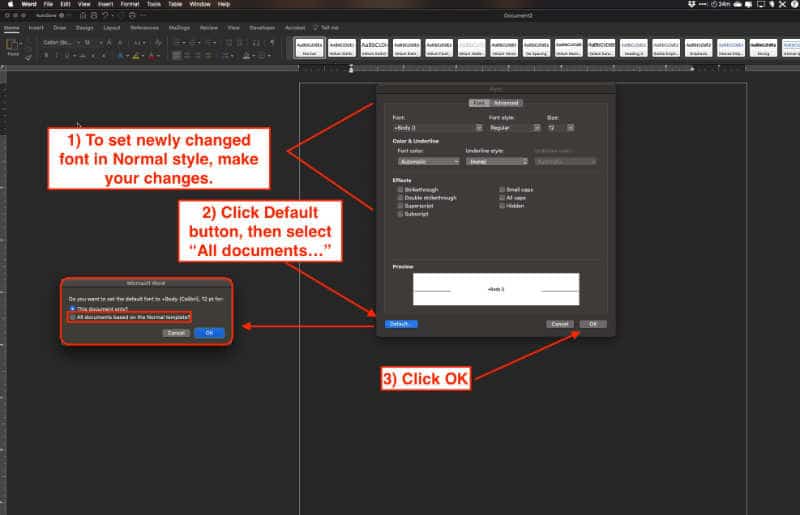
The third method for Mac users only is to go to the Format menu at the top. Select Font…. (You can also use Command + D to open the same settings panel.)
Select the Font tab and change any settings you’d like. Then click the Default button in the bottom left corner of the settings panel. You’ll be given the chance to apply the changes to your current document or to the Normal style for any future documents.
Click the Advanced tab for more settings on a more micro level, such as character spacing.
You’ll find more Microsoft Word tips here.
