Divi is a well-known theme and page builder for WordPress that has been downloaded and used by more than 700,000 website creators and businesses (according to Elegant Themes, the creator of Divi).
Table of Contents
One of my favorite Divi features is its versatility. With it, you can design and create your WordPress website practically any way you might imagine.
In this article we’ll focus on just one of Divi’s features – the ability to add a menu in Divi almost anywhere.
All WordPress themes allow the use of navigation menus. Except in the case of a single page website, menus are necessary to move about the website, from page to page. And on sites with just one long page, navigation menus allow your visitors to jump to different sections up and down the page without scrolling.
All themes will allow the basic WordPress position in the header and most will allow at least minimal use of menus in the sub-header area and in the footer area. But many themes restrict the locations where, beyond those basic areas, that you can insert your menus within your pages.
Add a Menu in Divi
With Divi, you can add a navigation menu basically anywhere you might want one. You can add a menu in these places and more:
- In the header
- In the sub-header
- In a sidebar
- In the footer
- In the sub-footer
- In the center of a page
This is possible through the use of Divi modules which can be inserted wherever you need a navigation menu to appear.
Following are directions for inserting menus in various places within your website. These instructions assume you are already familiar with the use of sections, rows, and modules in Divi.
You can add a menu in Divi almost anywhere you wish.
As with any software, in Divi rows are horizontal; columns are vertical. Remember, a section can have multiple rows. Rows can be arranged with any number of columns from one to six. Each column can have multiple modules, stacked one above the other.
These instructions do not detail how to style the menus after you have created them and placed them in your theme. You can style them using the Design tab of the menu module. Explore the Design tab. You can change fonts, font color and size, spacing, and much more.
Menus in the Divi theme header
There are multiple places and ways to add header menus in Divi.
Default Divi header
If you are using just the default header in your Divi website, you will control the menus from the customizer which is available via Dashboard > Appearance > Menus. You will also find it at Dashboard > Divi > Theme Customizer.
You can create menus and control which posts and pages are added to them as well as which of three locations the individual menus are displayed.
Menus in a Divi Custom header
Divi allows you to create a custom header for every page if you were inclined to do so. That could become unwieldy for a large site, but very useful on a smaller site. For example, you might want a different header for each section of your website.
If you are creating a custom header you have a lot of options. You may want a legal menu in the sub-header at the very top of your pages or even a different menu displaying in different categories.
Wherever you wish to display a menu, it all starts with creating your menus. They can be created in the Customizer, but I personally prefer to create them in the menu section at Dashboard > Appearance > Menus. We have an article about creating WordPress menus here. Once you have created your menus, you can add them to your header.
Decide which row and column should contain the menu, then:
- Insert a menu module.
- Open the Content tab of the module.
- In the first section of the Content tab page select your chosen menu from the dropdown box.

Menus in the Divi footer
Widget areas in the footer will normally have vertical, or stacked, menus. In WordPress, widgets are placed in sidebars. In the early days of WordPress, especially before the dawn of drag and drop themes and page builders, sidebars were limited to the right or left side of the page body. There may have been widget-capable areas in the footer.
Today much more versatility is possible. In Divi, you can use the default footer or you can create custom footers in the Divi Builder (Dashboard > Divi > Theme Builder). In that custom footer, those widgetized footer areas are created by inserting a sidebar module in the column where you want the menu.
In theory, you could display dozens of menus in the footer (or any other place on the page) by creating a row that is six columns wide, then stacking sidebar modules on top of each other within each column. Of course, the legitimate uses of that many footer menus are probably fairly limited. But it is frequently appropriate to have several menus arranged side by side or on top of each other in the footer.
Start by creating your menus as we discussed earlier in this article.
Once you’ve created your menu, go to Dashboard > Appearance > Widgets. The left side of that page is comprised of widgets that can be added to sidebars. The right side of the page displays the available sidebars.
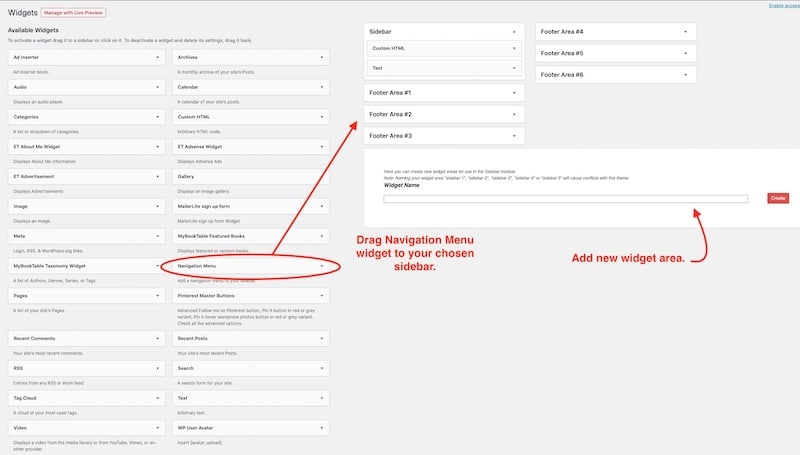
You can create additional sidebars and give them specific names appropriate for your website design. The box where you create new sidebars is just below the lists of existing sidebars. Be sure to heed any warnings about not using disallowed names for the sidebar.
Decide which sidebar you want to contain your new menu. Drag a menu widget from the left side onto your chosen sidebar. If your sidebar contains more widgets than just the menu, click on the sidebar to open it and arrange the widgets how you’d like them by dragging them up or down within the sidebar.
Now, return to the Divi Theme Builder where you are building your custom footer.
Assuming you have created the framework of sections, rows, and columns that your footer requires, add a sidebar module in the appropriate location.
With the sidebar module open, select the Content tab. In the first section of that tab, which is also titled Content, you should see a dropdown box titled Widget area. From that list select the same sidebar that you added the menu to earlier.
As with the menu you added to the header earlier in this article, you can style your menu using the options in the Design tab of the sidebar module.
Menus in the Divi subfooter
The subfooter, or bottom bar, as it is called in the customizer is where you commonly see the copyright notice and possibly the name of the agency who created the website.
It’s also common to display the site’s legal menu there, containing links to privacy policies, terms and conditions, etc..
If your site uses the default Divi footer, you’ll choose your menu in the customizer.
We need to look at two scenarios for the subfooter.
Scenario one: Nothing but menu in bottom bar
In the first scenario, you are okay with nothing in the bottom bar but the menu.
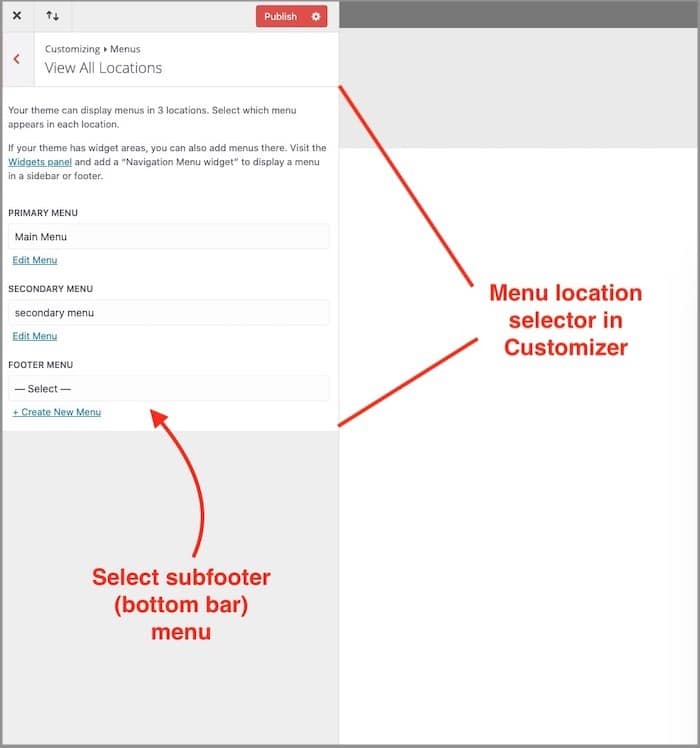
If that is the case, go to Customizer > Menus. Then at the bottom of the Menus page look for Menu Locations. Open the dropdown list in that section and at the bottom you’ll see Footer menu. Click in the box below that section title and select the menu you wish to display in the subfooter or bottom bar. You should now see a menu displayed all the way at the bottom of the page.
Scenario two: Copyright notice and menu in bottom bar
In the second scenario, you want to display a menu, say your legal menu. But you also want to include your copyright notice and possibly the name of your website creator.
To do this in the default Divi footer, you’ll need to use the Customizer again.
Note that you cannot select the menu as you did in the first scenario and add text before or after it. Instead, you’ll have to use the Footer Credits box in the Customizer and manually add your desired links.
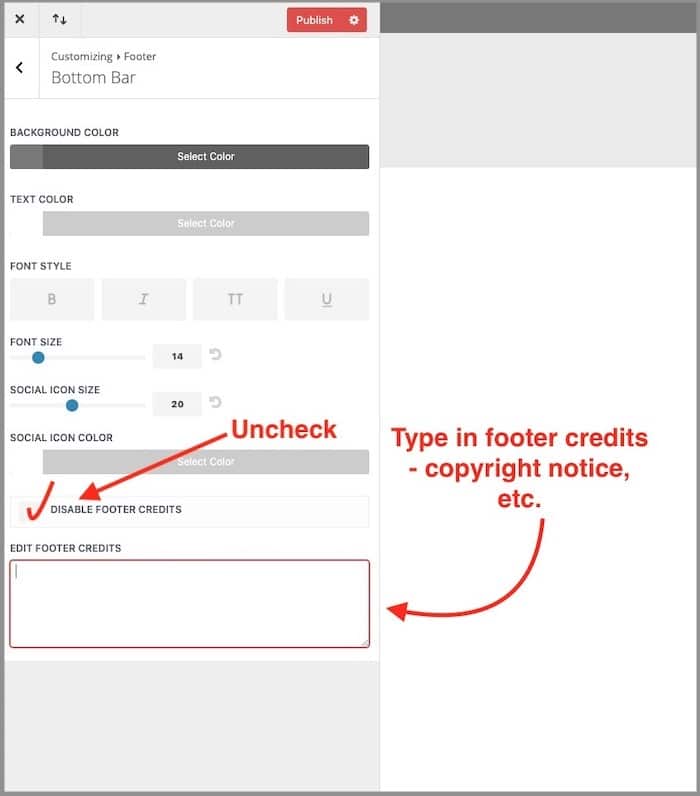
Go to Customizer > Footer > Bottom Bar. At the bottom of that Customizer page, you should see a box labeled “Edit Footer Credits.” If you don’t see the box, you’ll have to uncheck the box labeled “Disable Footer Credits.”
The Edit Footer Credits box is where you’ll type in your copyright notice and any other info you’d like in the subfooter/bottom bar. If you want a menu in that bar, you’ll have to type the individual links in HTML like this: <a href=“https://mywebsite.com/mypage”>My Page</a>. Do that for each page you want in the menu, one after the other with at least one space between them. You can also add a character such a vertical bar (|) between the links. The menu will be displayed horizontally.
NOTE: If a menu is selected to display in the bottom bar as in scenario one above, it will take priority over the footer credits. It will not delete any content that you have added and saved in the footer credits box, but it will replace the footer credits. You can use one method or the other.
Subfooter menu in Divi with custom footer
If a site uses a custom footer, the subfooter, if needed, is commonly created as part of it.
To add the subfooter/bottom bar to your customer footer, simply add another row to the bottom of the footer and add a menu module as we did in the header menus earlier in this article.
How you add that row is up to you. You can simply add another row in the same section, or if it suits your design better, add another section and row.
How to style your new section or row, adjust the spacing between the two, etc. is beyond the scope of this article and is something you probably already know to some degree.
With this information you should be able to add a menu in Divi wherever you wish. It’s a fairly simple process once you’ve gone through it once or twice.
