If you’ve just begun using Microsoft Word, you may have read or heard instructions that say, “go up to the Ribbon.” What is the Ribbon in Microsoft Word? Can you customize the Ribbon? I’ll tell you what the Word Ribbon is and how you can customize it to help you work faster.
Table of Contents
Readers who are already familiar with the versions of Word that have been released since 2007 will be familiar with the Ribbon.
If you are new to the Microsoft Office suite of apps, you’ll learn the basics of using the Ribbon.
In a short while, you should be comfortable using it.
What is a Ribbon in Microsoft Word?
In the simplest terms, the Ribbon in any Microsoft Office app is a visually oriented menu. It is situated across the top of the work area in a way that groups tools and features with a similar focus together.
For most people who have touchscreen computers, they are easier to use than standard menus.
Traditional top menus have a group of headings such as File, Edit, and Tools. When you click on one of those headings, you see a list of tools and other options.
The Ribbon replaces those lists of items with an assortment of buttons or icons arranged under tabs.
Those tabs correspond closely to the menu headings you might find at the top of the window in other similar apps.
Under each tab, you’ll see buttons with labels that are similar to the items you’d see in the older, more familiar top menus. Those buttons are arranged in groups.
Note: The dark mode images in this article are from MS Word for Windows. The light mode images are from Word for Macs. Features are the same except where noted.
How to use the Microsoft Word Ribbon
It’s worth noting that Word in Office 365 for Macs has both the traditional menu across the top and the Ribbon. The File menu is in the top menu bar. The first tab in the Ribbon is the Home tab.
In Word for Windows, the Ribbon replaced the traditional top menu. The first tab is the File tab which opens a familiar-looking menu. The Home tab is the second one by default.
In the Ribbon there are three things that will help you understand how it works.
Across the top of the Ribbon, you’ll find the Tabs.
Each of those tabs is divided into Groups. Groups are a collection of Commands that are similar in nature. For example, font, font size, font color, bold, italic, etc., are all found in the Font group of the Home tab.
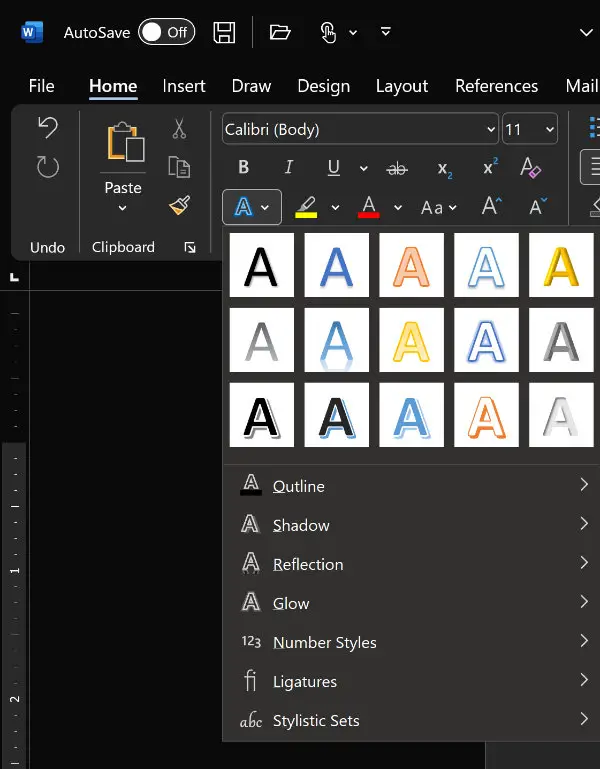
The buttons, icons, dropdown lists, checkboxes, etc., within the groups, are the Commands.
The process of using Ribbon Commands is basically the same as using commands in a traditional menu.
In most cases, such as changing a selection of text to bold, you would first select the words you want to be bold. Then go to the Ribbon, find the command you want and click on it.
In Word for Windows, you can click the arrow in the lower right corner of most Groups to open a panel that contains all of the settings that are in the Ribbon for that Group.
In the case of bolding text, the bold button is in the Font group under the Home tab.
Some commands have an immediate effect, such as when you bold text.
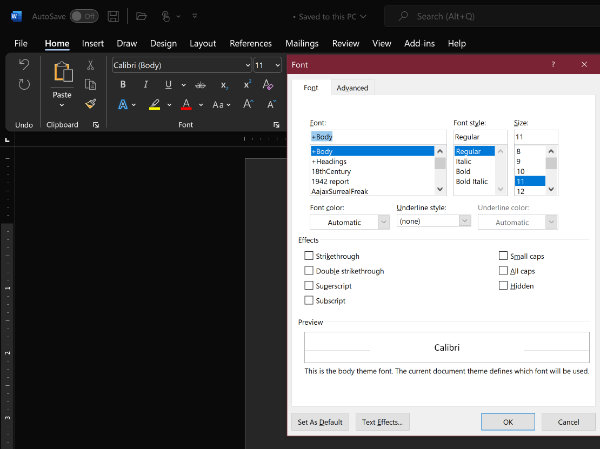
Other commands that involve settings that you want to apply may open a dialog box or panel. You would make the appropriate settings in the dialog box before they show up in your document.
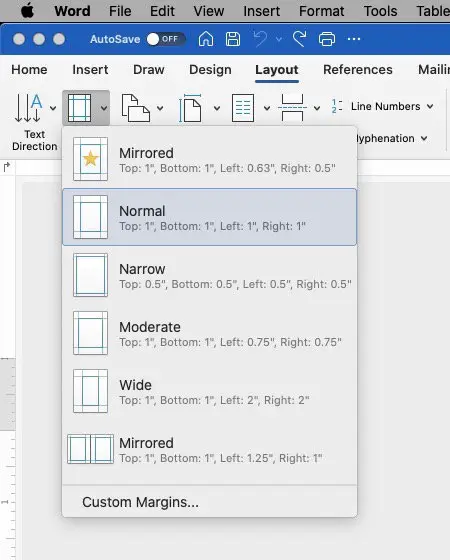
An easy example of a command that can pop up a settings panel is the Margins command in the Page Setup group under the Layout tab.
The basic tabs in the MS Word Ribbon
When you first open Word, you should see the following tabs in the Ribbon area.
- Home
- Insert
- Draw
- Design
- Layout
- References
- Mailings
- Review
- View
The Home tab includes the following Groups:
- Clipboard
- Font
- Paragraph
- Styles
- Voice
- Sensitivity
- Editor
- Add-ins such as Grammarly, ProWritingAid, and Adobe Acrobat will appear in the Home tab if they are installed.
The Insert Tab includes these Groups:
- Pages
- Tables
- Illustrations
- Add-ins
- Media
- Links
- Comments
- Header & Footer
- Text
- Symbols
The Draw tab contains these Groups:
- Tools (normal)
- Pens
- Mode
The Design tab includes these Groups:
- Document Formatting
- Page Background
The Layout tab includes these Groups:
- Page Setup
- Paragraph
- Arrange
The References tab contains these Groups:
- Table of Contents
- Footnotes
- Research
- Citations & Bibliography
- Captions
- Index
- Table of Authorities
The Mailings Tab includes these Groups:
- Create
- Start Mail Merge
- Write & Insert Fields
- Preview Results
- Finish
The Review tab contains these Groups:
- Proofing
- Speech
- Accessibility
- Language
- Comments
- Tracking
- Changes
- Compare
- Protect
- Ink
- Resume
The View tab contains these Groups:
- Views
- Focus
- Dark mode
- Show
- Zoom
- Macros
Customizing the Microsoft Word Ribbon
Some Microsoft Word users work under the assumption that they are stuck with the Ribbon as they see it when they first open Word.
Actually, the Ribbon in Word is highly customizable.
Collapse or lock open the MS Word Ribbon
The Ribbon is always open in Word for Macs. But in Word for Windows, it can collapse so that only the tab names show. You can also set it to stay open.
In Word for Windows, if the Ribbon is closed so that you see only the tab names, open any tab other than the File tab. The Ribbon will open. If you then click on other tabs, the Groups and Commands within the tab will change.

In the lower right corner of the Ribbon, you will see a downward-pointing arrow. Click that arrow to open a small menu that allows you set the Ribbon always to stay open.
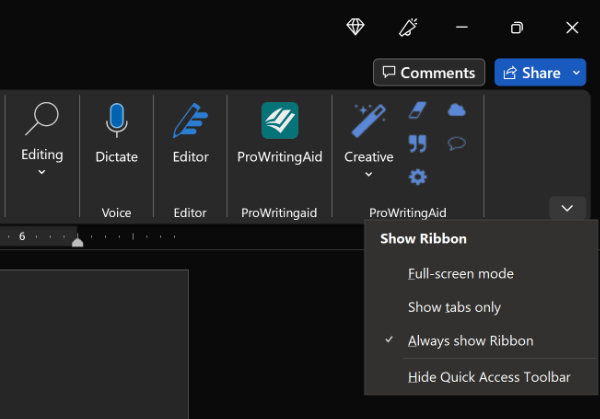
If you want the Ribbon to stay collapsed when not in use, click the option to Show tabs only.
Toggle Group titles on or off in the Word Ribbon
Each group has a title that will be displayed, centered at the bottom of the group. In Word for Windows, the Group titles are visible by default.
If you don’t have titles under your Ribbon groups in Word for Macs, you can activate them.
In Word for Macs:
- Go to the Word menu and select Preferences.
- In Preferences, open the View tab.
- In the bottom section labeled Ribbon, check the box beside Show group titles.
Where to customize the Ribbon in Microsoft Word
You can create your own groups under tabs and place commands that don’t show by default in them.
You can also create your own tabs and set them up with a special selection of groups and commands.
To customize the Ribbon in Word for Macs, first, open the Ribbon settings:
- Go to the Word menu and choose Preferences.
- Open the Ribbon and Toolbar tab.
- Open the Ribbon tab.
To customize the Ribbon in Word for Windows, there are two ways to open the Ribbon settings.
You can Right-click in the Ribbon somewhere in an area where there are no buttons, etc. Click Customize Ribbon. (It works best for me if I click somewhere in the middle of the blank area between the button and the right-side edge.) Or…
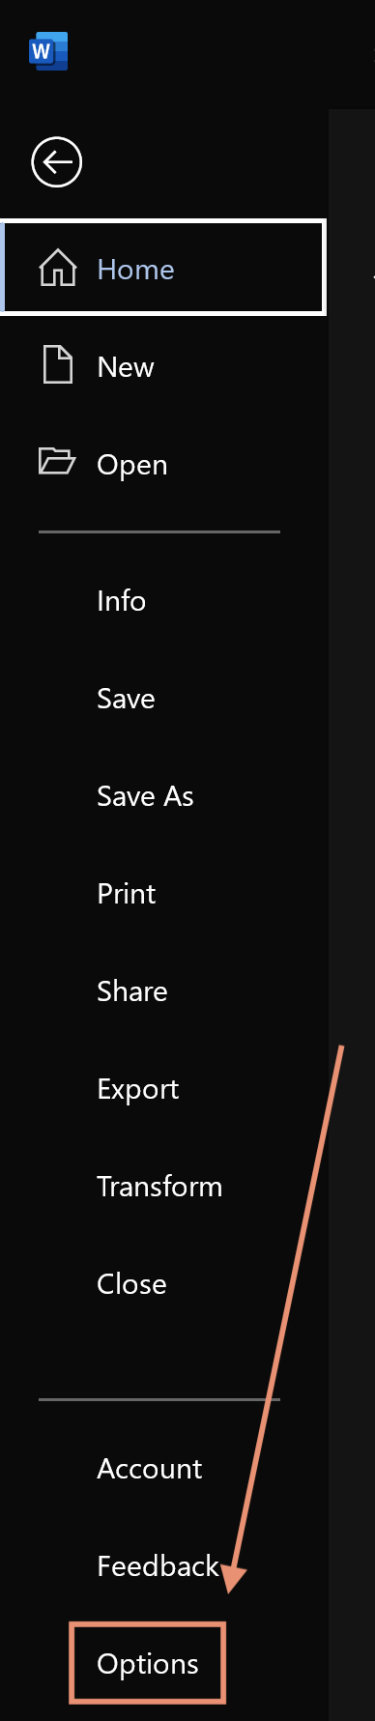
You can get there via the File menu.
- Open the File tab.
- At the bottom of the window, click Options.
- Select Customize Ribbon.
A large panel will open that is divided into two columns.
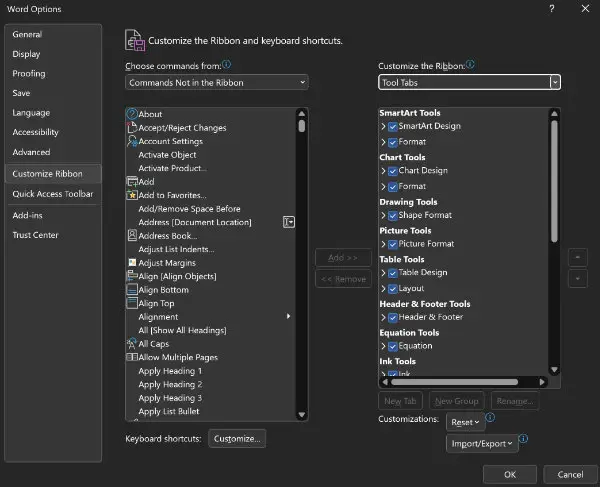
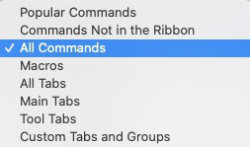
The left column contains all of the available commands and tabs. A drop-down list at the top of the column lets you choose from the following:
- Popular Commands
- Commands Not in the Ribbon
- All Commands
- Macros
- All Tabs
- Main Tabs
- Tool Tabs
- Custom Tabs and Groups
If you look in the right column, you’ll see a list of tabs with their groups and commands listed beneath each of them.
A drop-down list at the top of the right column lets you see all of the tabs. You can choose from the following:
- All tabs
- Main tabs
- Tool tabs
Main tabs are those that are available when you open a new or existing document.
Tool tabs are those that appear only when you are working on something that requires specialized commands.
An example of a Tool tab would be the Picture Format tab that is available when you have inserted an image in your document and it is selected. When the image is not selected, the Picture Format tab is not available in the Ribbon.
If a tab has a check beside it, it should be visible in your Ribbon.
You can simplify your Ribbon by removing the tabs that you don’t use. Just click the checkmark beside the tab name so that the check box is blank.
If you don’t see the actual groups or commands in the right column, click the arrow to the left of the tab name. A list of groups in that tab will open.
Click the arrow beside a group name to see the commands that are currently present inside that group.
How to add custom tabs to the Ribbon in Word
You can add your own custom tabs in Word. At the bottom of the right column, click the + symbol.
Select New Tab. A new tab will be inserted and named New Tab (custom).
How to rename a tab in MS Word’s Ribbon
You rename any existing or new tab in Word.
- Select the tab in the right column of the Ribbon settings panel.
- Open the Gear icon at the bottom of the column.
- Choose Rename.
- Type the new tab name in the selected tab.
Add custom groups to tabs in Microsoft Word
Adding custom groups to tabs in Word is very similar to adding new tabs.
- First, in the Ribbon settings panel, select the name of the tab where you want the group to appear.
- Click the + symbol at the bottom of the right column.
- Select New Group
Groups can only be added to tabs, but Word allows you to add new groups to both existing and custom tabs.
The procedure to rename a new or existing group is the same as renaming tabs in the previous section. Just select the group before you open the Gear icon at the bottom of the column.
Add new commands to the MS Word Ribbon
Microsoft Word only allows you to add commands to custom groups. Therefore, the first step in adding new commands will be to add a custom group to an existing or custom tab.
You learned in the previous section of this article how to add groups.
Once you have added a custom group to the Ribbon, click the name of that group in the right column to select it.
Select the command that you want from the list in the left column of the Ribbon setting panel.
Between the left and right columns, there are two arrows—one pointing to the right and one to the left. Click the right-pointing arrow to add a command that is listed in the left column over to your custom group in the right column.
Remove commands from the Ribbon in Word
You can remove commands from custom groups by reversing the procedure you used to add them.
Just select the command in the custom group. Then click the left-pointing arrow between the columns to remove the command.
Word does not allow us to remove single commands from normal groups. Instead, you’ll have to remove the entire group that includes the command.
For example, if you want to remove the Strikethrough command from the Font group under the Home tab, you’ll have to remove the entire Font group.
In that case, you’d probably choose to live with the Strikethrough command staying in place.
A workaround, if you just want a simpler Font group in your Ribbon, would be to create a custom Font group under whichever tab you wish. Then add the commands that you want to keep to that custom group. Remove the existing Font group.
How to reset the Microsoft Word Ribbon to default settings
If you find that the changes you made to the Ribbon aren’t working for you, you can easily reset any part of the Ribbon.
To reset the entire Ribbon to default:
- Place a check in the box beside every tab in the right column.
- Click the Gear icon at the bottom of the right column.
- Select Reset Customizations.
The entire Ribbon will be reset to its default state.
If you only want to reset one or a few tabs:
- Check the box beside those tabs.
- Click the Gear icon at the bottom of the right column.
- Select Reset only selected Ribbon tab.
Note: Resetting tabs will not remove custom tabs. To remove a custom tab from the Ribbon, select the tab and use the left-pointing arrow between the columns to remove it. It will remain in the left column under Custom tabs and groups in case you want to return it to the Ribbon.
Where is Visual Basic in the Word Ribbon?
Visual Basic is under the Developer tab. Follow the instructions given above for adding items to the Ribbon. Just place a check beside Developer in the list of tabs.
In Word for Macs, you can also go to the Word menu and open the View tab. Check the box beside Show Developer tab under the Ribbon label in the lower left corner.
Adjust the size of the MS Word Ribbon
In MS Word for Windows, you can adjust the size of the controls in the Ribbon. You do that by setting your Ribbon for touch screens.
The icons, buttons, and other controls are larger when the Ribbon is set for touch screens. That is because the fingertips are larger than the mouse arrow.
In the Quick Access Toolbar above the Ribbon, look for a button that represents a fingertip on a button. Tap or click that button and select For Touch Screens.
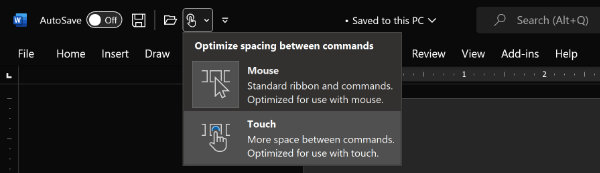
The Ribbon will take up more space on the screen, but it will be easier to use with fingers. Also, the larger Ribbon controls could be beneficial to sight-challenged users.

You can use either the normal Ribbon or the larger Ribbon with your finger or a mouse. If your eyesight is good and you never use your computer as a touch device, you can set the Ribbon for use with a mouse.

Options if you prefer the old-style menus.
If you are one who prefers to use the old-style menus instead of the Ribbon, there is an addin available from AddInTools.com that adds the menus to Microsoft Word for Windows.
I have never used the addin and therefore cannot vouch for it personally. However the addin has been around for years and is highly recommended by CNET and others. It may be just what you’re looking for. Classic Menu for Office. (Not an affiliate link.)
