You might appreciate AutoCorrect in LibreOffice Writer if you are one who uses the auto-correct feature when sending email or text messages on your phone or another device. In this article you’ll learn how to turn on AutoCorrect in LibreOffice Writer. You’ll also learn how you can customize it to work best for you.
Table of Contents
What is AutoCorrect?
If you are a person who prefers to get the words down as quickly as possible in a first draft and are less concerned with typing accurately, AutoCorrect could be a great help. It can help you work faster by automatically correcting common mistakes such as misspellings of frequently used words, missing apostrophes, using double spaces between sentences, and more.
How to turn on AutoCorrect in LibreOffice Writer
AutoCorrect in LibreOffice is activated by default. You can tell it is on by going to the Tools menu. Hover over AutoCorrect. If you see a check mark next to While Typing, AutoCorrect is on. If there is no check mark there, just left-click on While Typing to activate it.
To use AutoCorrect in LibreOffice Writer, I suggest starting with the Options panel so that you can set it up to fit your needs before you start. Then if you need to make an adjustment, you can easily go back in to do that.
To find AutoCorrect Options, go to the Tools menu and select AutoCorrect > AutoCorrect Options….
The AutoCorrect Options panel has five tabs across the top. They are labeled Replace, Exceptions, Options, Local Options, and AutoComplete. You can ignore the AutoComplete tab for this exercise. LibreOffice Writer also includes a feature called AutoComplete which is similar in some ways to AutoCorrect, yet quite different. We’ve covered how to use AutoComplete here.
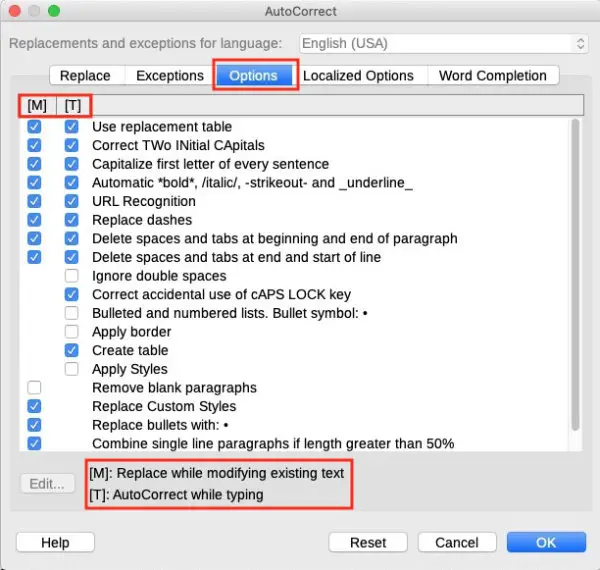
Click the Options tab. You’ll notice there are two columns of checkboxes. The first column header is M for Manual. The second column header is T for While typing.
How to use AutoCorrect in LibreOffice Writer
Most items in the list are self-explanatory. For each item on the list, click the box in the M column if you want to apply the action manually. The corrections are set manually when you select a section of text and go to Tools > AutoCorrect > Apply. Just under Apply in that menu is Apply and Edit Changes which will give you to option to accept or reject the changes.
Click the box in the T column if you want the action to automatically work as you type.
You can export each text document from Scrivener to Word aUsing shortcuts in LibreOffice Writer AutoCorrect can save you time.
The fourth item on the list is a markup item that will make text bold if you place a * immediately before and after the text, italic if you place a / immediately before and after it, strikeout if you type a – immediately before and after it, or underlined if you type _ immediately before and after the text.
The first item on the list is arguably the most important setting. It tells LibreOffice Writer whether to make changes in your text based on entries that are listed in the Replacement Table under the Replace tab.
You will see a long list of entries already in the table. If you scroll down the list you’ll see spelling corrections, punctuation corrections, and even code for emojis. Basically what happens is, if you type the text in the left column, it will be automatically replaced with the text opposite it in the right column. That is, as long as AutoCorrect is activated and the boxes in the M and T columns are checked beside Use Replacement Table.
Use AutoCorrect for shortcuts
If you are a writer you might appreciate Replace Dashes, the sixth option in the Options tab. If you check the boxes to activate it, you can automatically create an en dash with a space before and after it by typing a single space, a minus, and another space between two words.
Do the same, but with two minuses to get an em dash with spaces before and after.
Type two minuses with no spaces to insert an em dash with no spaces surrounding it.
If you scrolled through the list, you saw the first part of the list is made up of short codes for various entries (mostly Emojis). Scroll down past the short code entries to find spelling corrections.
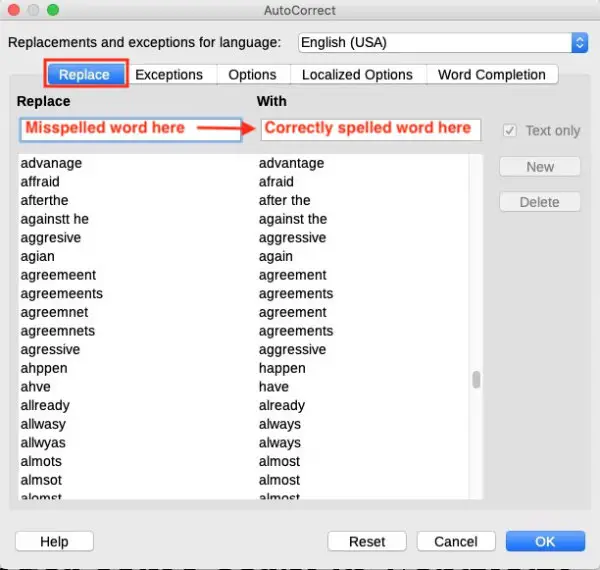
The most obvious way to use the table for spelling corrections is to type the most common misspelling in the left box and the correct spelling in the right box.
There are several other ways to use AutoCorrect beyond correcting normal misspellings. One is to automatically apply unusual capitalization.
For example, the word WordPress is correctly spelled with the W and P in uppercase. Most people spell WordPress with only the W in uppercase.
You could enter WordPress in the left column and WordPress in the right column to have it automatically correct it as WordPress as soon as you hit the spacebar.
You could also use AutoCorrect with text shortcuts similar to AutoText. An example would be to type wp in the left column and WordPress in the right column. Then every time you type wp followed by the spacebar, WordPress would appear on the page.
Shortcuts like that example can save a lot of time for writers who write about the same topic frequently. If you write for a magazine that specifically features articles about Chicago, you could type ch in the left column and Chicago in the right. If you intend to type Chicago, type ch then the spacebar instead and Chicago should appear as if you’d typed it out completely.
You can also create a table of exceptions.
You can learn about other settings and uses for AutoCorrect in LibreOffice Writer here.
