In this article I’ll show you how to print part of a Microsoft Excel spreadsheet. This will come in handy if you need to print a few adjacent rows and columns just once, or perhaps frequently.
Table of Contents
Print Part of a Microsoft Excel Spreadsheet
Microsoft Excel is huge piece of software with users that range from multinational corporations to indie authors typing away under a stairwell in their apartments.
For example, indie authors might manage their characters using Excel. Others might use it to keep progress reports on their works-in-progress. They can look at their spreadsheets for a particular book and tell how many words it contains, how many pages in paperback, whether it’s been edited and who the editor is, and much more.
Some creatives use Excel to track expenses and income on their projects.
Sheets can be massive, containing more than a million rows and more than 16,000 columns—much bigger than the average person would ever need and far too large to print out under normal circumstances. Often, you just want to print a summary section of a sheet. Doing so is very easy.
How to print part of a Excel spreadsheet
Like most other documents, you can use your mouse or trackpad to drag and select an area of your sheets, then in File > Print, tell it to print the selection. This is most useful for one time selection and printing.
If you are going to be printing the same area of a worksheet regularly, you can select the cells you want to print and tell Excel to remember those cells for next time.
Two ways to set the print area in Excel
Let’s say you want to print a section from the beginning of the sheet. For this example, we’ll print a section beginning with the first cell – the top left one. We want to print an area that is six columns wide and thirty rows long.
Select area to print in Excel by dragging the mouse
Using your mouse or trackpad, click in the A1 cell and drag your mouse down and across until you have selected cells A1-F30. It doesn’t matter how you drag. You can drag down and across, across and down, or at an angle from the top left corner of the area you wish to print to the lower right corner.
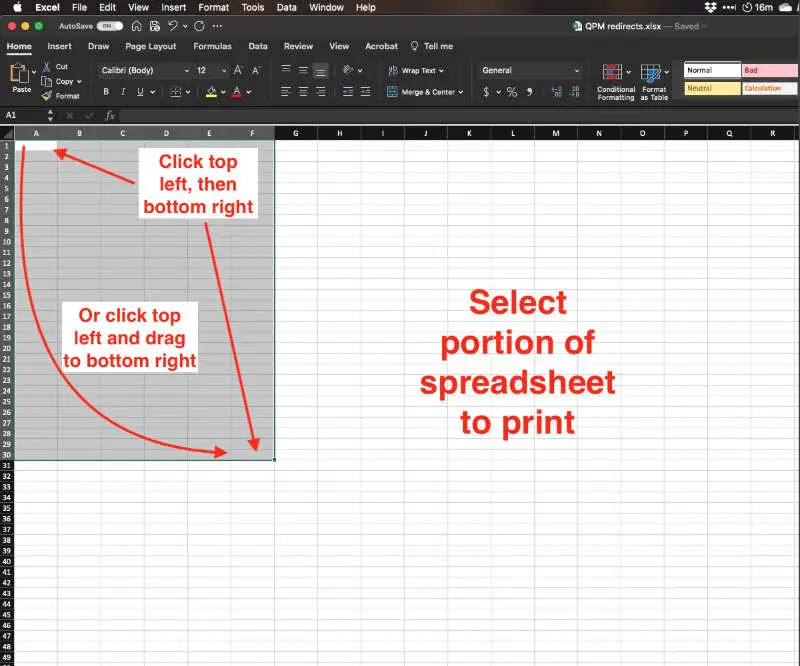
Select area to print in Excel by clicking two cells
Using your mouse, click in the top left cell of the desired print area. In our case it is A1.
While holding the shift key, click in the lower right corner cell of the desired print area.
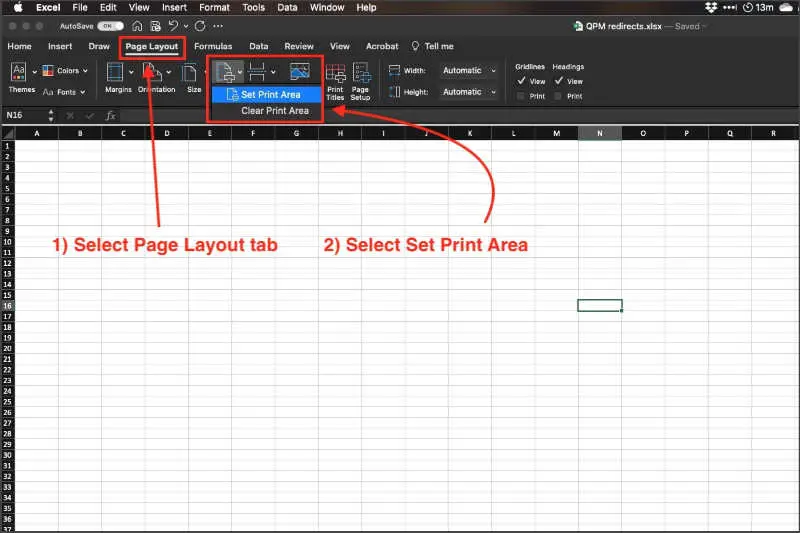
Use Selected cells to “Set” the print area in Excel
With that area selected, do one of the following to “set the print area.”
On Windows and Mac computers:
- Click on the Page Layout tab.
- Click the Print Area icon.
- From the choices that pop up, select Set Print Area.
Mac users have a second way to set the print area. With the print area selected:
- Go to the File menu.
- Select Print Area > Set Print Area.
Print the select section of the spreadsheet
When you’ve set your print area, Mac and Windows users will both go to File > Print to open their print dialog and print the document.
Like any other document, if the area you selected to print is very large, it may take more than one sheet of paper or print it. If it almost prints on one sheet, you may be able to tell your printer to “fit to page.”
Note: When you use the fit to page feature, the text will possibly be smaller and if the area you are printing is too large, the text may be so small that it becomes illegible.
In this article I’ve given you the basics of printing a section of a Microsoft Excel spreadsheet. As is the case with most complex software, there are other options related to printing Excel spreadsheets. The following links to Microsoft Support should be helpful if your Excel printing are more complex.
Set or clear a print area on a Microsoft Excel worksheet
Print a Excel worksheet or workbook
For more of our Excel tutorials click here.
