We may never need to write vertically in Word if we use it only for basic writing tasks—letters, book manuscripts, resumes, etc.. However, if we design posters, cards, or presentation covers, we may need to do so. In this article I’ll show you how to write vertical and stacked text in Microsoft Word.
Table of Contents
How to write vertically in Word
We do most of our writing in Word horizontally simply by typing wherever our cursor is. It’s simple, intuitive, and familiar to us.
There is another way to put words on the page in MS Word. That is with text boxes. You can type practically anything in them. They can be very large or very small.
This is not an exhaustive tutorial on the use of text boxes. But I will tell you that text boxes are versatile. You can drag them around the body of the document wherever you want them. And, they allow you to write not just horizontally, but vertically.
In Microsoft Word, vertical text refers to text that displays on its side relative to the page. It can be read from top to bottom or from bottom to top.
Use a text box to write vertically in MS Word
I recommend you start on a blank page for this exercise. These instructions are based on Word 365, but should work in certain other recent versions.
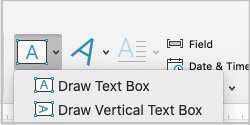
- Open the Insert tab.
- Click on Text Box.
- In Word for Windows, a panel with more than thirty pre-designed examples of text boxes will open. Below those examples, click Draw Text Box.
- In Word for Macs, a smaller panel will open. Choose Draw Vertical Text Box.
When you move your mouse back to the page, you’ll see that your cursor has changed to a cross. Click and hold while you drag your mouse over and down to draw a text box.
When you draw the box, you’ll notice that a new tab labeled Shape Format opens.
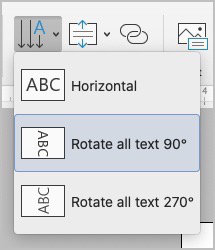
In the Shape Format tab, find the Text Direction button. When you click it, you will be given these options: Horizontal, Vertical 90 degrees (reads from top down), and Vertical 270 degrees (reads from bottom up). Choose the one you want.
Type your text in the box. You can select either Vertical setting before you type. If you find it more difficult to read your text as you type, you can select Horizontal before you type. Then, when you finish typing, you can click in the text box and go back to the Text Direction button to choose a Vertical setting. The letters will change orientation in the text box.
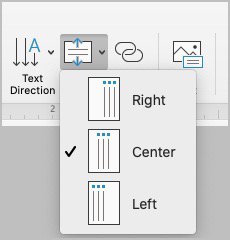
To center vertical text, click Text Alignment under the Shape Format tab. Choose Center to center the text horizontally.
Create stacked text in Word
The instructions that follow work in Microsoft Word 365 for Windows and Mac. They should also work in some other late versions.
- Click inside the text box that you drew and type out the word or words that you want to be read vertically.
- Place your cursor after the first letter. Hold the Shift key while you hit the Return or Enter key.
- Place your cursor after the second letter and repeat the process until you see each letter on a line by itself. If your text contains two or more words, treat the space between the words as a character to put the space on a line by itself.
You should see your words spelled out with the first letter on top of the second, and so on. It is likely that they may not be perfectly centered with each other, though. To correct that, use your mouse or trackpad to select all the letters. You can also just click your mouse inside the box and use Control + A (Windows) or Command + A (Mac) to select the text.
With the text selected, use Control + E (Windows) or Command + E (Mac) to center the text horizontally, one letter centered under another. You can also select the text and use the Center button under the Home tab. Either method accomplishes the same thing.
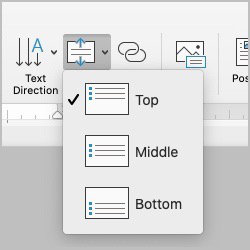
You can also center your stacked text vertically, with equal spacing at the top and bottom. To do that, place your cursor inside the text box. Under the Shape Format tab, click the Align Text button. Select Middle. The other options are Top and Bottom which obviously align your text to the top or bottom of the text box. (Note: This is the same button that you used to center text horizontally. The wording of the drop-down menu changes, depending on the task you are performing.)
Using Enter vs Shift + Enter to create stacked text
You may wonder why I suggest using Shift + Enter to move a letter to the next line instead of just hitting the Enter key. After all, either method will place the next letter on a line by itself.
There are two primary reasons I prefer to use Shift + Enter. Both of them stem from the way Word uses Shift + Enter compared to Enter. Every time you use the Enter key alone, Word creates a new paragraph. That presents two issues that I’d prefer not exist.
Paragraphs inherently begin with new sentences, even if they contain just one word. In essence, when you use only the Enter key to move the next letter to its own line, Word treats each letter that you place on a line by itself as a one-letter sentence (and a one-letter paragraph).
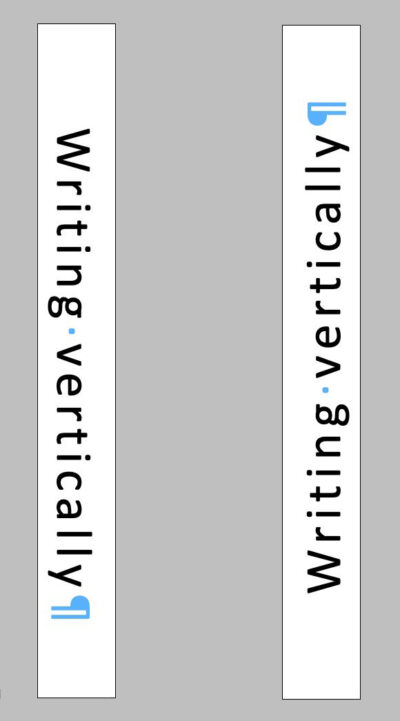
Unless you’ve set your AutoCorrect settings otherwise, Word will capitalize the first—or only—letter of each sentence. The end result when you use only the Enter key to create stacked text is a word with every letter capitalized. The following image illustrates this.
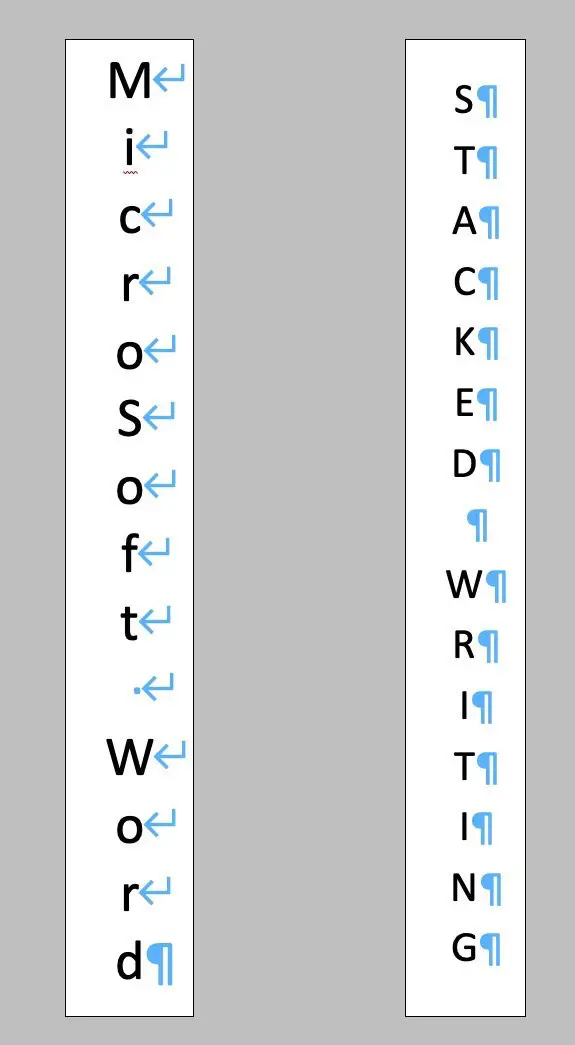
If you use Shift + Enter to place each letter below the previous one, Word does not place each letter in a new paragraph. Instead, it just creates a new line within one paragraph. Because new lines aren’t necessarily the beginning of new sentences or paragraphs, Word will not automatically capitalize each letter as you stack them.
The result is a word with its letters stacked but not capitalized unless you intentionally make them upper-case.
Using only the Shift key results in stacked words with all upper-case letters. Using Shift + Enter does not.
When each letter in the word is technically a paragraph by itself, the spacing between each letter can be adjusted in multiple ways. You can use before and after paragraph spacing to create very large spaces between the letters. Depending upon the paragraph settings you use in your document, you may find yourself with spacing that is automatically too large.
I’m not saying that it’s incorrect to use paragraph spacing to change the spacing between letters. However, I do find that doing so can present unnecessary complications. That is because instead of just line spacing, because each letter is technically its own paragraph, you will also have paragraph spacing affecting the space between letters.
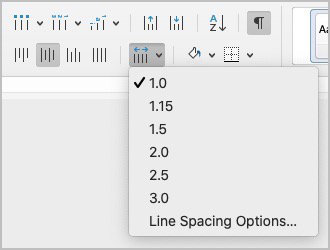
If you use Shift + Enter, you can simply select your text, then use the Line spacing button under the Home tab to adjust the spacing between letters and be done with it.
Two more methods to create stacked text in MS Word – with cautions
Method One
You can type your text horizontally into a text box, then drag the sizing handles inward from the sides to force the characters to stack. At first glance, this looks like a workable method.
The caution: You’ll find that you must constrain the text box to a very narrow shape. Otherwise, as the box is widened, the characters will begin to line up horizontally again. This makes this method unusable if you want your stacked text to be nicely organized in a wider text box with a nice background. In addition, even if the text box is kept to a very narrow width, the stacked letters are left aligned under each other and won’t center correctly. That can look untidy. For a more thorough explanation see The Caution under the second method below.
I don’t recommend this method when your Text box contains more than one word. That is because, in the case of text containing more than one word, this method eliminates the spaces between the words.
Method Two
You can type your text horizontally into a text box then, locate the Format Pane. To find the Format Pane settings panel, click inside the Text box and click the Format Pane button under the Format Shape tab. It will probably be the last button on the right. You can also Control + Click (Mac) or Right-click (Windows) on the border of the Text box and select Format Shape to open the Format Pane.
In the Format pane:
- Select the Text tab, then the Text box tab below it.
- Set the Vertical Alignment to Middle to center the text vertically. Set it to Top or Bottom to vertically align text accordingly.
- Set the Text Direction to Horizontal.
- Be sure to uncheck Resize shape to fit text.
- Be sure to check Wrap text in shape.
- Set the margins inside the Text box tab to force text into a vertical line.
Keep adjusting the margins for the left and right until the text is stacked where you want it in the Text box. Equal margins on each side will place the stacked text in the center horizontally.
You can move the stacked text left or right within the Text box by decreasing the margin on one side and increasing it by an equal amount on the other side.
The caution: This method eliminates the issue found in number one where the text box must be kept narrow. But you will still have the issue of the characters not being properly centered. At first glance the character alignment may appear okay, but if you look closely, you’ll see they aren’t perfectly centered under each other. You’ll notice this especially when you look at a narrow character such as an i under a wider character such as a w. The Text Alignment button under the Home tab has no effect on the text in this case.
Like method one above, strings of text with more than one word will run together as one very long word. Spaces between the words will disappear.
Official Microsoft Word documentation for Text boxes and Shapes.

