Microsoft Word users have access to dozens of fonts that can be used in our documents. But it frequently happens that we have a project in progress that calls for a font which is not available on our computers. We’ll show you how to add fonts in Microsoft Word.
Table of Contents
How to Add Fonts in Microsoft Word and Be Certain They’re Visible to Your Readers
In this article, I’ll be referring to Microsoft Word 365. I use that name for the version of MS Word that is part of the Microsoft 365 suite.
Fonts that you see in the font list in Microsoft Word 365 come from three likely sources:
- Several dozen are installed when Microsoft 365 is installed on your computer. Those are normally available for use in Word, Excel, Powerpoint, and Outlook.
- Microsoft Office 365 fonts that exist only in the cloud until you select one for use in your document.
- With a few possible exceptions, Microsoft Word has access to basically all of the additional fonts that are installed on your Windows or Mac computer.
How to use more cloud fonts in MS Word
Cloud fonts are fonts that are retrieved as needed from a server on the Internet. Standard fonts are stored on, and retrieved from, your computer.
You may have heard of Google fonts which are used on thousands of websites. In this article we’ll be referring to Microsoft cloud fonts which are only available to Microsoft 365 subscribers.
When you open the drop-down list of fonts in the text settings area of the Home tab, you see two groups of fonts comingled in one list—those that have a cloud icon before the font name and those that do not. (The cloud icon looks like a cloud with a downward pointing arrow through the bottom of it.)
Those that do not have the cloud icon preceding the font name are already in use on your computer. They are ready to use with or without an Internet connection, just by selecting them.
Those font names that do have the cloud icon preceding the name are also available for you to use in Microsoft 365 apps, but are not actually installed on your computer.
To use a font from the cloud, be sure your computer is connected to the Internet then select the font like any other on the list. That font will then be retrieved via the Internet and cached on your computer, ready for use in Word and other Microsoft 365 apps.
Download and add custom fonts
You can install additional fonts on your computer which will be available for most apps to use, including Microsoft Word.
There are many sources for fonts online, some offering them free of charge and others offering fonts that require you to purchase a license to use them.
Whether you download paid or free fonts, you will want to look for fonts in the OTF or TTF format. Many fonts will download as a .zip file that contains both versions. OTF is a newer format and will normally work fine. If you have an older app on your computer that does not seem to work with the OTF version, try installing the TTF version.
Fonts normally download in a zipped file (with a .zip file extension). Before you can install them, you’ll need to unzip them.
To unzip a file on a Mac computer, just double click it. A folder with the same name as the zipped file will appear in the same folder. The contents of the .zip file will be inside that folder.
To unzip a file on a Windows 10 computer, right-click the .zip file and choose Extract all. A folder containing the actual font files will be created in the same location as the .zip file.
Once the file is unzipped, follow the instructions below for Windows or Macs.
Install fonts in Windows 10
With the font unzipped, right-click the font file itself and choose to install. Remember, you are installing the font file with a .ttf or .otf extension, not the .zip file.
If the font doesn’t install correctly using the right-click method, you can use another method. In the search bar in the bottom left of your screen, type Fonts. The fonts tool should be the first item shown in the search results that appear.
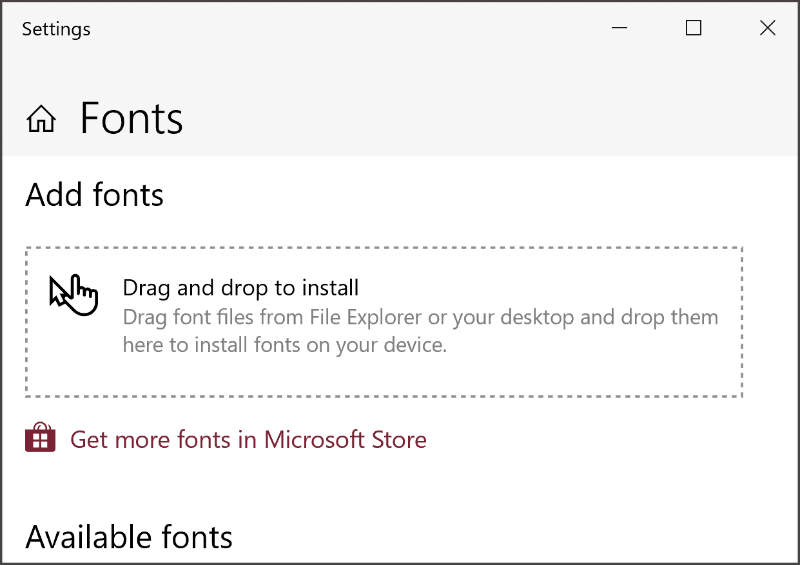
- Click the Fonts tool.
- The window that appears will probably be a small window with a box in the center where you can drag and drop your font tile to install it. Drag your unzipped font file into that box. The font will automatically install.
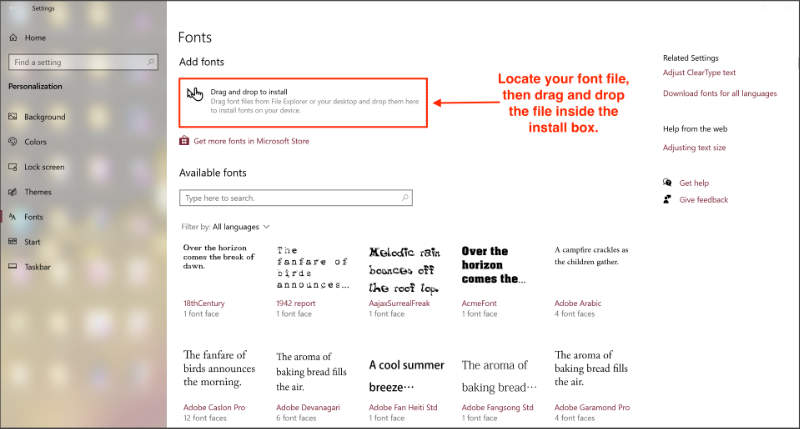
You can also reach the Fonts management area in Windows 10 by clicking the Start button in the bottom left of the screen. Then:
- Click Settings
- Click Personalization
- Click Fonts
That should open the font settings page shown in the following image. If the smaller drag and drop panel described in the previous instruction is maximized, you will see the following page as well.
Install fonts on Mac computers
The easiest way to install fonts on Mac computers is to simply double click the unzipped font file. A box will open with your font listed and an install button in the lower right corner. Click the install button and you’ll be on your way.
You can also add fonts using the Font Book app.
- Open Font Book.
- Locate the + icon.
- Locate the .ttf or .otf file and click Open.
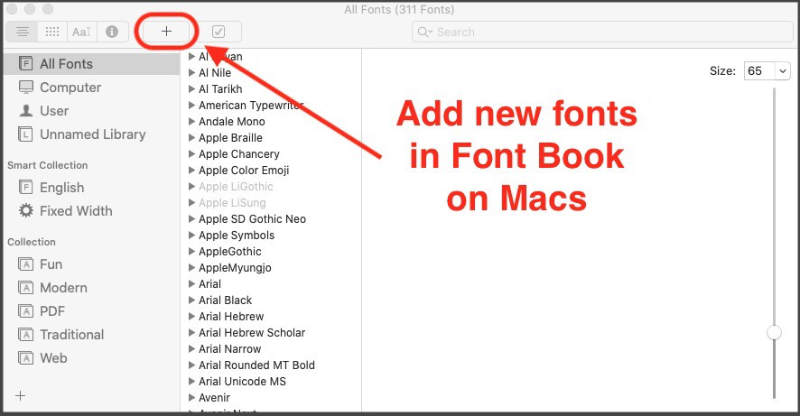
If your Font Book app is pinned to the dock, you can simply drag the font file onto the Font Book icon.
Restart may be required
On both Windows and Mac computers you may have to restart your computer before Word or other apps will recognize the new fonts that you installed.
Be sure your recipient can view your document as you designed it
If you plan to send your Word document to another person, and it matters to you whether or not that person views your document exactly as you designed it, you may need to take an extra step when you save the file.
Whoever receives your document will need to have the same font available on his computer if he is to see the document exactly as you sent it. This is true whether you used only those that are available via Microsoft 365 or you used custom fonts that you bought and installed as instructed above.
If your document uses only cloud fonts that are available with recent versions of Word (Microsoft) 365, the fonts aren’t embedded into the document by default and will only be displayed on the recipient’s computer if that person also has Microsoft 365 installed on a computer that is connected to the internet.
If your recipient’s computer is not connected to the Internet or he uses an older version of Microsoft Word, or your document includes custom fonts that you installed, your recipient will not be able to view your document as you designed it unless you embed the fonts into the document.
Embedding the fonts into the document insures that the recipient will see the document as you intended, whether or not he has the included fonts available. Note that it is possible for font creators to make their fonts unembeddable. However, most commonly available OTF and TTF fonts can be embedded.
How to embed fonts into your Word document on Windows computers
With your document open, click the File tab, then:
- Near the bottom left corner of the window, click Options.
- In the Options panel, look for Save in the left column and click it.
- Near the bottom of the panel, look for “Preserve fidelity when sharing this presentation.”
- Check the first box labeled, “Embed fonts in the file.”
Be sure you save the document after you check the box to embed the fonts.
I recommend that you not check the box labeled, “Embed only the characters used in the presentation.” Leaving it unchecked helps to insure that your recipient sees the document as you intended and, if you intended that person to be able to edit the file in the same font, insures that will be possible.
How to embed fonts into your Word document on Mac computers
The ability to embed fonts in Word documents that were created on Mac computers is only available to Microsoft 365 subscribers as of the time this article was written.
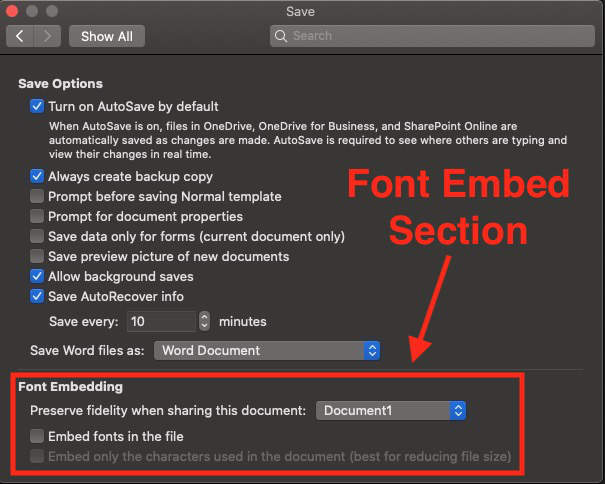
To embed fonts in Word documents that were created on Mac computers, first go to Preferences under the Word menu.
- Under the Output and Sharing section, click the Save icon.
- At the bottom of the Output and Sharing panel, under Font Embedding, check the box beside “Embed fonts in the file.”
- Be sure to do the preceding before you save your document for the last time.
What happens if you don’t embed your custom fonts
If the recipient of your document is using an older version of Microsoft Word, if she uses Microsoft 365 but her computer is not connected to the Internet, or if you do not embed the fonts into your document, your recipient’s computer will substitute a different font for your chosen ones. That may cause your document to be displayed in a undesirable manner.
A bonus tip
If it’s important to you that your Word document appears exactly as you created it, but it’s not important that the person who you send it to can read or edit it in MS Word, sending the file as a PDF may be just what you need.
In MS Word 365 for Macs and Windows, to create a PDF of your document with the fonts embedded, go to the File menu. Click Save As… and for the file type select PDF. Be sure you check the box to create a PDF for printing.
In MS Word 365 for Windows, you can also go to the File menu and select Export. Then choose PDF. That option will give you a PDF with fonts embedded.
Find more articles about using fonts and text here.
Learn more about Microsoft cloud fonts here.
