Writers often send their works-in-progress to beta readers. Freelance writers may send articles for approval. In either of those cases, it could be appropriate for you to make Word documents Read-only. We’ll show you how. We’ll also show you how to password protect your Word documents.
Table of Contents
What is Read-only in Microsoft Word?
Read-only is a protective measure that you can set for your documents which can deter readers from changing the file without permission.
Document protection in Word for Windows offers similar, but slightly different options than Word for Macs. We’ll look at those differences shortly.
Can Microsoft Word Read-only files be edited?
It is important to understand that setting a document to Read-Only does not prevent that document being edited.
When a Read-only document is first opened on the recipient’s computer, it opens with a bar across the top advising that the document is in Read-only mode.
There is a button in the bar that allows the recipient to open the file with Read-only mode turned off and edit the file.
When you set a document to Read-only, the document that you protect by making it Read-only can’t be edited by anyone but you unless they choose to override the Read-only mode as described above.
Changes can be made if the document is saved under a new file name. Saving under a new name creates a new document. Changes can be made to that copy.
You can password protect the file which will limit those who can edit the file to those who have the password.
You can mark a file as Final, but like Read-only, the recipient can still choose to edit the file.
How to make Word documents read-only
MS Word for Windows and Macs both allow you to apply Read-only protection to your entire document.
You can set a file to be Read-only without requiring a password. Remember, if the document is not password protected, the Read-only setting can be changed by anyone.
Passwords are entirely optional but highly recommended if you want to discourage changes being made to your original file by an unauthorized reader.
In the sections that follow, we’ll look first at Read-only mode in Microsoft Word for Macs, then Ms Word for Windows.
Make Word documents Read-only in Microsoft Word for Macs
The following instructions will help you make a document Read-only in Word for Macs.
With the document open, use either of the following methods.
- Open the Review tab.
- In the Protect section (toward the right), click Always Open Read-Only.
- Save the document.
OR
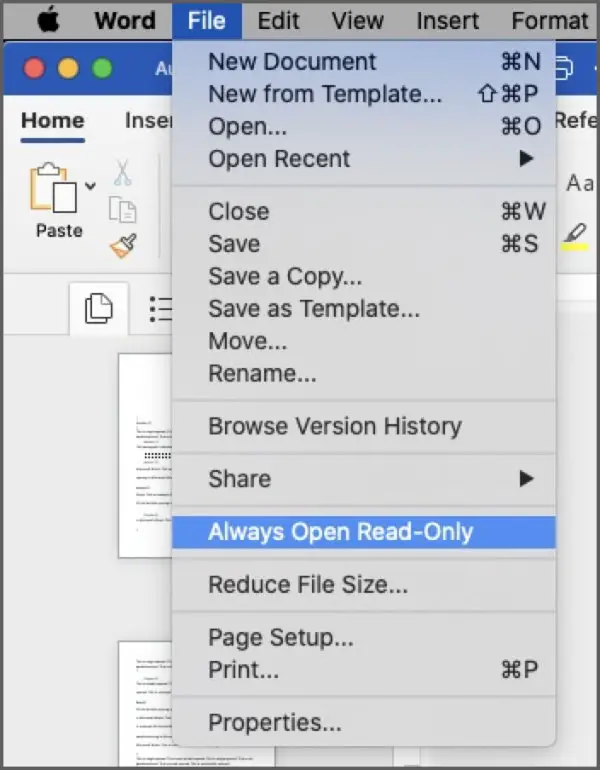
- Open the File Menu.
- Select Always Open Read-Only.
- Save your document.
The next time the document is opened, it should open in Read-only mode.
Password protect a document in Word for Macs
To password protect a document in Microsoft Word for Macs, use either of the following methods to open the Protect Document panel.
- Open the Review tab.
- Click the Protect Document button.
OR
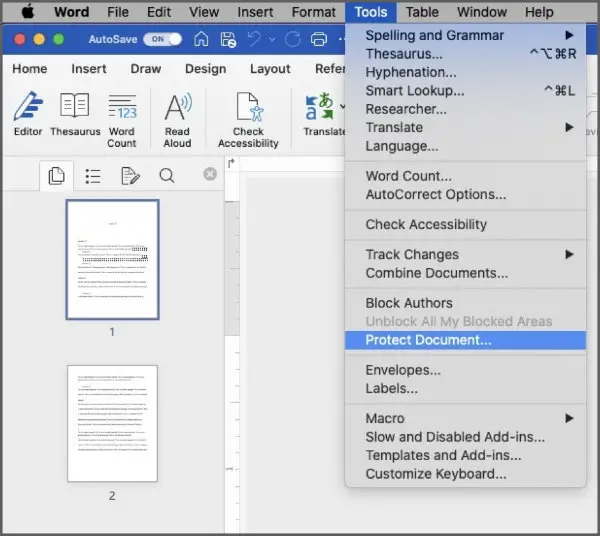
- Open the Tools menu.
- Select Protect Document….
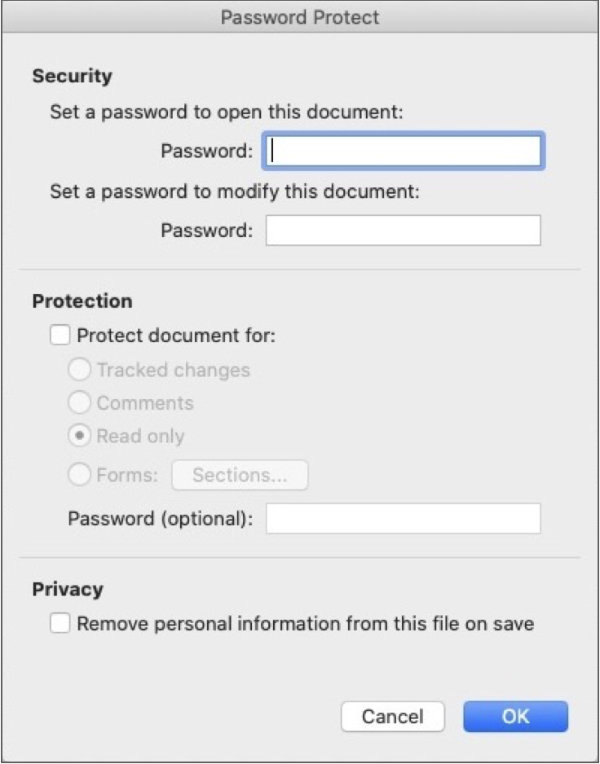
Either of the above methods will open the same Password Protect settings panel.
- In the first section of the settings panel, type a password in the first box if you want to require a password to open the file.
- Type a password in the second box if you want to require a password to modify the document.
- Click OK.
- Save your document.
When anyone opens the file, it should require a password to access it. Since you created the password, you will have to provide the recipient of the document with the password.
Make sections of a document Read-only in MS Word for Macs
It is possible to set a document as Read-only, but allow part of the document to be modified.
You might need to leave one part of a document editable if you have a form in a document. Your reader could fill the form in without being able to change the surrounding text.
Another example might be a writer who sends a document out asking for alternate ideas in one paragraph. She could set that one paragraph to be editable and the remainder of the file to be Read-only.
In Word for Macs, that is done through the use of sections.
Divide your document so that the part for which modification is allowed is in a section of its own. If you want non-contiguous paragraphs to be modifiable, place each of those paragraphs in its own section.
Let’s assume you have set a paragraph in a section of its own. To make that section of a Read-only document editable, first follow the steps above to make the entire document Read-only.
Then, click the Protect Document button in the Review tab.
OR
Select Protect Document… from the Tools menu.
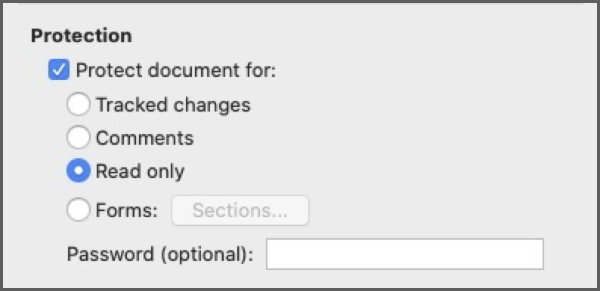
- In the Protection section, check the box labeled Protect document for….
- The last item in that section is Forms with a Sections… button beside it.
- Click the Sections button. Note: If your document has no sections, Forms and the Sections… button will be greyed out and unavailable. If your document includes sections, but no forms, only the Sections button will be active.
- You will see a list of sections in your document. Every section that is checked and highlighted is protected. To make a section editable, uncheck the box next to it. Click the Ok button to save your section selection.
- Fill in the appropriate Password fields if you want your document password protected also.
- Click the next Ok button to save your document protection settings.
- Save your document.
You should now have a document that is Read-only, but with a section that is editable.
If you look closely you will see a thin cursor at the beginning of the unprotected section. If you don’t want to make changes at that point you can move the cursor further into the editable section.
You can click anywhere in the protected document and possibly see your mouse or trackpad cursor flash there and disappear. That is because the only place you can type is inside the unprotected section.
No matter where you think your cursor is outside the editable area, when you start typing, you will notice you are actually typing inside the section you just set as editable.
Make Word documents Read-only in Microsoft Word for Windows
You can use either of the following methods to apply Read-only protection to your document in Word for Windows.
With your document open:
- Open the Review tab.
- Look for Restrict Editing in the Protect section.
- A Restrict Editing settings panel will open. You should see three numbered sections in the panel.
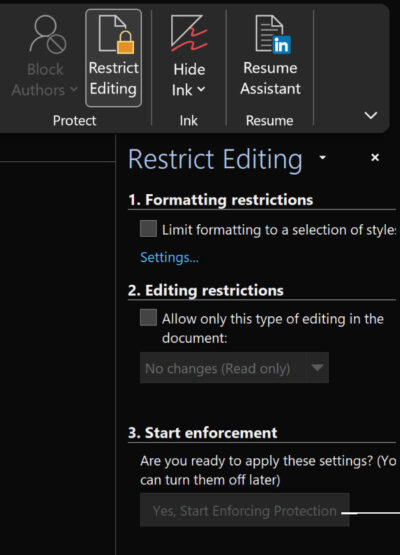
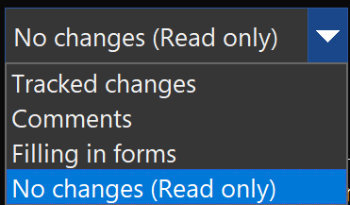
- In the section labeled 2. Editing restrictions, tick the box next to Allow only this type of editing in the document.
- In the drop-down box in section 2, select No changes (Read-only).
- An Exceptions setting will open. We’ll cover that shortly, but you can ignore it for now.
- In section 3, click Yes, Start Enforcing Protection. If you want to insure no one else can edit your file, enter the same password in the next two boxes and click the OK button.
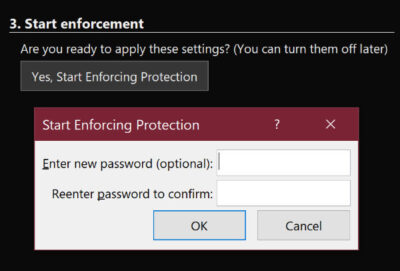
Otherwise, leave the password boxes empty and click the OK button to set your file Read-only but without password protection. - Save your document.
Password protect a document in Microsoft Word for Windows
To password protect a Word document in Windows…
- Open the File menu and toward the bottom, select Info.
- Choose Protect Document, then Encrypt with password.
- Type your password in both boxes and exit the settings panel.
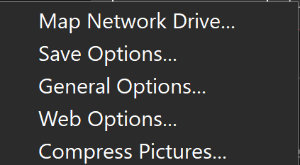
You can also use the Save As… process to require a password to open a document in Word for Windows. When you save your file using Save As…, near the Save button at the bottom of the Save As panel, there is a button or link labeled Other Options. Click that button to open a small list of options. One of them is General Options.
The General Options panel provides a place to fill in a password that will be required whenever the file is opened in the future.
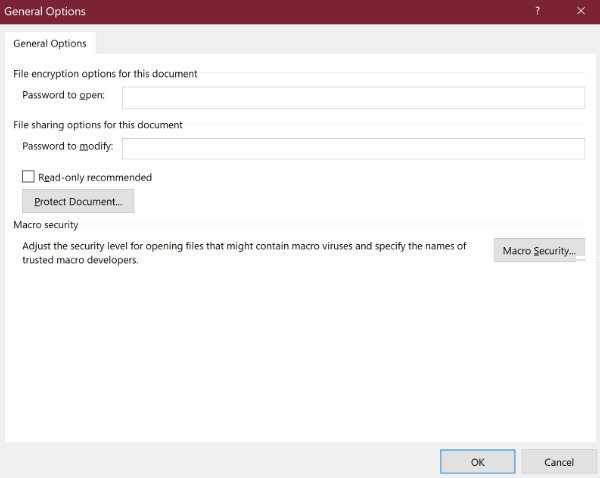
You will see a place to fill in a password for file encryption and a second password for sharing capabilities.
If you want the file to be Read-only, in addition to requiring a password, tick the box for Read-Only recommended.
As with any of the settings listed in this article, save your document after you’ve finished.
Make parts of a document Read-only in MS Word for Windows
Unlike Word for Macs which uses sections to allow portions of a protected document to be editable, Word for Windows allows you to set specific paragraphs as modifiable without the need for specifically creating sections.
- The first step is to make your entire Word document Read-only. Use the instructions above to do that.
- Select the paragraph that you wish to keep editable.
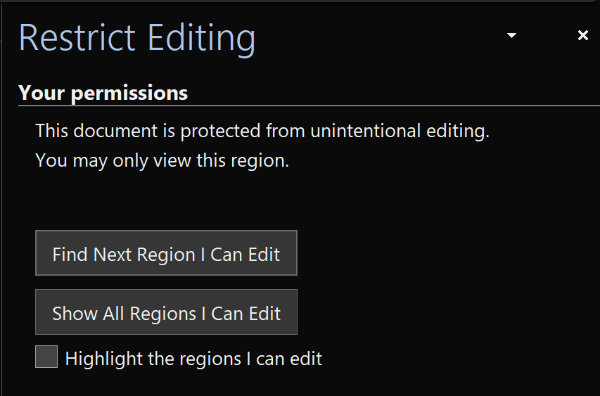
- In the Review tab, click Restrict Editing.
Later, to see which paragraphs are editable, open Restrict Editing again. Individual parts of the document that have been marked as Exceptions are now called Regions. You should see a panel with two buttons. One allows you to move to the next editable region (paragraph, etc.). The other allows you to see all of the regions you are allowed to edit.
Make your Microsoft Word document more difficult to change
As for myself, if I really didn’t want the recipients of my work to be able to edit it, I’d prefer to convert the file to PDF before I send it.
PDFs can be set as Read-only. While an unprotected PDF can be edited with the right software, it is not nearly as straight-forward as editing a Read-only Word file.
