Every office software suite provides a way to change margins in documents. In this article you’ll learn how to make one inch margins on Google Docs.
Table of Contents
How to make one inch margins on Google Docs
Since this article was originally written, Google Docs has introduced it’s Pageless format. To use the instructions in this tutorial, you’ll first need to be sure your document is set to Pages format.
- From the File menu, select Page Setup.
- Click the Pages tab.
When I open Google Docs, I find that the default margins are set at one inch. If they aren’t, here’s how you can set them to one inch or any other setting you need.
- Open your new or existing document in Google Docs.
- Go to the Google Docs File Menu (not the browser’s file menu).
- Near the bottom of the menu select Page setup.
In the settings panel that opened, you’ll see the margin settings in the right column. From top to bottom, the settings are for:
- Top
- Bottom
- Left
- Right
Just click in each box to change the current setting to your preferred setting.
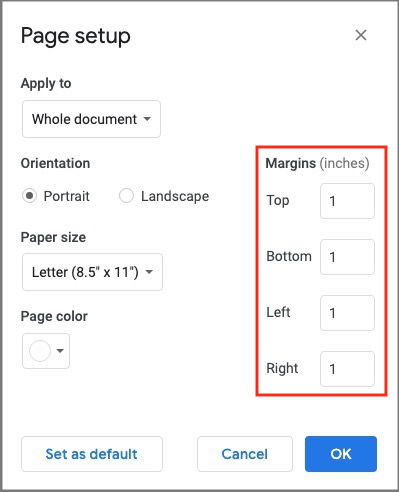
Click OK when you have finished.
The settings you adjust there will apply to the entire document unless you tell Google Docs to do otherwise.
Set Google Docs margins for selected text
You can set different margins for selected sections of text within a Google Docs document.
Let’s say you want to place a section of quoted text inset with wider margins.
To set margins only for a selection of text, first select the text by dragging your mouse over the text from the top left to bottom right.
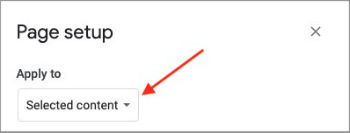
- With the text selected, go to the File menu and open the Page setup panel.
- Click on the box below the Apply to label and click Selected content.
- Set your margins as you need them.
- Click OK.
You will see that the text you selected is now on a page by itself. That is because margins are set on a page basis, not per paragraph.
Margins vs indents in Google Docs
If you run into complications when you are trying to set wider margins on small blocks of text, it may be that you haven’t been taught the difference between margins and indents. They each have different functions and are set in different ways.
Margins basically dictate the minimum distance that the body content of the document can be from the edges of the page, were it to be printed.
When you type a paragraph in Google Docs or a similar app and the text wraps to the next line then the next, an inch or so before the edge of the page, it is because your text is being kept inside the boundaries set by the margins.
Margin settings dictate the width of the “white space” between the text and the edge of the paper.
When you wish to accentuate a small selection of text by having it appear narrower than the rest of the document, you want to use indents, not margins.
Indentation settings dictate the distance between a selection of text and the inside of the margin.
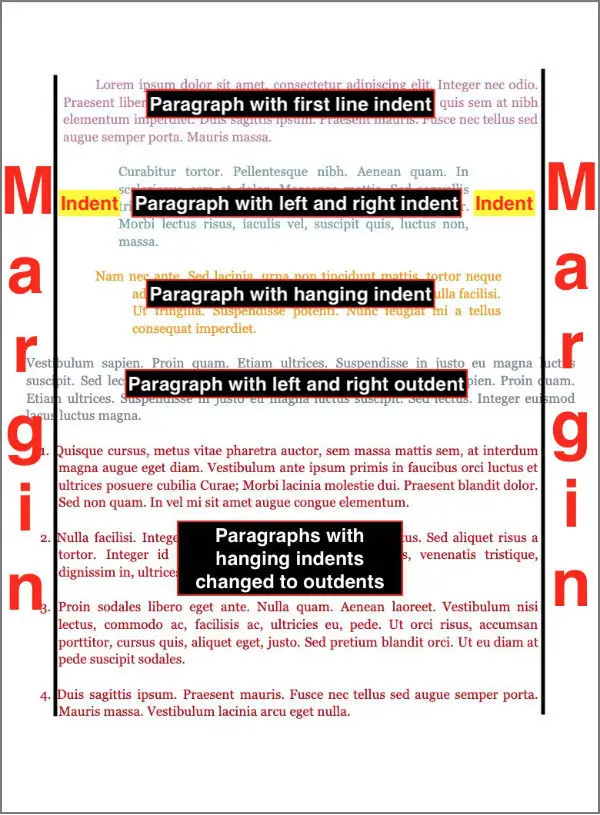
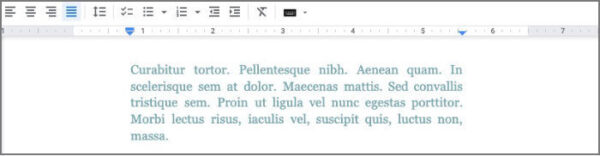
It’s easy to see how one might believe the margins had been set wider for a paragraph when the right side appears to have a wider margin than the paragraphs before and after it.
In the next section you’ll learn how to achieve that appearance with indents.
How to set paragraph indents in Google Docs
To set indents on both sides of a block of text in Google Docs, first be sure the horizontal ruler at the top of the document is visible. If it isn’t, go to the View menu and select Show ruler.
Select the paragraph(s) that you wish to indent.
At the left end of the Ruler, notice where the color changes from white to grey. That marks the left margin.
There, locate a blue arrow pointing downward with a flat blue bar above it. That arrow sets the left indent. The blue bar above the arrow sets the indent for the first line of a paragraph.
To indent from the left with no first line indent, set the bar to be straight above the arrow.
Drag the arrow toward the center of the document. You should see the entire selected block of text indented from the left with no additional first line indent.
If you set the bar further inward than the arrow indicates, when you drag the arrow, the bar will move with it. You can then adjust the bar individually if need be.
The place where the Ruler changes from white to grey on the right marks the right margin.
With your text still selected, you can indent from the right by dragging the arrow on the right end of the Ruler inward toward the center.
Use the Increase indent and Decrease indent buttons
A quick way to change the left indent for a selection of text is to use the Increase indent and Decrease indent buttons in the toolbar.

Select the text that you want to indent. Use the Increase indent button to move the left edge toward the center of the page.
Use the Decrease indent button to move the left edge toward the left margin.
Outdents in Google Docs
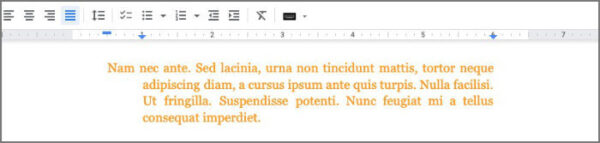
The same arrows on the left and right ends of the ruler can be used to outdent text should you ever have a need to set a single selection of text wider than the margins that restrict the rest of the document.
To set outdents in Google Docs, select your text and follow the instructions above, but drag the arrows outward beyond the margins toward the edge of the page.
You may remember that changing the margins for one selection of text resulted in that section being on a page by itself. Using outdents to make a paragraph wider than the margins allows the paragraph to stay on the page and in line with the rest of the document.
How to create hanging indents in Google Docs
There are two ways to create hanging indents in Google Docs.
In the first method, select the entire text of the paragraph you want to set with a hanging indent.
- Go to the Format menu.
- Mouse over Align & indent. Another menu will appear.
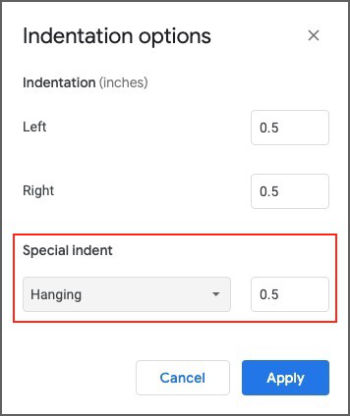
- Select Indentation options.
- Under Special indent, choose Hanging.
- In the small box to the right, type in your chosen indent amount in decimals. For half an inch, type .5 etc..
- Click Apply.
Change a hanging indent to an outdent
Some fields of writing have specific standards for the use of hanging indents but there are also other uses for them.
On the left side of the Ruler, you can set the blue bar at the margin. Then drag the blue arrow a few spaces toward the center of the document. That should result in a hanging indent where the first line is longer than the remainder of the paragraph. The result is very similar to the first method where you set hanging indents from the Format menu.
The scenario I describe in the following paragraphs is not a method or use that I’ve ever seen in any official documentation of Google Docs or any other similar office app. It’s just another way you can be creative in the use of indents and outdents.
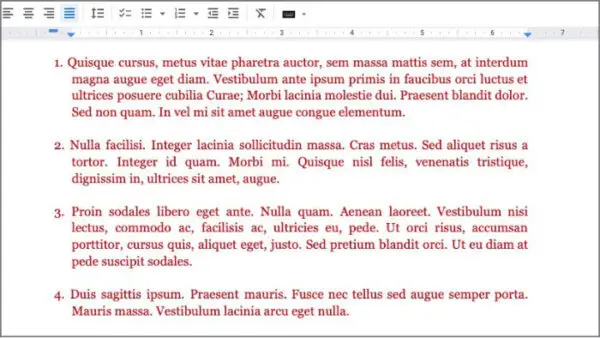
This method can be used for formats in which the first paragraph of a section is numbered. You could use the hanging indent capability to outdent the first line by a specific amount and set the remaining lines of the paragraph to begin at the margin with no indention or outdent.
In this example, start the first paragraph of a section of text with a number such as 1. Follow it with a space then the remainder of the paragraph. Format the paragraph with a hanging indent, then drag the blue arrow marker outward until the number and space are just past the left margin, creating an outdent. The blue bar should follow as you move the arrow marker.
The number for the first paragraph of each section would be set just outside the left margin, making them easier to follow as demonstrated in the next image.
The end result would be similar to an ordered list in which a list of items is numbered and frequently indented.
One difference here is that when you create a numbered list in Google Docs, each paragraph is numbered, including single blank lines that might appear after hitting the return key.
The method I described above might require some extra formatting if the numbered sections include multiple paragraphs. In that case you wouldn’t want the first line of every paragraph to be outdented. To avoid that you’d format the indents and outdents separately for each numbered paragraph.
There may not be quite as much formatting work to do as it appears. If a numbered section of text has six paragraphs, you would separately format the numbered paragraph to have the outdent. Then select the remaining five paragraphs together and set the format for all of them at one time.
The scenario I just described is just an example of how you could use indents, outdents, and margins together to achieve results outside the default settings. You can take the information and use it to create your own creative formatting.
Summing up: Margins vs indents in Google Docs
Now you know how to set margins in Google Docs. You also know how to set indentation and how to use the same tools to set outdents and hanging indents.
There is a place to use of them and it’s much easier when you know the difference and how to create them.
More Google Docs information: How to Change Google Docs to Landscape.
