Indie authors and other creatives often find themselves needing a website. For some, the easiest and most affordable way to have one is to create it themselves using a theme such as Divi.
I use Divi on some of my websites and early on, one of the tricks I was forced to learn was how to clear the Divi cache.
Table of Contents
What is the Divi cache?
Websites that are built on modern standards use CSS (Cascading Style Sheets) to control the styling of the site. In short, CSS is what gives your website its colors, font choices, design features such as overlays over background images, and much more.
“CSS is a language for specifying how documents are presented to users — how they are styled, laid out, etc.” Mozilla.org
A few years ago Divi’s creators changed the way it handled CSS in an effort to streamline things in the backend and speed up page load times on the front end. They did that by adding the site’s CSS to static page files, rather than loading it inline inside every page of the site.
The Divi cache is a stored copy of the CSS file that is necessary for the site you build using Divi to look the way you intended. As you create or modify your site’s appearance in the backend, new CSS is written so that the work you’ve done will stay the way you intended.
Why would I need to clear the Divi cache?
A problem arises sometimes when a lot of changes are made and we go back and forth from the builder in Divi to the browser, checking if our changes gave us the intended result. It is possible for the browser to display a version of the site that does not reflect our most recent changes.
When that happens, my first go-to trick is to clear the browser’s cache. Browsers cache (store) pages that are loaded (except in private windows that have been closed) so that the page will load faster the next time the person visits it.
If the browser is showing the cached version, you won’t see the newest version of your site’s changes. To correct that problem, you’ll need to clear the browser cache.
Even with your browser’s cache cleared, you may still see a version of your site that does not reflect your changes. That’s when I would head for the Divi Options panel to clear the Divi cache. This in effect, clears out the CSS that was in control prior to the newest changes you made.
How to clear the Divi cache
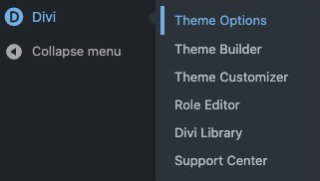
To clear the Divi cache, log into WordPress. Use the navigation in the left sidebar to locate Divi > Theme Options.

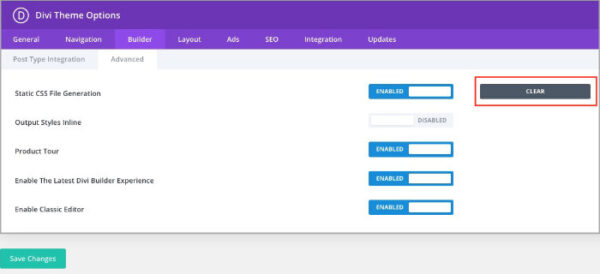
Inside Divi Theme Options:
- Click the Builder tab.
- Click the Advanced tab.
- Beside Static CSS File Generation, click the black button labeled Clear.

If clearing the Divi cache doesn’t work
You may discover that neither clearing the browser cache nor the Divi cache solved the problem of your site changes hiding from you.
Do you have a caching plugin such as WP Rocket installed? If you do, try clearing the cache there. It’s typically not a great idea to have more than one caching plugin installed and activated. If you have other WordPress caching plugins installed, clear the page cache in them also.
If you are positive you saved your changes in Divi Builder, and after clearing the browser cache, the Divi cache, and your WordPress caching plugins your changes aren’t visible on the front end, you might want to contact your web host. Ask him to clear any server-side caching.
Finally, if you use a CDN such the one WPX hosting provides, clear that cache also.


