You can easily change the default font in Scrivener. As with many things related to Scrivener, it’s easy to over-complicate making adjustments to the default settings.
Table of Contents
However, once you know where to look, you’ll find it easy to not only change the fonts, but many other settings as well.
Let’s get started.
How to change the default font in Scrivener Version 3 for Mac and Windows
Update: In late March, 2021 Literature and Latte released Version 3 of Scrivener for Windows, bringing Scrivener for Windows up to par with the Mac version. Because of that update, if you have upgraded Scrivener for Windows up to Version 3, your instructions are similar to the Mac version. You should find it very easy to find your way around in the new Version 3 for Windows using the Mac instructions.
We’ll look at two methods to change the default font in Scrivener. The first method is to change your preferences so that any new documents you create in Scrivener will have the font, line spacing, etc. that you prefer.
- In Scrivener for Macs, go to the menu bar and select Scrivener > Preferences.
- In Scrivener V3 for Windows, go to the menu bar and select File > Options:
- Select the Editing tab. The Editing tab contains three pages of settings that can be changed by choosing either Options, Formatting, or Revisions from the secondary row of tabs.
- Select Formatting. The Formatting tab allow you to set most things that pertain to the primary editing window, including the font, font size, line spacing, alignment, and more.
The Formatting tab interface will have a familiar look with toolbar icons that are similar to those in MS Word, Apple Pages, LibreOffice, and most other word processing apps. To change the font, select the Aa icon on the left end of the toolbar. That opens a floating box from which you can choose the font you want as well as size and typeface (regular, italic, bold, or bold italic).
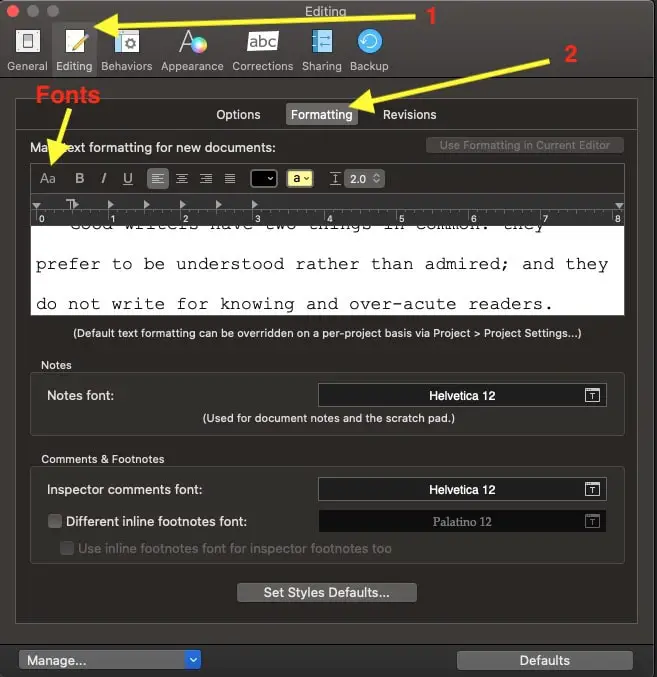
From the Formatting tab, you can also set the font for Notes, Inspector comments, and footnotes.
Note: Making font changes here will not automatically affect your current or existing documents. It will only change the default font and formatting for new documents unless you convert them to use the new default settings. To convert existing documents within the current project to your new font settings, go to the Binder and select the documents that you want to use your new settings. With them selected:
- Go to the Documents menu > Convert > Text to default formatting….
- A small box will open with a few self-explanatory settings. Select your choices there.
- Click OK.
The documents you selected in the Binder should all have the newly edited default font settings.
That brings us to the second method. In the editing panel, you can make the same document font changes that are available in the Preferences panel we just looked at.
For this method, open a document that you wish to format with your default style. Add some text, then format it until it has the font and appearance that you want.
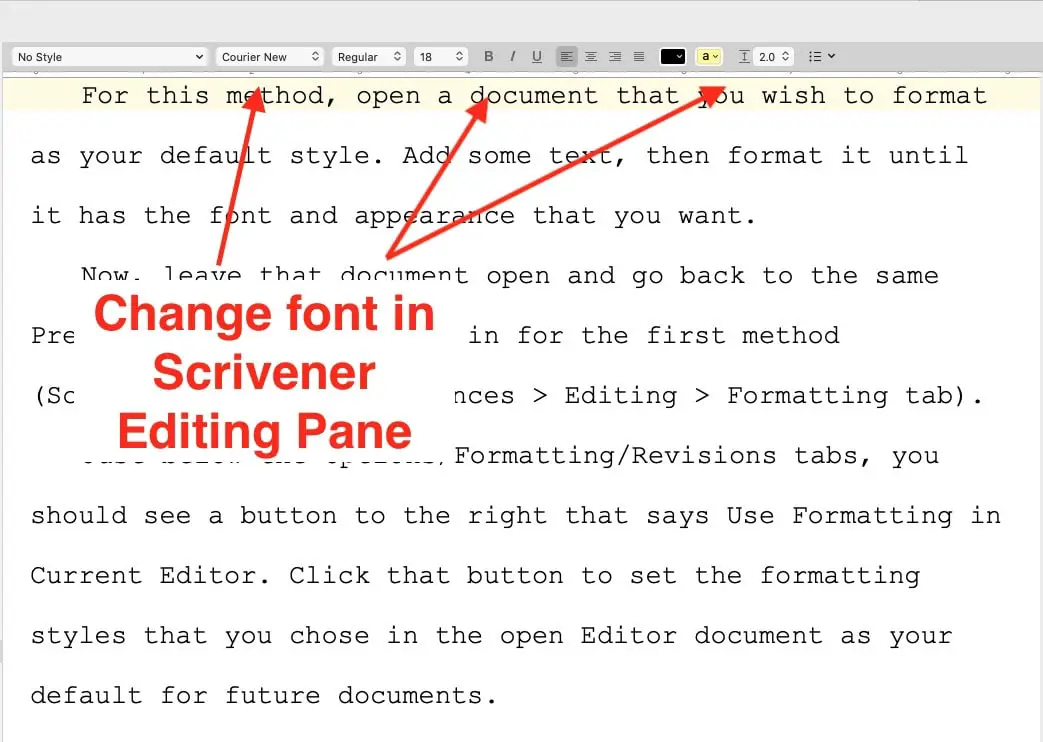
Now, leave that document open and:
- Go back to the same Preferences panel you were in for the first method (Scrivener menu > Preferences > Editing > Formatting tab).
- Just below the Options/Formatting/Revisions tabs, you should see a button to the right that says Use Formatting in Current Editor. Click that button to set the formatting styles that you chose in the open Editor document as your default for future documents.
NOTE: You can change any of the style settings on a document by document basis by setting them within the Editor windows. Changing them there will not affect future documents unless you set them as default using the button you just learned about in the previous paragraph.
How to change the default font in Scrivener Version 1 for Windows
If you are using Scrivener Version 1 for Windows, you are probably aware that your version does not have some of the features that Scrivener for Mac has. Literature and Latte, the creators of Scrivener have released an updated Windows version – Version 3.
In Scrivener Version 1 for Windows, you are limited to using the first method we discussed for Scrivener for Macs. The difference is that you get to the formatting options by going to Tools > Options > Editor. After changing the font, sizes, etc. be sure to click the Apply button, then OK. If you move on without doing that, your settings will not be saved.
NOTE: You do not have the option to save your current document’s settings as your new defaults in Scrivener Version 1 for Windows as you do in Version 3.
You may have seen Presets in Scrivener for Windows or Styles in Scrivener for MacOS and wondered if you could use them to set your default font. Unfortunately Presets and Styles have a different function and are not the focus of this article.
A note about this tutorial. All of our Scrivener tutorials are personally written based on our own experience with Scrivener. If you would enjoy more in-depth training, we recommend Joseph Michael’s Learn Scrivener Fast Course.
