If you work with dates in Microsoft Excel, you know how tedious it can be to manually enter different dates individually. Fortunately, there is more than one way to automatically fill dates in Excel.
Table of Contents
We’ll look at a few scenarios in Excel where you might want the date to fill in automatically.
Auto-Fill sequential dates in Excel
Let’s say you are about to enter data into a spreadsheet in which you want each row to contain a month’s data. Each row will contain data from one day in the month of April.
To accommodate that, you use row 1 as a header row. Then, beginning with row 2, you have thirty rows – one for each day in April. The first cell in each row contains the date for that row of data.
One very simple way to quickly fill dates in Excel is to use the AutoFill feature. To use AutoFill in this scenario, enter April 1, 2023 (or a different year, if needed) in cell A2, the first cell below the header.
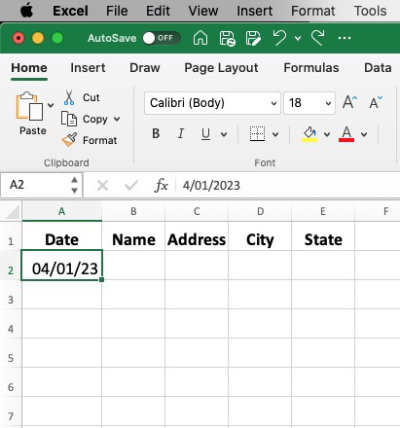
With cell A2 still selected, click and drag the fill handle down to cell A31 to fill in the remaining dates. The fill handle is the small square in the bottom right corner of the cell.
As you drag downward, Excel will recognize that you have filled in a date and will enter the correct dates in the remaining cells for you. Your auto-filled dates will have the same formatting as the date in cell A2.
Use Excel’s Fill command to fill in a series of dates
You can also use the Fill command to fill in the dates in your spreadsheet. This allows you to fill in a range of cells with a series of dates, either by month, day, or year. You can also customize the series to fit your specific needs, such as skipping weekends or only filling in weekdays.
The Excel Fill command works in a similar way to AutoFill. To use the Fill command in our example, type your date in cell A2. Right-click the handle in the lower-right corner of cell A2 and drag it down to cell A31 to select a cell for each day of the month.
When you release the mouse, you should see a small context menu beside the cell selection. That menu offers you some interesting choices for displaying dates. I’ll cover just four of them in this tutorial.
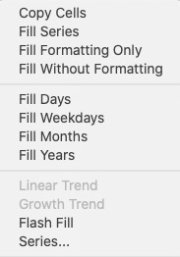
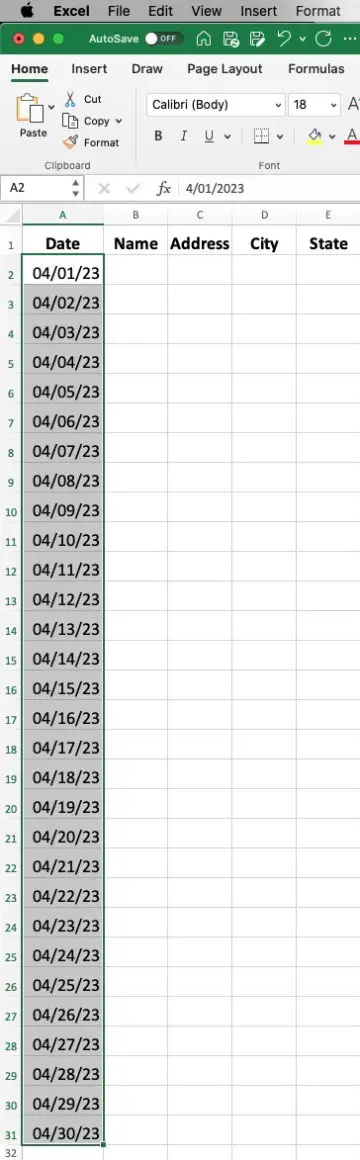
Fill days: The dates in column A will begin with the date in cell A2 and be filled in sequentially through cell A31. In our example, column A simply contains all of the days in April, each on its own row.
Fill weekdays: Each cell from A2 – A31 will contain a date, but the dates will only be for the days Monday – Friday. Saturdays and Sundays will be skipped. No cells will be skipped, but the dates shown will skip over Saturday and Sunday. In other words, there will be no rows or dates for Saturdays and Sundays.
Fill months: In a case such as our example where cell A2 contains the date April 1, 2023, each row that you drag down to will advance the date by one month. So, if cell A2’s date is April 1, 2023, cell A3 will contain May 1, 2023, A4 will contain June 1, 2023 and so on.
Fill years: The Fill years option works similarly to Fill months. The difference is that the date in cells below A2 each progress by a year. If A2 contains April 1, 2023, cell A3 will contain April 1, 2024. Cell A4 will contain April 1, 2025. The progression will continue for as many cells as you drag the Fill command handle.
To format your date, you can type the date in cell A2 and format it then, before you right-click and drag downward. The format that you choose for the date in A2 will be used to format the other dates when they are filled. Or you can fill in all of the dates, then select all of the date cells and format them after they’re filled in.
Note: In this tutorial, the example we’re using involves auto-filling dates in columns. The same process will work across rows, where you type a date in the first cell, then drag across the required number of columns to fill the date in each cell across the selected columns.
Using the TODAY Function to fill dates in Excel
You may need a spreadsheet that is designed with the current day’s date at the top, for example. But you’d rather not have to look for a calendar to see the right date. so that you can open it and have the date for that sheet always show the current date.
To do that, we’ll use the TODAY function. The TODAY function returns, or displays, the current date in the cell where it is placed.
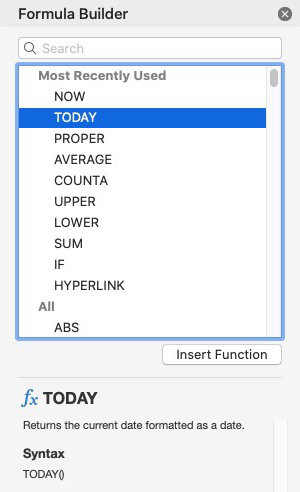
Most of the images used in this tutorial are from Excel for Macs. The same features are available in Excel for Windows. The Insert Function panel in Windows may open floating in the center of the screen. When you click the Insert Function button under the Formulas tab in Excel for Macs, the panel that opens is called Formula Builder and will probably open anchored along the right side of the screen.
Note: The TODAY function can be used in more complex situations. For the purpose of this tutorial, we are using it to automatically insert the current day’s date.
To use the TODAY function, select the cell where you want to insert today’s date. Then do one of the following:
- Type =TODAY() in the cell. If it doesn’t seem to work right, type it in the Formula bar just above the column labels (just to the right of the functions button fx).
- Click the Functions button (fx) in the Formula bar or the Insert Function button under the Formulas tab. The Formula builder panel in Macs (Insert Function panel in Windows) will open. Locate and select the TODAY function. Click the Insert Function button.
Inserting the function using the toolbar buttons is a slightly slower method than typing the function into a cell, but there is less likelihood of error.
The current date will appear in the selected cell. You can also format the date to display in a specific way. To do this, right-click the cell and select Format Cells. Choose the date format from the list in the Format Cells dialog box.
Warning: The TODAY function updates itself every time the worksheet is opened or changed. That means if you open your spreadsheet today, it will show today’s date. If you reopen the sheet tomorrow, the date will change to tomorrow’s date.
If you want to save the date so that it does not update, you can right-click the date and save it. Then use Paste Special to paste just the date value into another cell.
Using the NOW Function in Excel
If you want to insert the current date and time in Excel, the NOW function should do the trick for you. The NOW function returns the current date and time and is updated every time you recalculate or open your worksheet.

To use the NOW function, use the same process you used to insert the TODAY function. The difference is that you select the target cell, then either type “=NOW()” or select the NOW function using the Insert Function button.
Using the NOW function in Excel is a quick and easy way to insert the current date and time in your worksheets. With a few simple formatting options, you can customize the display of the date and time to meet your needs.
In addition to using functions and formulas to fill dates in your worksheet, you can also use them to count cells that contain text.
You can also access Microsoft’s official Excel documentation.

