If you are new to Scrivener, the writing app from Literature & Latte, you may not have found a way to add chapters to your book manuscript. If not, hang around for a few minutes and you’ll learn how to easily add chapters in Scrivener. If you are a seasoned Scrivener user, you most likely already use a similar method.
Table of Contents
How to Add Chapters in Scrivener
If you’ve been writing in Microsoft Word you may have written your manuscript as one very long file with each chapter starting on a new page.
You may have applied a style on the title to help you visually locate the start of a new chapter, then used the Navigation pane to move through the chapters. There are other methods that writers have used to organize their chapters in Word.
Scrivener is flexible enough that you could use it in a similar way but that would be basically wasting much of it’s capability.
To be fair, there is no menu command to add chapters to Scrivener. But, I’m going to show you two ways to add chapters in Scrivener that are simple as a menu command. Both are based on the folder and file system that you’ve been accustomed to in Microsoft Explorer or Mac’s Finder.
Giant hint about learning to use Scrivener:
It’s a matter of terminology stemming from an intentional design that makes Scrivener incredibly versatile.
Please try not to get hung up on the idea of Scrivener using folders and files to organize your work. Technically that is how it works in the background, allowing you to arrange your work any way you wish. But seeing it as just folders and files may unnecessarily complicate matters for some users.
To simplify matters, just look at the folder as a container that holds whatever you put in it. In a simple example of a fiction book, we’ll use a folder to hold the contents of a chapter. That folder (chapter) might contain several text files (scenes or beats).
While technically you’re looking at folders and files in the Binder, as far as your book is concerned you are simply looking at your chapters, sections, scenes, and beats.
In the case of a non-fiction book, that folder might be a chapter containing other folders representing sections, which then contain text files—the paragraphs of text that comprise the section.
When you’re finished, you tell Scrivener to compile your book, using all of those folders and files, into a finished manuscript with each chapter, section, or scene exactly where you told Scrivener to place it.
The beauty of this method is that you can see at a glance exactly in what order the parts of your writing are. If you want to move a part of it elsewhere, just click it and drag it exactly the same way you’ve been moving files and folders around on computers for as long as you’ve used one.
Following are two simple methods for adding chapters to your book manuscript.
Add chapters in Scrivener – Method #1
This method works well for writers who write in chunks or not necessarily in the order the finished book will have. It allows you to move the bits and pieces of your masterpiece into place, regardless the order in which they were written.
If you go to the File menu and select the first option to start a New Project, you will be given the option to use a novel template. There are other templates available, too. If you choose the novel template, most of the basic organizational work is already done for you.
Understand that the novel template is not limited to fiction writing. Scrivener doesn’t care what genre you write in nor how you use its features. With any form of writing, you can organize Scrivener practically any way you wish.
The left side column in Scrivener as it opens by default is called the Binder. You’ll see folders, then if you double click one of them, you’ll see the text files that are inset below them.
Following is my preferred way of using Scrivener with long form writing such as books, whether fiction or non-fiction.
I start each chapter by creating a folder to hold that chapter’s scenes, beats, or sections. I’ll typically name it Chapter 1, Chapter 2, etc. unless I already know the title of the chapter.
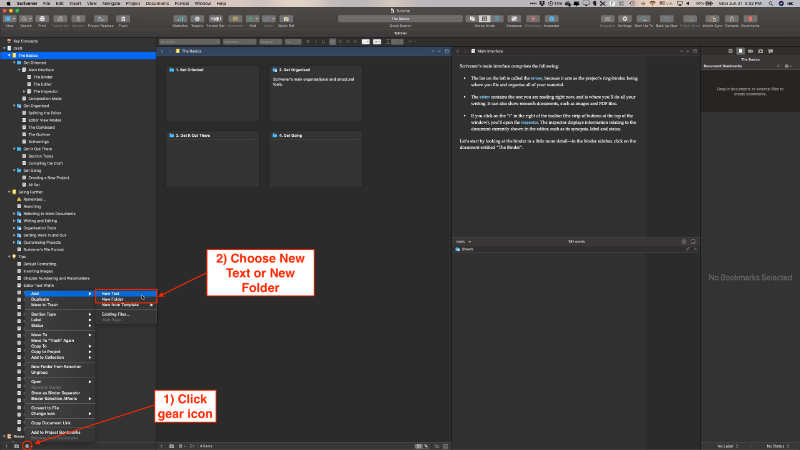
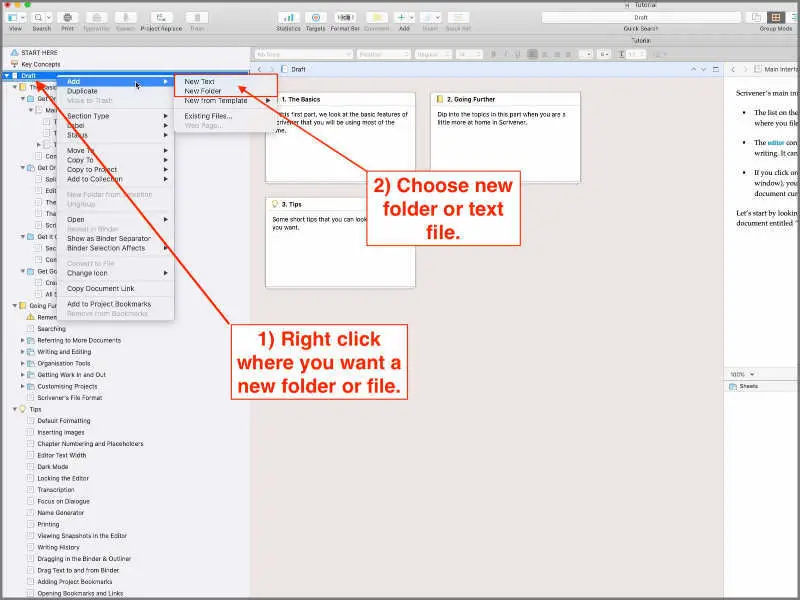
You can create the folder by right-clicking anywhere in the Binder, but preferably in the spot where you want to add the folder.
From the right-click menu choose Add, then New Folder. If you missed the exact spot where you wanted the new folder to be, just left-click it and drag it into place.
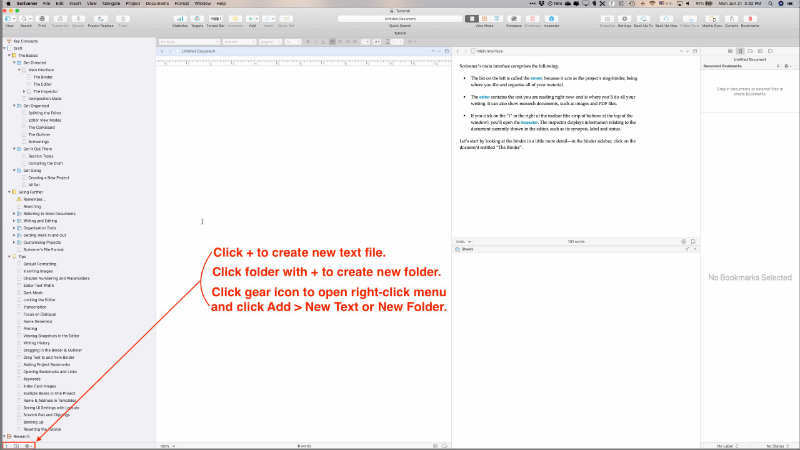
Note: You can reach the same menu you see when right-clicking if you click the gear icon in the footer below the binder.
You’ll probably want to name your new folder. To do so, just double-click the title beside the folder and type in Chapter One, or whatever you wish.
With the folder created and named to indicate the chapter, use the same method you used to create a new folder, but this time, from the right-click menu you will choose Add > New Text.
A blank text file will appear. Text files are where you type the content of your scenes, beats, chapters, etc.. You can write each beat or any section you desire in its own file, based on your own style of writing. Break it down into as many smaller pieces as you wish.
If you’d prefer to write your entire chapter in one text file, you can certainly do that. We’ll look at that method in a minute.
Let’s say your chapter folder has five files in it, each containing a scene. The beauty of this method is that you can left click any file and drag it up or down within the chapter to rearrange the order.
If you decide that scene would work better somewhere else in the story, you can just as easily drag it wherever you want it in another chapter’s folder, thereby moving it to that chapter.
You can just as easily drag the chapter folders to new locations. If you decide your chapter ten would work better as chapter eight, drag it into that location.
If your chapter titles include the number, you’ll need to edit your chapter names after you move them. If you don’t, your writing will actually be in the order you intended but the chapter titles will appear to be out of order.
NOTE: You can also add new folders and text files by selecting a folder or file anywhere in the Binder where you’d like to add a new one. Then go to the very bottom of the Binder. You’ll see a + icon. That will add a new text file. Next to it is an icon of a folder with a + in the center of it. Click that icon to add a new folder.
Add Chapters in Scrivener – Method #2
I briefly alluded to this method earlier. You can create a folder and name it whatever you wish. Then, inside that folder create a separate text file for each chapter.
If you write fiction that can appropriately be further divided into parts, you could do that. Title the first folder Part 1 and include a text file for each chapter. Then the second folder would be Part 2 with its chapter files inside.
Another variation would be to create a folder as the master that holds the entire book. Then create a folder inside the master for each section. Inside the section folders, you would add a text file for each chapter or another chapter folder containing your scenes or beats.
Wrapping it up
Scrivener is ridiculously versatile. When you get the basics of how it works, you’ll find yourself zooming around in it, organizing your work in ways you might never have thought possible.
It’s a subject for another article, but after you’ve organized your work in one of the ways we looked at, you could switch Scrivener to the Corkboard view.
If you are a visual person you’d see each part of your work organized like 3X5 cards which you could then drag around until they were in exactly the order you wanted.
You can find more of our Scrivener tutorials here.
A note about this tutorial. All of our Scrivener tutorials are personally written based on our own experience with Scrivener. If you would enjoy more in-depth training, we recommend Joseph Michael’s Learn Scrivener Fast Course.
