We’ve all read documents that were tedious to read because the lines of text were too closely spaced. Double spacing in Microsoft Word solves that problem in your documents. We’ll look at how to start and stop double spacing as well as how to use extra line spacing that can be more or less than double.
Table of Contents
How to set double spacing in Microsoft Word
There are four basic scenarios to consider when explaining how to double space your document. Those are:
- Changing an existing section of text to double spaced.
- Double spacing the remainder of your document.
- Having mixed spacing so that one part of your document has different spacing than the rest.
- Changing an entire document to double spacing.
Word’s line spacing works on a paragraph level at the minimum. In other words, the smallest part of a document that can be set with different line spacing is a paragraph.
Remember, though, a paragraph can be pages long or a single word. If you want two lines of a paragraph to be double spaced and the rest of the paragraph to be single spaced, you’ll have to break the text into multiple paragraphs and set the line spacing in each of them.
For example, if you want one short sentence in a paragraph to have focus with perhaps a larger size font and greater line spacing (also known as line height), you would place your cursor before the focus sentence and hit the return key to force a new paragraph. Then, place your cursor just after the focus sentence and hit the return key again to force another new paragraph.
Now, you can set the line spacing for that one-sentence paragraph, leaving the surrounding paragraphs as they were. Learn about spacing between paragraphs here.
How to change an existing section of text to double spaced
Click in the paragraph that you wish to be double spaced. Then do one of the following.
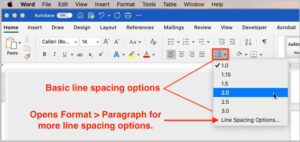
- In Word’s Home tab, select the Line spacing button. That button should be in the third section of settings from the left. If you have trouble seeing it, with the Home tab still selected and open, take a look at the names of the different tabs across the ribbon. When you see the View tab’s label/name, look below it for the Line spacing button. You can identify it by its blue up and down arrows, a stack of four horizontal lines, then a downward pointing arrow.
- Click that button and choose 2.0 from the short list that appears. That will give you double spacing in the paragraph that you have selected.

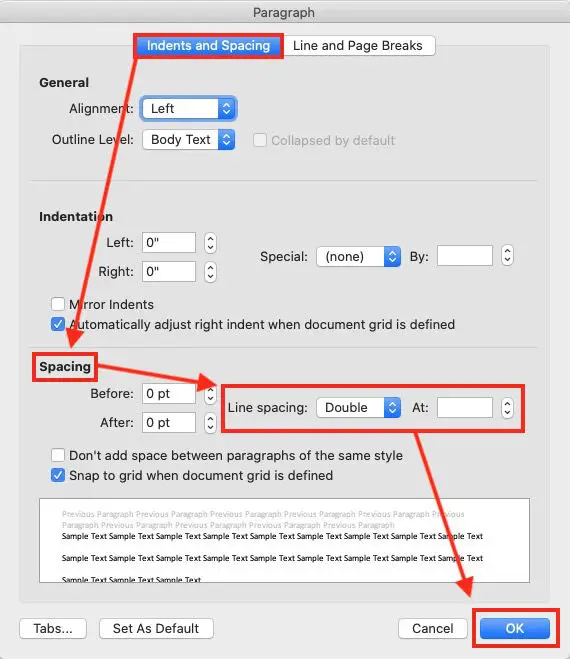
- Go to the Format menu, then Paragraph… (Format > Paragraph…). Click the Indents and Spacing tab at the top of the settings panel. In the bottom section of the panel labeled Spacing, look for Line Spacing. Next to that label is a drop-down box that you should click. Choose Double. You’ll see other choices there which we’ll look at later in this article.

You may also right-click anywhere inside a paragraph and choose Paragraph… from the menu that appears. That will open the same settings panel that is available from Format > Paragraph… .
Double spacing the remainder of your Microsoft Word document
To set line spacing so that any new text will be double spaced, simply click at the beginning of the first new paragraph and use one of the previously mentioned methods to set your line spacing. Text you type from that point on will be double spaced unless you change it.
Having mixed spacing so that one part of your document has different spacing than the rest
Click only in the paragraph that you want to have different line spacing, Use one of the previously mentioned methods to change it.
Changing an entire document to double spacing
To change an entire document to double spaced, click Control + A on Windows or Command + A on Macs to select the entire document. Use one of the previously mentioned methods to change the line spacing.
Keep in mind that this method will change the spacing on everything. If you’ve made earlier changes to line spacing in that document, this method will change those. You may need to go back through your document and edit the line spacing in those areas. It should not change spacing in headers or footers.
Change Microsoft Word line spacing to a custom setting
Double spacing is not the only choice outside of single spacing. You can adjust the spacing between your lines of text using a number of different measures.
For example, when you clicked the Line spacing button in the ribbon, you probably noticed there were several choices there other than double. For example, you could have chosen 1.0, 1.15, 1.5, 2.0, 2.5, or 3.0.

If those options weren’t enough, you could have chosen the last option, Line Spacing Options…. In the dropdown box there, you would have been given the options of setting your line spacing at single, 1.5, or double.
Line Spacing Options… would also have allowed you to set your line spacing to At least (a minimum of) any number of points from 0 upward.
You could have set your line spacing to Exactly any number of points.
Finally, you could have set it to Multiple, then choose any number of lines by using the up or down arrows to change the spacing (or type a number in the box). In reality, you can set your line spacing to a much higher number than would be practical in most situations.
How to stop double spacing in MS Word
Stopping, or turning off double spacing in MS Word is simple. Just follow any of the suggestions in this article and set your line spacing back to 1.0 or whatever your normal line spacing is. There is no magic button that will stop double spacing in the middle of a document. Just change the settings back to your normal. See Double spacing the remainder of your Microsoft Document earlier in this article for a reminder.
Microsoft offers help double-spacing in older versions of Word.


