Changing orientation of one page in Word is easier than it may sound. We can do it using sections.
Table of Contents
Changing orientation of one page in Word
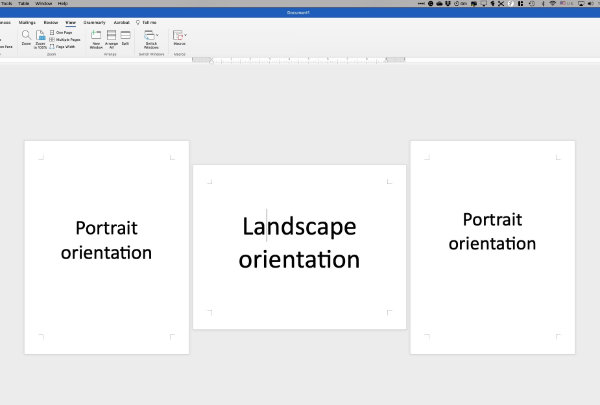
Page orientation refers to the way content is arranged on the page.
Landscape orientation is wider than it is tall. You would read the page with the longest edges at the top and bottom.
Portrait orientation is taller than it is wide. It is the most common orientation in which the page is read upright with its longest edges at the left and right.
In most cases, the entire document will have the same page orientation from beginning to end. But there are times when it is important to have a mix of portrait and landscape pages in the same document.
Having mixed page orientations within the same Word document involves the use of Sections.
Note: For this tutorial, we use screenshots from Word for Mac and Word for Windows. Most offer the same settings.
A presentation or report may include a combination of content types, including visual objects such as large charts or graphs. In some cases, those objects would be easier to read if they could be placed in landscape orientation.
For this tutorial we’ll assume the following:
- The bulk of your document is presented in portrait orientation.
- The only pages that should be landscape-oriented are those that contain visual objects. (You can display any content in landscape orientation, not just images, charts, etc..)
I’ll first show you methods that work in Word for Windows and in Word for Mac. Then I’ll show you a method that only works reliabily in Word for Windows.
Step one – Insert a section break in Microsoft Word
To change the orientation of a single page, you’ll insert a section break just past the last character on the previous page. It doesn’t matter if that page is full of text or has just one line.
Scenario number one
In our first scenario, you’ll set the page to landscape before you insert the object on the page.
To insert the section break, place your cursor just past the final character or object before the new page.
In MS Word for Macs or Windows:
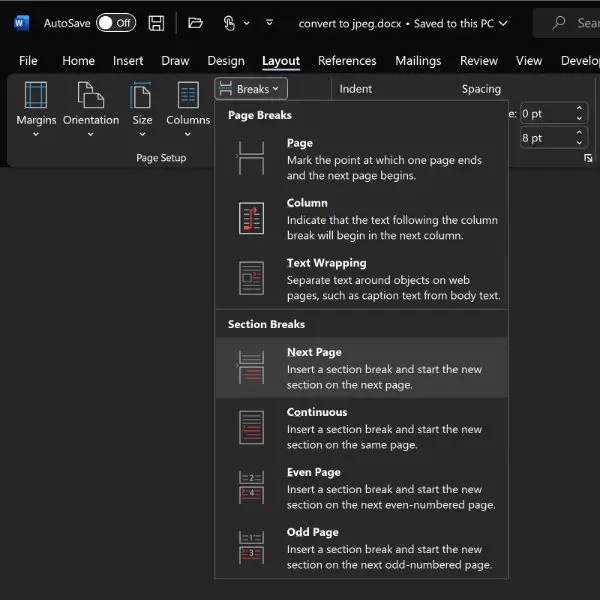
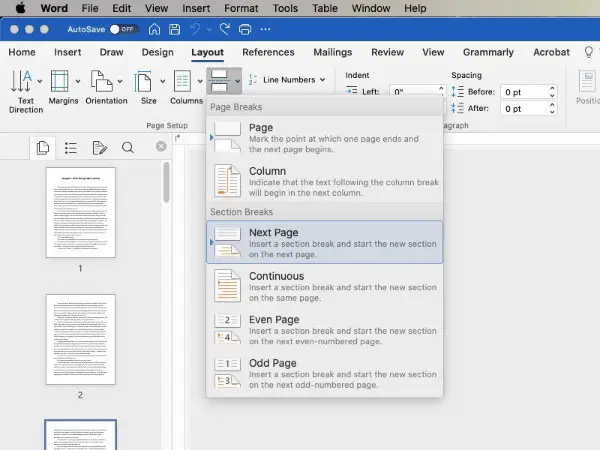
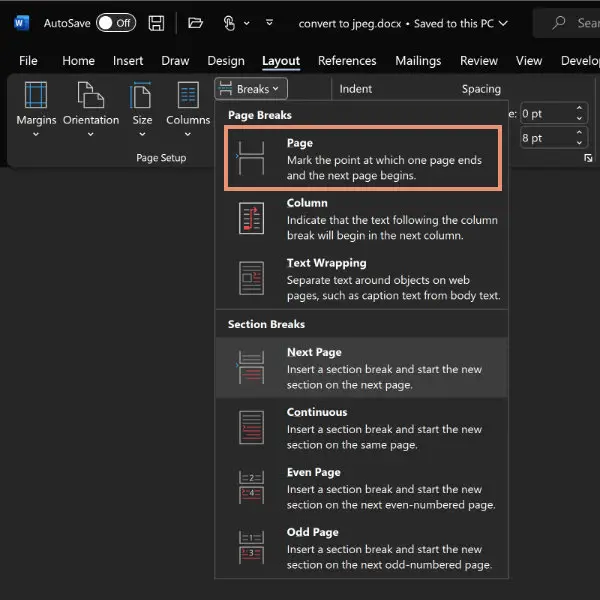
- Open the Layout tab.
- Click the Breaks button in the Page Setup group.
The Page Setup group is usually the first group of buttons in the Layout tab.
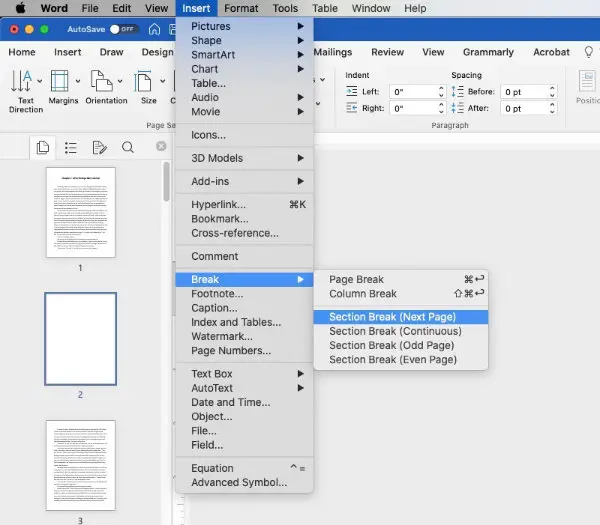
In Word for Macs, you can also use the menu bar to open the Breaks panel.
- Go to the Insert menu.
- Select Break.
- Select Section Break (Next Page).
When the Breaks panel opens, you will see several options. Choose the one labeled Next Page. That will create a Section break that begins on a blank new page.
We have a tutorial showing how to see and delete line and section breaks in Microsoft Word.
Step two – Set the orientation for the new section
With the new section created, it’s time to set its orientation.
Be sure your cursor is somewhere in the newly created section.
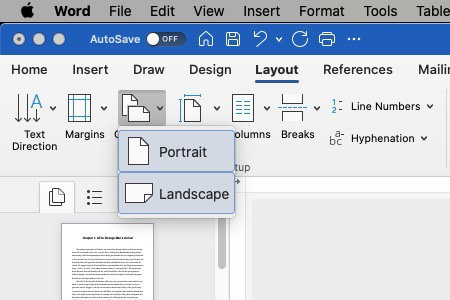
- Go to the Layout Tab.
- Select Orientation.
- Select Landscape.
You can now insert the chart or other object into the page in the newly created section.
Note: You can have more than one consecutive landscape-oriented page that each contains an object. Just insert a page break after each object, insert the next object, then another page break with its object, etc. until all have been inserted.
Important: If you do not create a section, the page orientation that you select will apply to the entire document.
To insert the page break without a new section break, choose Breaks from the Layout tab, then choose Page.
To switch back to Portrait orientation for the remainder of your document, place your cursor just past the object that you inserted and repeat the process you learned above.
The difference is that you will create a Section Break (Next Page)and choose Portrait this time for your next page’s orientation.
Scenario number two
The difference in this scenario is that all of your content is already in the document before you set one page to Landscape.
The process is nearly identical to the first scenario. The thing you’ll do differently is that you set one section break just before the content that you want to be in landscape orientation. Then set another section break immediately following the landscape-oriented content.
Place your cursor somewhere in the newly created section.
- Go to the Layout Tab.
- Select Orientation.
- Select Landscape
Optional method to change single page orientation in Word for Windows
Whenever possible, I try to include instructions that apply in some way to Word for Windows and Macs. There is one other method for applying a different page orientation to a selection of text that is simple and fast. But it works in Word for Windows only.
This method still uses sections to apply a different page orientation. It’s just done automatically. While this works perfectly in Word for Windows for some situations, I don’t believe it is quite as versatile as manually inserting sections to change orientation.
You must manually insert Section breaks as detailed earlier in this tutorial to change orientation of a single page in a multi-page Word document on Macs.
Use the following method to quickly change the orientation of a text selection in Word for Windows.
- Select the text that you want to have a different page orientation.
- Go to the Layout Tab.
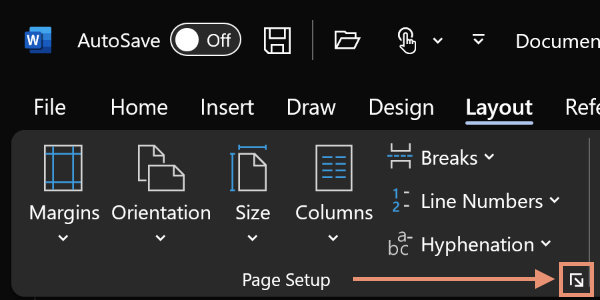
- Click the small arrow in the lower right corner of the Page Options group to open the Page Setup options panel.
- Choose the Portrait or Landscape button.
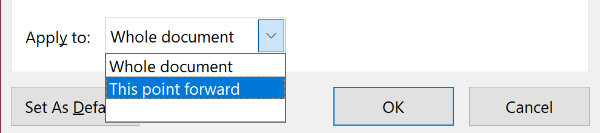
- Tell Word that you want the change to apply to the Selected text using the Apply to box in the lower left of the Options panel.
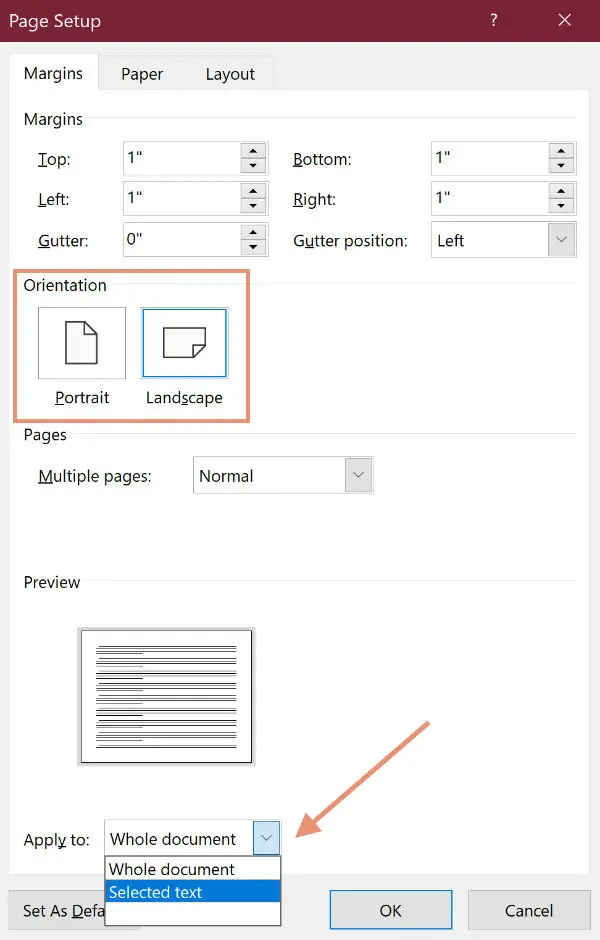
Hint: If you do not select a section of text before you open the Page Setup options panel, you will be given the option of applying the orientation change to either the entire document, or from that the point where your cursor is located onward. The option to apply only to a text selection will not be available unless you first select the text.
There are also other types and uses of section breaks in Word.
Printing a Word document with mixed page orientation
To print a Microsoft Word document with mixed page orientation, just use the same process you’d use if the document had just one orientation throughout.
Word will take care of things behind the scene so that you don’t have to do anything out of the ordinary.
Just tell Word to print the document. It should print out just as you laid it out.
If you create a PDF from the document, it should also appear just as the original document.
