We’ll show you how to change the order of items in Scrivener Outliner columns. It’s easier than you might think.
The Outliner in Scrivener is a versatile tool that, in spite of its name, is not just useful for writers who outline. Even if you don’t outline as part of your writing process, the Outliner can be used to check the flow of your work in progress in terms of word count, word targets, chapter length, and much more. It is the place to see an overview of your chapters, scenes, etc along with the meta-data that you have given each of those documents.
Table of Contents
Meta-data available in Scrivener
As of version 3.1.3 for Mac, you can see the following meta-data for each document:
- Title (with or without Synopsis, Icons, and Numbers)
- Modified Date
- Target
- Label
- Word Count
- Target Type
- Status
- Total Word Count
- Total Target
- Section Type
- Character Count
- Progress
- Keywords (displayed as color chips or not)
- Total Character Count
- Total Progress
- Created Date
- Include in Compile
- Custom Columns
What to do if synopses seem out of order
For writers who choose to use the Outliner in Scrivener just for arranging their chapter, scenes, or beats, it could be at least a temporary shock to open the Outliner and see that your documents seem to be scrambled and out of order, compared to the way you have them in the Binder. There are ways to use the Outliner when you would want to rearrange the Outliner data, but for this hypothetical situation, you want everything to match the binder.
If you open the Outliner and find that the scenes and synopses are listed, but not in the same order of they are in the Binder:
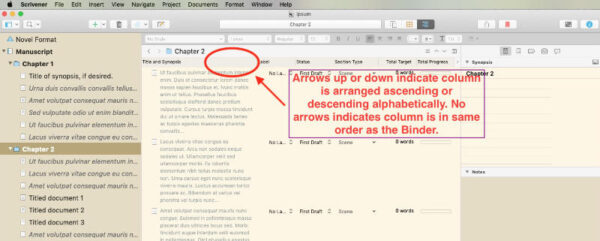
- Go to the header bar just at the top edge of the Outliner window.
- Click on the header at the top of the Title and Synopsis column.
- Look for a very small arrow at the right side of that column pointing either up or down. One arrow sets the items in the column in ascending alphabetical order, the other arrow sets them in descending order.
- Click on that arrow repeatedly until the arrow disappears. When the arrow disappears, you should find your scenes in the same order they are in the Binder.
How to Change the Order of Items in Scrivener Outliner meta-data columns
The same method works to rearrange the Outliner according to the data in any column. For example, if word count is one of the columns you have set to display in the Outliner and you want to sort your work so that you can quickly compare one scene or chapter to another, you use the same method described in the previous paragraph and click the right side of the column header to see the document word counts in ascending or descending order. Setting it to have no arrow displayed, resets the columns to match the order they are displayed in the binder
Our training recommendations
If you want to become more familiar with Scrivener we suggest you check out Learn Scrivener Fast. Whether you simply want to be more comfortable with Scrivener, or you want to become a master at it, we recommend this course.
