You can auto-fill the synopsis in Scrivener V3 for Mac or Windows. You can very easily do that without manually typing in the entire text of the synopsis. Here’s how to do that.
Table of Contents
What is the synopsis?
According to Dictionary.com a synopsis is:
- a brief or condensed statement giving a general view of some subject.
- a compendium of heads or short paragraphs giving a view of the whole.
- a brief summary of the plot of a novel, motion picture, play, etc.
In Scrivener, your individual documents can be whatever you want them to be in your workflow. Any document in a folder can have its own synopsis. If you choose to write an entire chapter in one document, you would have a synopsis for that chapter. If you set your project up as I do when I’m writing fiction, each chapter has its own folder. Then each document within that folder is a scene or beat. At that level, each scene or beat could have its own synopsis. I can drag them up or down within the chapter or even into a different folder/chapter.
You can type any text you desire into the synopsis box.
You might use the synopsis feature in Scrivener to see an overview of the thought you are expressing in that particular section, scene, or chapter. Or you might use it to remind you of the actual beginning lines of a section, scene, or chapter. The synopsis can be text that you type in because you want it worded in a certain way. Or you may be happy having the first few lines of the document displayed just to remind you how the document began.
Where is the synopsis in Scrivener?
There are at least four places where you might see the synopsis.
- In the notes pane of the Inspector (when the synopsis tab is selected).
- On the individual cards in the Corkboard view.
- In the Outliner.
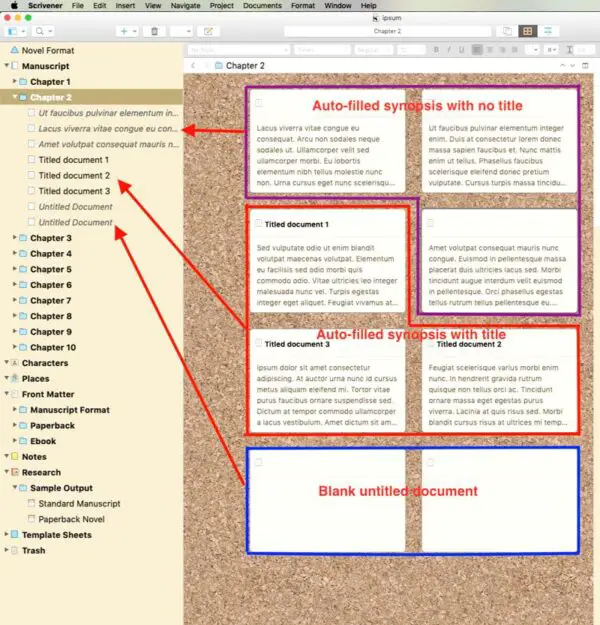
- In the Binder (when no title has been typed in and the synopsis has been added in the Inspector).
How to auto-fill the synopsis in Scrivener for Mac.
NOTE: These instructions apply primarily to Scrivener for Mac. To find how to auto-fill the synopsis in Scrivener for Windows click here.
To auto-fill the synopsis in Scrivener for Mac, select a document in the Binder. Then:
- Go to the Documents menu at the top of the window.
- Select Auto-fill.
- A sub-menu will fly out. From that menu, select “Set synopsis from main text.”
There are a few other settings on the fly-out menu, but the one I mentioned will use the first few lines of text from your document to fill the synopsis in the Inspector.
The synopsis that you type in or allow Scrivener to auto-fill will also be displayed on the cards in the Corkboard view and in the Outliner view when synopsis is checked as one of the items to display in the Outliner. Keep that in mind as you consider whether to create your own synopsis or use the auto-fill solution that Scrivener makes available.
Auto-fill multiple documents on Mac.
You can use the same method outlined in the previous section to auto-fill the synopsis for multiple documents at one time. Select the first document for which you want the synopsis to be auto-filled, then select others to add to your selection. Hold the shift key click the first document, then move to the last document in the group and click its title to select a group of consecutive documents. Choose the Auto-fill>Set synopsis from main text option from the Documents menu to auto-fill the synopses for all of the selected documents.
If you want to select non-consecutive documents to be auto-filled, do as I just instructed you, but instead of holding the shift key and selecting the last document in a list of consecutive documents, hold down the Command key and click each document you want, then release the shift key and use the menu commands as above to auto-fill your non-consecutive documents.
Bonus hint: Scrivener’s Adaptive Naming feature
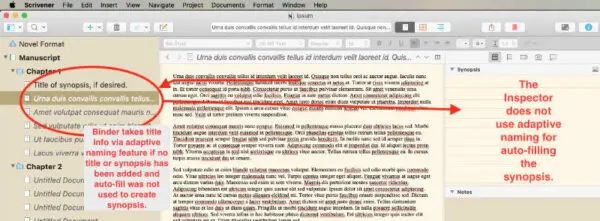
If you don’t need a title for each document in the Binder, you can leave the document title box in the Binder blank. If you do not use the auto-fill synopsis feature and you choose not to specifically title your documents in the Binder, Scrivener’s Adaptive Naming feature will automatically use some of the text from the document to display in place of the title there. This text will be similar to the text that auto-fill synopsis uses, but is technically not the same since it will also display in the Corkboard and the Outliner, but not in the synopsis box in the Inspector.
A synopsis that you manually enter in the Inspector will override any auto-filled text in the Outliner and Corkboard. It will also override any text in the binder unless you have typed in a specific title for the document.
My Recommendation: The best training that I know of for people who want to easily come to grips with Scrivener and to do so in an easy to understand way is Joseph Michael’s Learn Scrivener Fast course. Whether you want to learn just the parts you need to use Scrivener in a light-duty way or you want to dive in nose-first and learn the software inside-out, the Learn Scrivener Fast course will give you what you need.
